
This post has been a long time coming. I mean, what is a hobby blog without some foam hills? Yes, there are many ways to build up wargaming hills. Some methods are even more simple than this, but this is the method I have used for my table terrain. This has been a post idea for the blog since early 2019 apparently, so yeah, a very long time coming. I just haven't had the need to make hills since I got my first few done. Now however, I am trying to do up some more terrain for a "meet and greet" Kings of War day, and figured I'd document the creation of these new hills. So let's get to it! To make these hills you will need:
- Pink Insulation Foam Sheet
- Utility knife (longer is better)
- Optional: Hot wire foam cutter (handheld or table)
- Metal ruler
- PVA Glue
- Optional: Mod Podge
- Newspaper
- Disposable bowls
- Optional: dark primer with matte finish
- Sand and small pebbles
- Cheap craft Paints and large cheap brushes
- Optional: flock and tufts
- Acrylic Sealer with matte finish
Like any recipe, I'd recommend reading through this before starting on the project yourself. And instead of a step-by-step approach, I'll try to break the process into larger chunks, so you can focus in on what you want to do, as this is not a be-all-end-all kind of guide.
Making and Shaping the Hills
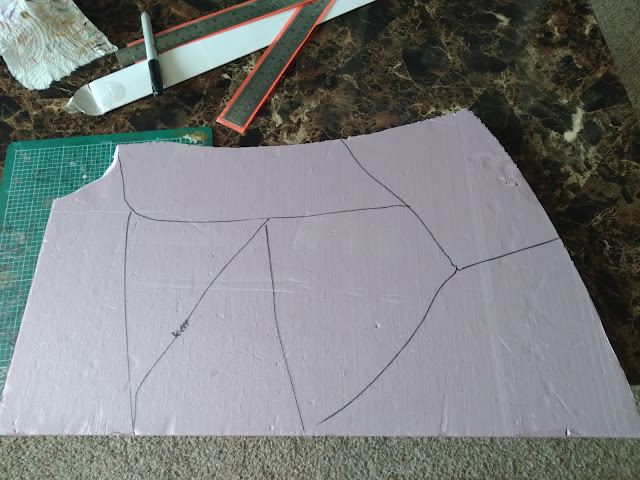 |
| What will be 6 hills, roughly drawn in with a sharpie prior to cutting. |
Optional alternative: if you have a hot wire foam cutter, either something simple and handheld, or something fancier like a Proxxon table, you can use that to break down your foam sheet into your basic hills sections. Your cuts will be very clean. I would highly recommend some tapered cuts near the top to give the hill a little more slope, and some more angles to work with when you get to painting.
 |
| The cut hill. Here, I used a very shallow knife cut, and then broke the rest off. With a long knife or a wire cutter, you can have a nice uniform face, and could even call it good here. |
 |
| The final pro tip here is to use a new trash bag before you start this step. It makes this step more pleasant. But, as you can see from above, there is a lot of fine particles kicked up during this step. |
 |
| The top one here has had the tapering cuts and is ready to be roughed up with the ruler. The bottom hills are all done already. |
Once "roughed up" use your fingers to brush away any weak flakes. You want to get all the tenuous and flimsy bits off, leaving just the rough but firm wall texture. If you do not do this part, the flimsy bits are likely to break off in future steps or in games, and you'll need to do a lot of touch-up work to fix and re-seal the piece. So, gently brush away those flimsy bits now to save yourself a lot of future hassle.
Foam does not play well with a lot of things, and wargaming terrain also tends to take a bit of a beating, so next we need to protect what we've got done so far. There are a few ways to go about this, but the youtube channel Black Magic Craft has a great video covering the basics. Essentially we want to get a protective layer onto the foam, so it is protected and the paint will stick better to it. Find a working area that won't be disturbed for a day or so and put down some newspaper to protect that working surface.
Get some PVA glue, like Elmer's, or alternatively get some Mod Podge, and add just a splash of water to make it slightly more runny in consistency. Thick, gluey gooey blobs are bad, you want this to apply more like a very thick paint. You could add some squirts of cheap craft paint too here, if you want. Doing so, particularly with a dark color like a black or a grey or a brown, will help cover up the pink foam and protect it in one step, and adding a color here also helps you more easily figure out what areas you have covered already!
Once your gluey substance of choice is mixed up, then use a cheap large brush, like a simple foam brush, to apply it to the foam. Just slap it down everywhere on the edges and then either on the bottom or the top side. Place the uncovered side atop the disposable bowl, so any excess will drip off (ideally onto the newspaper). Give it a few hours to dry. During this waiting period, you can either toss your glue away, or preserve it with some plastic wrap over your reservoir. Then repeat the process, covering up the other side with the glue now, and touching up any spots you might have missed. Again, adding a color lets you more easily identify missed spots.
 |
| It is important to wait and do just the top or just the bottom each time. Otherwise, the gluey hill will stick to the disposable bowl, and peel away much of your progress, as shown above. |
With your gluey substance of choice dried, your hills should be well-protected for hobbying, and be a good starting point for just about any table style.
Hobbying on and Finishing up the Hills
I was trying to get these new hills to match up with some of my spooky terrain, which uses a lot of brown tones and greyish rocks, but these hills can be a good basis for any table style. I won't document this part too much, as there is too much variation to cover.
In my case, I used slightly diluted PVA/Elmer's glue to cover a section, and sprinkle sand and tiny rocks around. I'd wait a few hours for it to get completely dry, and then repeat the process in another section, usually with a different sized rock, as variation helps the piece look better. Nature is not uniform, after all. After the top was covered with "stuff" and fully dry, I then went on to prime the piece haphazardly with both a brown and a black primer, to get some color variation going as well. Then I used cheap craft paints to paint it mostly brown, overbrushed the edges with a dark gray, and then gave the entire piece a drybrush in dark gray and then light gray.
 |
| Brown hills for a brown, earthy table. |
I have also done this style of hill for a desert table, using super glue to affix some larger pebbles (the PVA or Mod Podge shell will protect the foam), and then spread PVA glue all around the top, sprinkling small small rocks and sand onto it, painting it up in more tan and sandy colors.
 |
| Tan hills for a tan, sandy table. |
What you eventually do for this section depends on your table. You might go for something I did above, or opt for some static grass and flock, or even choose a thick, snowy plateau to hobby up. Take inspiration from your table and your miniatures and your play mat, as having a matching table for your army is a pretty nice nerdy flex.
Once done hobbying on and painting up your hills, the final step is to take an acrylic spray sealer with a matte finish (like Aleene's) to the piece. Go outside and spray liberally along the the edges and top, and give a few minutes for it to dry. Once dried, there should be a nice "clack" sound when you tap it. This last step add another layer that should protect your painting and such from the wear and tear of normal gaming.
And that's it! A hopefully easy-to-replicate way to make yourself some interesting hills for your wargaming endeavors. Thanks for reading!
No comments:
Post a Comment