
One had played Vampire Counts back in WHFB days, and has played a few KoW games with me before, piloting some Undead; the other was pretty new to wargaming, but a big ol' nerd and a quick study. Since I was going to be doing the heavy rules lifting... one of them needed to run the big 2k list, and me and the other friend would run two 1k lists.
I had a handful of generic lists ready. I think they were all current with CoK2019... For 2k, I offered up Herd, Abyssal and Undead lists. While I was hoping the Abyssals would win out, as they have never hit my table ever, the Undead prevailed, again. There is something about such a classic fantasy army that is alluring I suppose.
They opted to give the newbie a 2k list, and my ally and I would each have 1k. Since this was a very friendly game, there was a lot of coaching and general discussion throughout. The objective was more to showcase the game, rather than a serious throw-down. The newbie opted for the Undead and a straight "Kill" game, to keep his first game simple.

Wights for the core of the list, with two Regiments and two Hordes and over a third of the points. The Skeleton Warriors and Archers are around for chaff/support/objective holding; Zombie for a tar pit (ideally, for Wight surge-charge shenanigans), Wraiths are there for annoyance and chaff-related duties. Soul Reavers are around to highlight the difference between Shambling units and normal units. The Revenant King is a good all-rounder hero (Inspiring, Surging, and combat in a pinch), and the Necromancer is a classic.
I opted for the Weakness spell over say, the Inspiring Talisman, just to try it out. With their Lifeleech, the Undead are excellent at grindy combats, so I figured that could tip something in their favor.
Overall, the list is a meat grinder. If you are the aggressor, you will likely be crunched pretty hard when the list hits back. It lacks ranged threats though, so if you can pick apart a few things (Wight Regiments or Wraiths) before the main combats begin, you can start to tip the odds in your favor. Furthermore, while it's got some faster elements (Wraiths), a faster list (any cavalry) should be able to combo-charge the bigger elements (Zombies, Wights), and help dictate when the decisive combats occur. In objective games, the list will struggle a bit to cover everything; fortunately for my opponent, he chose Kill to keep things simple...
I decided to go with the Regnum. I was temped towards the Abyssals... but decided I really wanted to see what my Colossal Giant could do. I mean, they've been waiting patiently for six months on my shelf...

The list was mostly around for objective games. Scouts to harass; Crossbows to camp an objective; Shield Wall to meander and reinforce where needed; Militia to screen for the smashy Foot Guard and the Giant, who would do the killing. The goal of the list is to spread out a bit, harass for a few turns, and then commit to a fight.
My ally unexpectedly chose to double-down on Team Human, and picked my Ostermark League to play, which is made up of much of my old Ostermark Empire army. While the blog started out with their repaints, this is their first time on the table (iirc) as the League, which is cool. Unfortunately, the list isn't all that exciting... I have them around as a stock "human" force, to showcase the basics of the game, and provide a very low learning curve.

The Militia and House Guard highlight the normal vs elite gradients in most armies. Crossbows give some ranged options, while the Honor Guard shows off a very elite unit. The Baron is a pretty normal hero; decent attacks and Inspiring. The whole list has CS or Piercing, which I felt would make for a pretty forgiving list for a newcomer choosing humans.
So we had a bunch of humans vs the Undead, which is pretty typical for this blog! While our shooting isn't great, I wanted to try and leverage that for a few turns if possible. I was mostly concerned with the Wraiths, as I didn't have a lot that could easily deal with them (Defense 6 is really hard to overcome without good modifiers... which I lacked). If we could pick off the Wraiths or Wight Regiments, I felt we could win combats with our numbers.
Set-Up
I set up the table and terrain beforehand... as we were playing at my apartment. We didn't follow the rules for set-up, but I was mostly concerned with keeping things going. We started a few hours later than I was expecting, and didn't want to keep them too late...
 |
| The groundskeepers would tidy up the crater, and the Undead would soon occupy the chapel grounds. |
While this was a friendly game, a lot was being asked of the new player, so we didn't follow typical set-up rules. I gave him choice of sides, and he opted with the chapel. Perhaps the Undead were trying to hold it and raise more troops? My ally and I plopped down our units on our side, and I walked through rules with the Undead player as he formulated his plans...
 |
| The visiting Ostermark League! |
 |
| ..and the Regnum, on the right. |
The Undead would eventually castle up pretty hard in the corner. My friends decided to roll off for first turn choice then, the Undead player won, and chose to go second. The set up was not by the book, but it worked out. Again, the goal was to introduce the game, so off we went!
Turn 1: Puny Humans
Seeing the Undead castle so hard, the Regnum advanced. The Scouts pushed out pretty far, intending to try to entice my opponent to spread out a bit. The Shield Wall on the right shifted; I intended for them to swing in and look for a flank charge later in the game.

My experience has convinced me not to commit with humans in the early game. The Militia screen set the pace, and the Giant and Foot Guard came in behind. Out of range.. the Crossbows moved up, with the other Shield Wall protecting them. My intent was to pepper the Undead, and in the final turns, hit their flank as my ally tied up the main body.
My ally, meanwhile, intended to make use of his Crushing Strength... Everything moved up... at the double. His crossbowmen took the hill, but couldn't shoot either, silly Reload.
 |
| The Baron says "Forward!" |
At the end of our first turn... I got a bit concerned. We have nearly 300 points tied up with Crossbows; another 200 in my Mounted Scouts. While not great killing investments.. I felt we really needed to try and leverage our ranged options in order to win this. We didn't make use of them this turn, and it looked like the fights would start on our next turn too.
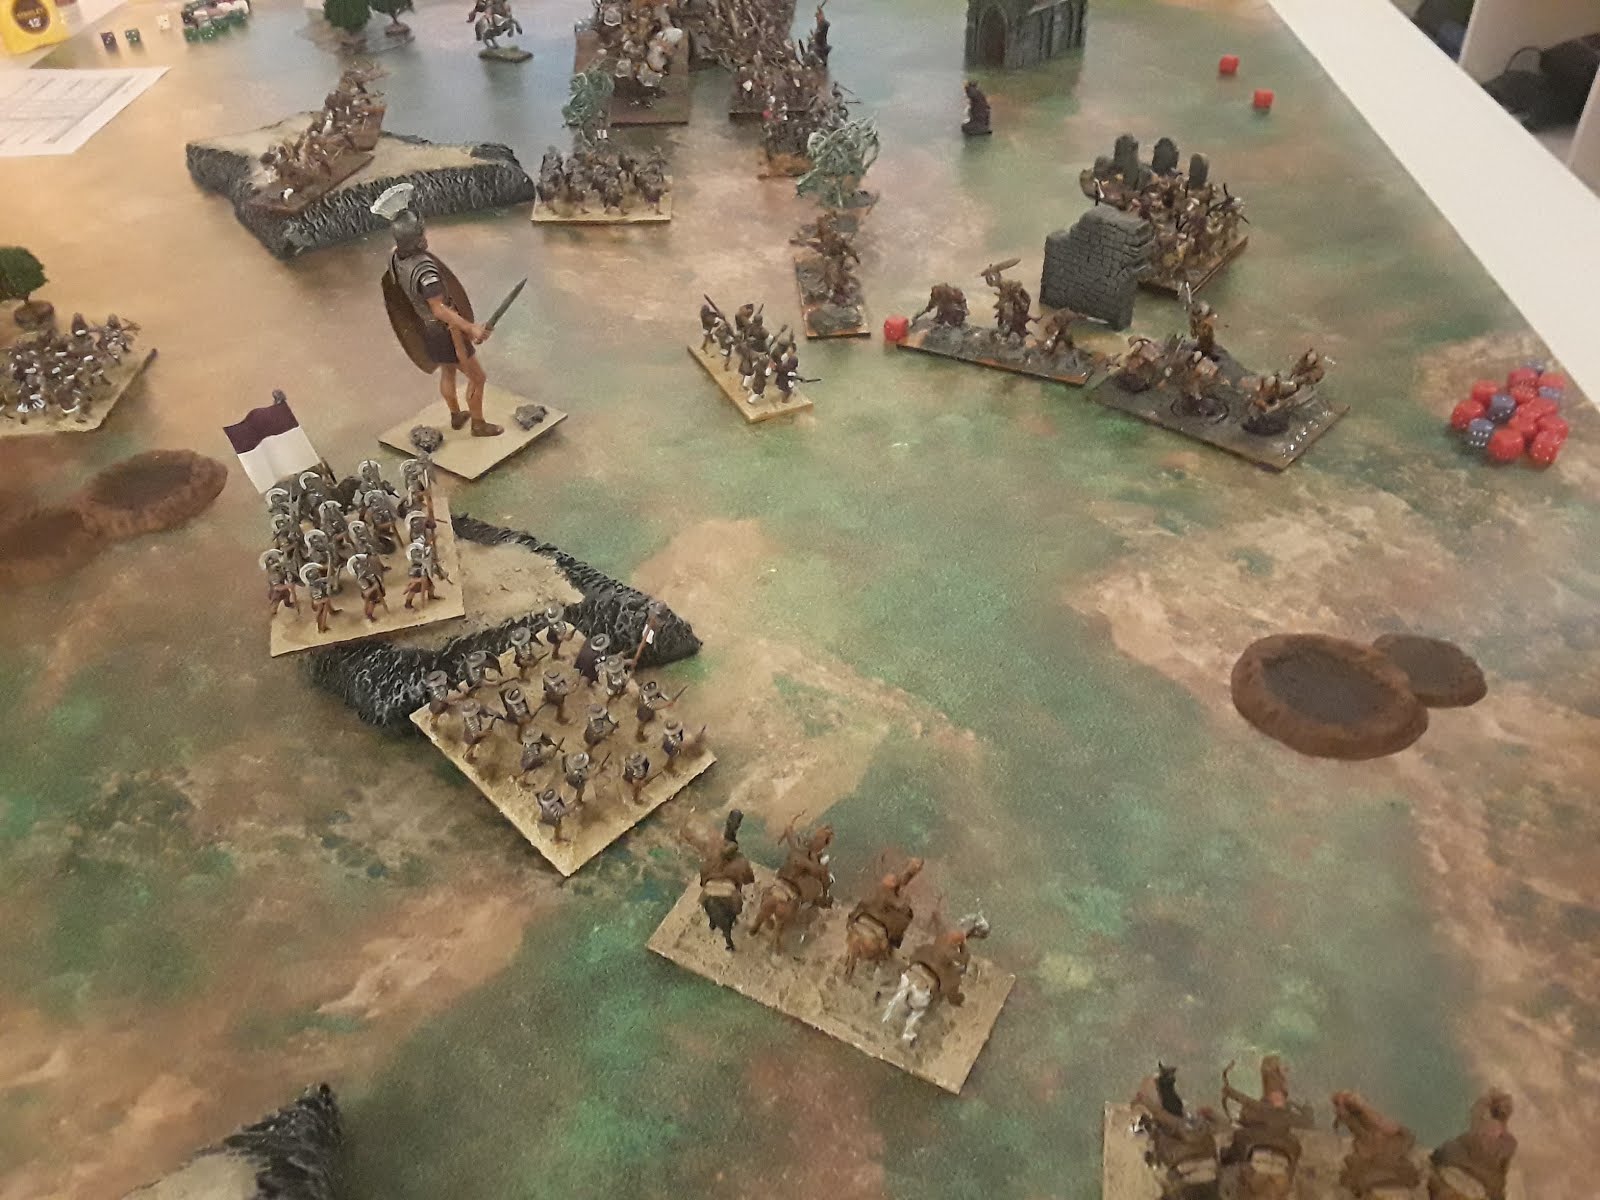
Turn 2: Undead
The Undead had deployed solidly in the corner against my ally. To our left of the Chapel was the zombie legion, with a Wight Horde behind. The Skeleton Warriors and Characters were around too. The Soul Reavers were protecting the Wraiths, and a Wight Regiment mostly getting in the way of the Skeleton Archers. On his flank facing the Regnum, on the other side of that little ruined wall, were the other Wight Regiment and Horde.
 |
| The best pic of the Undead deployment, as it turns out. |
The Undead player decided to try and focus on my opponent before I could join the fight. Had the positions been reversed with my ally (me defending, him moving to flank), I would have loved our chances. I didn't move up much; and most of my stuff was tankier than his. All his little hammer units swing in from the flanks would have been quite preferable to what was unfolding currently... alas.
Our opponent opted to start pushing forward to meet my ally. Shambling slowed him down a little, with the skeleton Warriors only scooching up a bit. The Soul Reavers maingain the line, inviting a charge from the House Guard next turn. One unit of Wraiths is sneakily hiding behind the vampires; the other is eyeing up the Regnum to delay, as the Wights change facing to take them head-on. The Skeleton Archers can draw line of sight to one of the House Guard regiments, though they are obscured enough to get cover. Still, a wound slips through.
After some discussion, he opted to try and double Surge the Zombies up. The Revenant King had Surge 6, the Necromancer had Surge 8, and he needed something like 9 out of the 14 possible to make a charge with the City Militia... and freaking made it.
 |
| ...and my opponent decides he rather likes Kings of War! The Zombies connect... |
Turn 3: Puny Humans
My ally is quick to get to strike back. Most of his units take the fights offered. Unfortunately, the dice are not as hot. The City Militia strike at the Wraiths, and only a wound goes through. The House Guard charge the Soul Reavers, and only manage 3 wounds...
 |
| They took the hill, for what it's worth. |
 |
| Daring charges... but not great ones. Humans should be combo-charging whenever possible. |
On the far left, the dice have treated my ally better. I think going against Defense 3 on the Zombies really helps... the City Militia and House Guard (joined by the Baron as well) strike back against the Zombies. They hits are bit above average, and hitting on 2's... most of the hits go on to wound, and the unit is obliterated.
 |
| Taking out sweet sweet time... |
Turn 4 Undead
Well, it's the Undead's turn to counter-charge, and they really let lose. As you can probably guess, the undamaged Wight Regiment flank charges the plucky City Militia. Joined by the counter-charging Wraiths, the unit is destroyed. The Soul Reavers show the House Guard how them how to swing swords, and delete that unit. The Wight Horde and a Skeleton Warrior Regiment charge the other House Guard Regiment, wavering them...
 |
| Heavy losses for the audacious Ostermark League... |
Turn 5: Puny Humans
The Regnum continue to lollygag. The Wights are solid flank protectors, and between the Horde and Regiment... I am loathe to try and get behind enemy lines with my Scouts. They continue to shoot at the wounded Wight Regiment, though I don't think they do any damage this round... Likewise, the Regnum's crossbows shoot at the undamaged Wight Regiment... but fail to hit. Some damage is scored, but it is courtesy of the League's shooters.
There isn't much to celebrate. Battle was joined too quickly, and the damage done so far has been spread out, and the Undead are quickly gaining it back via Lifeleech.
The Militia advance at the double to try and block the Wights this turn, protecting the Giant from them. The Regnum is simply late to the party. The Shield Wall decide to try a flank charge against the plucky Wraiths, but only manage to get 1 damage through... that Defense 6 is hard to crack.
On the left, the Ostermark League struggles to claw it's way back. The Honor Guard want to charge the Soul Reavers, but are railroaded into a meaningless unit of Skeletons. The City Militia charge against the Wight Horde and do some damage, but they will not prevail. The House Guard, wavered, simply stay put, and the Baron looks for a way out.
The turn has two positives. The first is the victorious Honor Guard, who destroyed the Skeletons, and reform to avoid a flank charge by the Soul Reavers. The second is the Scouts, who manage to pincushion their favorite Wight Regiment, and roll high enough to see them off the table.
Turn 6: Undead
The relentless Undead continue to grind things out.. On the far left, the Wight Horde tears into the City Militia. The Skeleton Warriors attack the House Guard, deal one more point of damage. The Guard will go on to roll up Insane Courage! Those units have done work this game; killing the Zombie horde is our only real achievement so far...

The Skeleton Archers shuffle up, and fire off a shot at the Regnum's Crossbowmen. They manage to sneak a point of damage through. Sheesh. As expected, the Soul Reavers crash into the Honor Guard. That's not ideal. They're sitting on 10+ damage now, and have lost their Thunderous Charge.
Unexpectedly, three units descent upon my Shield Wall. A Wraith Surged into the front; a Wraith in the flank, and a Wight Regiment in the rear. The Militia will be Surge-charged in the flank by the other Wight Horde, courtesy of the Necromancer. My opponent picked up on the fun uses of Surge pretty quickly... The Shield Wall take on... some ridiculous amount of damage. The Wights turn around to face the Giant, the flank-charging Wraiths overrun, and the front-charging ones turn around to face the deployment zone of the humans as best they can.
 |
| Now it is the Regnum's turn to get hit. |
The League has their Baron, two untouched Crossbowmen troops, and an Honor Guard and House Guard both with 10+ damage on them. The Regnum lost the Militia troop and a regiment of Shield Wall... but don't have much heavy-hitting to pull this back.
Turn 7: Puny Humans
It's kinda now of never, unfortunately. The Regnum have arrived, but aren't really potent in melee, and there isn't much of the League to try and rescue... The courageous House Guard only manage 5 damage against the Skeletons, and the Honor Guard fail to put much of a dent in the Soul Reavers, I think they managed only a few damage, to put them at a whopping 3 damage.
Seeking a more noble end, the Baron charged the Revenant King, and whiffed all his attacks.
Against the immediate threat of the Wight Horde, the Foot Guard with two-handers and the other Shield Wall regiment charge the front, while one unit of Mounted Scouts hit them in the rear. The other unit of Scouts swoop into the Undead's deployment zone.
One troop of Crossbowmen shoot at the Wraiths. The other shrugs, and joins the Regnum's Crossbowmen in a flank charge against the other Wight Regiment. Statistically... there's not much of a difference I think, but we decided that tossing more dice against the unit might help us out. It didn't. I think we did maybe two damage to it?
 |
| A bold move... but a misplay. |
The Wight Horde remained quite resolute. The multicharge was a good plan... but Defense 5+ is hard to overcome. Out of the 38 attacks, 5 damage made it through, 4 of it from the Foot Guard.
...And with that... the human have stalled out. This needed to be a big turn, but the dice were not there. Unfortunately, my ally had to leave at this point. We got a late start.
Turn 8: Undead
The Revenant King thankfully flubbed his attacks back against the Baron. That was about the only good thing.
Against the courageous House Guard, the Skeletons fought back, joined by a flanking Wight Horde. The Guard, already on 13 damage, broke.
The Soul Reavers finished off the Honor Guard.
The Wraiths descend upon the Crossbowmen troops, routing both and then eagerly eye up the Giant. The Wounded Wights smash into the Crossbowmen regiment, wavering them.
The Skeleton Archers manage to get a point of damage against the Giant, despite needing 6's and 5's.
 |
| Those pesky Wraiths.. still around and have healed all the damage dealt to them so far. This... is not how one fights the Undead. |
Turn 9: Puny Humans
In a moral victory, the Baron switched targets to the Necromancer, who had come closer last turn... probably something to do with a surge spell, but I forget. All the sword strokes found flesh, and all wounded. Two convincing Nerve checks saw the Necromancer felled! Though the Baron now turned to face down the Revenant King and remaining Wight Horde and Skeleton Regiment...
There are no good options for the Regnum. Again, probably should have gone for the "guaranteed" kill against the Wights on the previous turn. Alas. Lesson learned.. I need to support my Giants, like I do my Beasts of War.

Movement-wise, I run the ASB up to try and roadblock the Soul Reavers. It's all damage control at this point... and there is not much I can really do. I don't have the pivots and range to protect the Giant from the oncoming Wraith charges. I can either flank charge the Skeletons (around/behind the stone wall), or try and shoot the Wight regiment, and I opt for the latter. Nothing even hits.
This turn, the Giant will deal another 4 damage to the Skeletons, bringing them to 7, since they Lifeleeched one point back last turn. I will roll for Nerve, get a 15 and sigh. The Foot Guard will deal another 4 to the Wight Horde; no help coming from the Scouts and their 14 attacks in the flank.
Failing to move anything, the game is essentially over, and I concede. But we play it out, as my opponent is ever the fan of "what ifs."
 |
| Middle of Turn 10... right before I remembered Brutal. |
The Wight regiment will kill the Crossbowmen on Turn 10, and the Wight horde will do the same to the Shield Wall on Turn 10. The free unit of Scouts will rear-charge, and by weight of the dice, some damage will go through. I think he ends up at 14 damage? But rolls double 1's for his Turn 11 Nerve Check.
The final turn sees the Wraith and Soul Reavers take down the Giant. The Wight Regiment brutalizes the flank of the Foot Guard and destroys them; and the Horde counter-charges the Scouts previously in their rear. At the end of Turn 12, all I have are one last unit of Scouts. So... not tabled! Better luck next time!
....Victory for the Undead!
=======================================================================
Despite the brutal and near total defeat, this was a really great game. Both players are good friends, so it was nice to catch up and push some minis around at the same time. The newbie had a really good time, and really liked the game. The clean rule set in particular seemed to catch his interest. He's got a kid on the way, but hopefully I'll have him back soon.
The Undead list performed as expected; grinding up everything that came near it. Likewise, the League list performed well; it killed things and was easy to use.
The KoM list seemed way more geared for an objective game than straight Kill, and as such, didn't really perform as well as I would have liked when it eventually got into combat. That said, I did get a better feel for Giants, which was goal. In short, they need to be supported! Crushing Strength 4 is great, but your attacks need to connect, and they are unlikely to shift much on their own. Overall, I'd say I prefer the Beast of War (Ballista shots!!), but we'll see how I feel after another game or two with the Giant. With something like Berserkers I think the Giant could grind/push better; or with heavy cavalry, they could be a very swift striking force.
========================================================================
Game-wise, the humans lost because we were too aggressive. All my experience has told me that humans need to delay combat. We don't last long in any slugfest, so we really need to bide our time.
In this game, that meant trying to leverage our shooting. We had the right idea, focus-firing the Wight Regiment Turn 3... but we needed to also be avoiding combat until Turn 5 or so. Instead, we got charged Turn 2, and most of the League was chewed up or overwhelmed pretty quickly.
Oh well. It was still a great game, as the new player not only enjoyed himself, but won big. I'll bust out the big tactics and scenarios on him next time!


