
I had the pleasure of making a day trip out to the Milwaukee area and visiting the Battle Brothers shop, a very neat "hole in the wall" gaming place. I drove past it three times trying to find it. Once at the shop though, I was fortunate enough to play a pair of games against another new opponent and a new army! This is the first game we played.
Lists
The Salamanders seem like a really neat army. I looked at the overall army list a bit ahead of time, and they look like they have a lot of potent list options and a ton of neat hobby avenues with all their fiery monsters and such. Mantic's minis for them are also pretty solid from the look of things. My opponent has been hobbying up a bunch from the sound of it, though unfortunately still waiting on a few things to come in the mail. I've got a decent miniatures collection, but nothing much for the fiery Salamanders, so my opponent ended up needing to stealth proxy a few things. For the first game, they brought the following:

I know I asked at least once, but I cannot remember what made up the 15 point shortfall, or if he just ended up playing down in points in this instance. If he played down, that was a boss move, but generally not advisable! We traded lists a day or so before. The Salamanders here seemed quite strong individually, with most units sporting Defense 5 and some Crushing Strength, but with only 10 Units and 18 Unit Strength, I thought I might be able to overwhelm him, depending on the scenario. The trio of Clan Lord on Fire Drake, Phoenix and Pale Rider ate up a massive chunk of points (about 1/3 of the list), and were likely to cause me some problems. With no flier of my own this time, my plan all around was avoidance, and then a swarming counter-attack relying on my more numerous units.
I decided to try out a larger TVI-style list. Of the three lists I had worked up to potentially test, this was probably the most complex, so I wanted to play it first to give my brain a good chance of keeping up. I brought the following:

This TVI-style the list focused on infantry blocks, all bumped up to regiments for survivability, with a trio of Mounted Scouts to assist where ever they could, given the scenario. Up to test for this lists are:
- Checkerboard deployment, with a strong defense. The units taking the charges are likely to eventually fall. So is it worth it to invest to get stuff like Pikes and Foot Guard over cheaper things like Militia or Shield Wall or Spears? Essentially, will these expensive options survive long enough to strike back and make a difference?
- Small cavalry support units. Minimum-sized knight and pistolier units were common in TVI lists. I want to give Scouts troops more of a try, so I am bringing three. How will they perform?
- Ballista. It is a cheap source of ranged damage, though at the cost of an unlock. I like testing things in multiples, so we'll give two a try here and see how they do.
- Indomitable Heroes. They seem quite good at disruption, and I want to keep exploring this unit.
- Outlaw Formation. I like the Brigand a lot, so we'll give the formation another chance.
My general plan was to split the list roughly in two so that I would run nothing next to itself. I'm paying for regiments, so I want them scattered about. Then, I wanted to deploy back to leverage my shooting, and hopefully allow me time to get a plan going for the scenario and his big monsters.
We used the shop's playmat and some of their really neat mesas, which we ran as Height 9 Blocking terrain. I had brought some of my own terrain, and produced two Height 6 Forests, two Height 3 Hills, and one Height 9 Blocking Tower, which would hold the new foam turn counter I wanted to try out. I tend to get lost in the game, and wanted to do a better job at tracking that for myself. And if that shows up in pictures, that should help me write up the report quicker.
Scenario and Deployment
For the scenario, we had rolled and got Raze. Neither of us had played this so I dug out some tokens and we set about muddling through it. My opponent placed his three on my left side of the field, while I placed one there and two on my right.
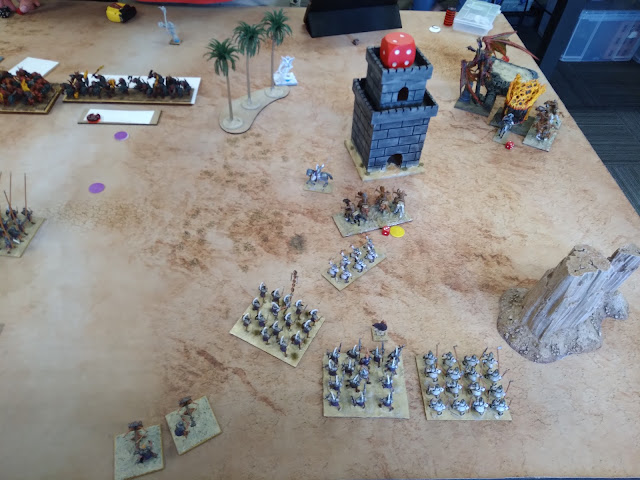
My opponent deployed slightly off-center, compactly and in two main lines. Rhinosaurs, Salamander Primes and Rhinosaurs formed the first line, screening Tyrants, the Pale Rider, and the horde of Ceremonial Guard. The Mage Priest sat behind the guard to babysit. The Lekelidon lurked on a flank, while the Phoenix and Clan Lord were dropped as late as possible on my far right.
 |
| White under Purple was the center token that we couldn't interact with. The rest of the tokens were just purple. It was my first time using these gaming aids, and I am glad I brought them. |
I deployed in a bit in a mess. These TVI lists are pretty unwieldy with so many units! I am already getting a little better at it though I think. From left-to-right, I had some Mounted Scouts ahead of some Outlaw Bowmen, tucked behind terrain. The rest of my list did deploy back. The Brigand hid nearby, with Pikes, CS Foot Guard, Def5 Foot Guard, Pole Arms and more Pikes forming the line here. Both Pikes ended up here, as I figured the bulk of his forces would indeed be coming this way. Decently pleased with all of this, but going with a concave formation, I should have spaced things out just a little bit more.
Both Ballistae took the center of the field. I didn't know what to do with them and figured front-and-center should at least get them good lines of sight.
 |
| My second token is on the far right. The third hidden behind the tower. I picked up a pair of foam dice to hopefully help me keep track of the turns in-game. |
My other flank had a jumble of units. A Def5 Foot Guard stood nearby to protect the Ballistae. The second units of CS Foot Guard and Pole-Arms stood in reserve, with Bowmen, two Heroes, and two Mounted Scouts scattered about. The Inspiring Wizard sat near the center of it all, presumably looking quite dashing with his Talisman.
I think deploying back was the right idea. As a weaker army stats-wise, I really don't want to get into combats too soon. The two fliers against me seemed like trouble, but with two heroes and two Mounted Scouts, I was hoping I could stall them out on this flank to mitigate their effectiveness. My opponent won the roll off and elected me to go first.
Top of Round 1: Kingdoms of Men
On my left, the Scouts moved up, as do my Bowmen. The Scouts fail to damage the Rhinosaurs while the hill is blocking the Bowmen from seeing anything. I move one Regiment of Pikes up into the edge of the forest, looking to bait a hindered charge from the Rhinosaurs. The rest of the line sort of pushes up, but is a little congested.
 |
| Bit of a traffic jam. |
The wizard eyes up the Rhinosaurs nearest the center line, releasing a lightning bolt, though I think fails to hit with anything. The Ballistae fire a volley though as well. I think one out of four ballista shots hit, and a few damage does eventually sneak in, but the ranged barrage has been underwhelming.
 |
| Thank goodness for blocking terrain. |
On the right, I try to mitigate as best I can. We talk it out and my intention was to use the tower to block line of sight to the Heroes. Going from the base of the terrain, I should be hidden. A unit of Scouts join them, while the second unit holds a few inches out of charge range, and even scores a few wounds against the Phoenix. While the fiery bird has 4+ Regen, it has very low defense and so it still seems like a decent idea to chip at it here while I can.
Bottom of Round 1: Salamanders
The Lekelidon pokes into the forest to get line of sight, and spits against the Mounted Scouts, scoring a few damage and wavering them. The flying duo advance, with the Phoenix throwing a fireball against one of the heroes. Both my units are wavered. Thankfully, the Clan Lord was just a bit out of range for his breath attack.
 |
| Two wavers for me. Not bad at all! And one even has Indomitable Will! |
The strong center for the Salamanders moves up in unison, but not too far. They elect to hold just outside of my charge range. They are a speedier than my infantry, so are just setting up for future turns.
Top of Round 2: Kingdoms of Men
My Hero pops Indomitable Will, brushing the embers and char from his uniform. Taking advantage of being an individual, he charges forth into the Phoenix, looking to tie it up, and is joined by the Mounted Scouts, who assail the fiery bird in its flank. The Hero manages one wound; the Scouts far more. The monster is wavered, but holds.
 |
| We'll see how the Heroes do this game. Off to a decent start. |
The other hero loiters near the building. I am not sure yet if I want him to gum up the main Salamander line or to fight the Lekelidon, so he sticks close for now, and out of the charge arc of the Rhinosaurs.
 |
| The Rhinosaur screens are doing their thing so far. |
My left rearranges itself, with a fair amount of side stepping. This flank was not deployed well. I like the Pikes anchoring the lines, but I am up too far I think. The Def5 Foot Guard also take refuge in the forest, and anything hitting them should be hindered. It's not pretty, but the best I can manage against the bulk of the Salamander line.
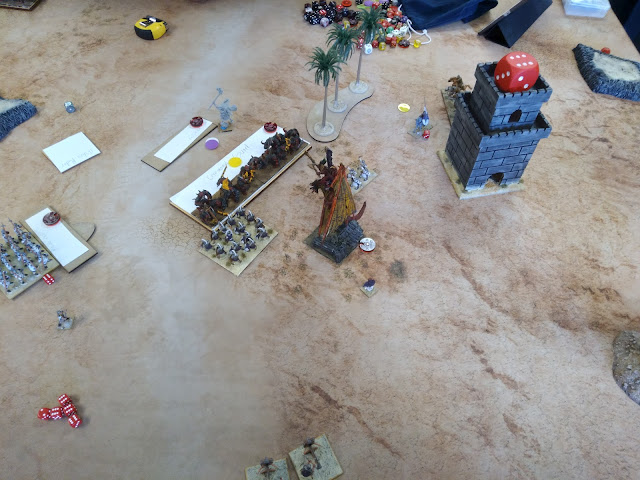
Bottom of Round 2: Salamanders
The Salamanders strike, and I fail to take enough pictures it seems. On the right, the Phoenix turns to face the Scouts. The Clan Lord munches through the Hero and their mount. I think my opponent keeps the Clan Lord facing the Scouts, but it actually reforms to face my deployment zone. I am perfectly fine with this trade.
 |
| I am fine trading a Hero to slow things up here. As the turn wrapped up, my opponent realized the Phoenix should have been able to change facing, and does so, to face the Scouts. |
The Lekelidon misses its shots it seems, and in the center, Salamanders move to attack. The wounded Rhinosaur Regiment charges into the Pikes, and are Hindered going through the terrain, and then Ensnared by the Pikes. Despite this, they manage to get in four wounds against the Pikes, and waver them. The Primes hit the Def5 Foot Guard, dealing 4 but they hold. The Tyrants charge up and over the hill into the Pikes. Just Ensnared, they manage to inflict 10 damage on the Pikes, however, the Pikes hold with Insane Courage.
I don't feel too bad about holding, because I think this might be an illegal charge? The Tyrants started behind the hill. Even if the Rhinosaurs move to give them a way in (and they do), the Tyrants are Height 3, and can't see the Height 2 humans behind the Height 3 hill. Oops. I assumed the Tyrants were Height 4, and maybe my opponent was treating the hills as Height 2. Either way, it seems this was a goof of a situation as I write this up.
I did not get pictures, but the Salamanders control all three of their tokens, and remove them, taking an early lead. Now they just need to hold the center to achieve a victory.
Top of Round 3: Kingdoms of Men
The singed Mounted Scouts are no longer frightened, and pivot and run to block up the Ceremonial Guard. The other unit that had joined the Hero in his foray against the fliers now find themselves alone, but continue the fight. The Phoenix was wavered, and only regenerated two wounds last round, so the Scouts charge in again. The remaining hero goes into the Lekelidon to hopefully occupy its attention.
The Pole Arms move and pivot, looking to be offered up to the Clan Lord. I think this might not be good enough, as the Lord probably has a flank against the Bowmen if it wants it? Though that is a tight squeeze.
 |
| The Scouts are feeling so much better they left their damage die behind. |
With the center largely taking their lumps like champs, I counter attack. The wavered Pikes hold. Arguably, I think I should have side stepped them to let the Pole-Arms charge in. Instead, they enter the forest, ready to reinforce.
 |
| A big, proper fight! |
The Brigand stays back, and the ASB with Lute attempts a Bane-Chant on something. I brought a tiny notebook but the shop's tables were exactly 6x4, and the shop was busy so I didn't take notes and didn't have space to spread out dice and tokens and game aids.
 |
| And some surprising results! |
 |
| The Phoenix burns to ash! |
My opponent is feeling a bit on the back foot since the middle fights are going unexpectedly badly, but he is still ahead 3-2 on the scenario. My third objective sits a bit behind the big tower, and I have yet to get enough stuff there to wrest it from the Lekelidon.
I thought the Clan Lord was still pointed at my Mounted Scouts on my far-right, so I was extra pleased the I was able to secure the objective from under its snout. I missed that it had victoriously reformed, after munching on my Hero and on this turn, it crashed into into my Pole-Arms, who surprisingly hold against the monstrosity.
The Lekelidon counter charges the Hero, wavering them, and the Horde of Ceremonial Guard attack the Mounted Scouts.
 |
| My opponent moves the Priest into possssssition. |
The Pale Rider Slams into the untouched CS Foot Guard, the Rhinosaur Cav charge into the Bowmen on my far left, and the Priest scampers back to toss a fireball against the insane Pikes.
 |
| And it is my turn to wince pretty hard at the center combat results. |
My opponent is still ahead 3-2, and I lost a lot of units this turn.
Top of Round 4: Kingdoms of Men
I apparently get invested in the game, and fail to take pictures for this entire round...
On the left, my Pole-Arms stick it to the Rhinosaur Cavalry, though the fighting it inconclusive. The Mounted Scouts attack the rear of the Primes, while the Foot Guard take them in their front, and the scaly unit is wiped out.
On my Right, I move closer to the Horde of Ceremonial Guard with both Foot Guard units, while the Bowmen chaff them up, moving at the double to get in their faces. Unengaged, the Ballistae and Wizard shoot into the Ceremonial Guard, though I don't recall if any damage is done. My shooting felt lackluster this game, even though these
The Hero pops Indomitable Will, and continues the fight against the Lekelidon with the Mounted Scouts joining him, and together, they waver the spitting beast.
Bottom of Round 4: Salamanders
The Clan Lord continues against the Pole-Arms, chewing through them this turn, and turning to face more towards the center, looking to fight units instead of munch through my war machines.
The Ceremonial Guard are holding the central objective and securing the win, so my opponent rightfully wants to get me to force them off of it. They elect to hold, with the Priest coming up to heal them a bit.
One unit of Rhinosaur Cavalry continue against the Pole-Arms, counter-charging them, but flub their rolls, dealing only 3 damage, and the unit holds. The second (which I had forgotten about) moves up to take the hill, which I do not take note of, as I hard forgotten about them. The Pale Rider charges the remaining Foot Guard on my left, obliterating them.
Top of Round 5: Kingdoms of Men
The Hero and Scouts finally prevail against the Lekelidon, and the Scouts are able to secure that token, making it a 3-3 game and a contest for the center now.
 |
| A big play! Alas it is only wavered. |
The Pole-Arms vs the Rhinosaur Cavalry disengage, opening the unit up to ranged attacks. The Ballistae both fire and miss, as does the Wizard and his lightning. I believe Bane-Chant does hit though, buffing up the Def5 Foot Guard, as they, their CS comrades hit the unit in the front, with the Mounted Scouts hitting from the rear.
The combined charges do a lot of damage, but the Ceremonial Guard is only wavered.Bottom of Round 5: Salamanders
The Rhinosaur Cav continue against the Pole-Arms, chasing the latter through the woods. This should be a new charge, and in the forest, they are Hindered, dealing only an additional 3 damage to the unit, which dutifully holds. This is the same unit that wavered my Pikes in the same situation. Sheesh.
Pale Rider moves up, looking to threaten and block in the coming turn. The second unit of Rhinosaur cavalry crashes into the rear of my Mounted Scouts and obviously routs it. I had forgotten about that unit, so this was a big yikes for me. The Clan Lord opts to rear-charge the CS Foot Guard, and easily crunches through them. And just like that, a lot of pressure is taken off of the Ceremonial Guard.
Top of Round 6: Kingdoms of Men
Going into round 6, the score is 3-3 and it is just a contest for the center.
 |
| Pre-movement at the top of Round 6. |
The Pole-Arms continue their fight against the Rhinosaur Cavalry, but it is still inconclusive. Bane-Chant is attempted but failed as I recall.
The Mounted Scouts hit the flank of the Clan Lord, grounding it I believe, but it is in no danger of fleeing.
I try to keep going, and the Foot Guard, Bowmen and Hero go into the Ceremonial Guard, and manage to break it. The Foot Guard advance, and the Bowmen shuffle to (maybe) block the Clan Lord from reaching the rear of the Guard.
I try more shots and Lighting into the Pale Rider, but I don't recall if anything hits. My shooting was just underwhelming.
Bottom of Round 6: Salamanders
And at the bottom of turn 6, we have a 3-3 tie, with the center contested. The Foot Guard have a US of 3, while the Rhinosaur Cavalry only have 2. If this was my turn, it'd be relatively optimistic, but alas, it is not.
 |
| The hand of God! Guiding the Clan Lord towards future violence! |
I think we talked out the best moves for my opponent as we saw it, and I believe the Priest threw a Fireball into the Bowmen to remove the Unit Strength, and did rout them, and I think the Clan Lord just counter-charged the Scouts to also remove the Unit Strength.
At the end of the turn here, I don't have a way back even if there is a turn 7, and that's all she wrote. We've each scored our 3, and the central token is worth 1, so the result is a 4-3 victory to the fearsom, fiery Salamanders!
Game Conclusion
- Checkerboard deployment, with a strong defense. The stronger defense units seemed to work well, and paired nicely well with the ASB's Lute. Bane-Chant only went off on about half the casts, but I liked this approach. The general checkerboard worked well too, with the weaker Pole-Arms all surviving until I chose to commit them, but this seems more due to my opponent lacking ranged options besides a few supporting fireballs and such.
- Small cavalry support units. Scout troops seem to work best for me, and they performed really well this game, disrupting things and grabbing all my points for me.
- Ballista. Like most war machines, these were hit-or-miss. Firing lanes seem to be really hard to set up in Kings of War. The more central positioning worked ok though in this case, even if they didn't hit much.
- Indomitable Heroes. These worked really well, and I think this battle convinced me to give them the upgrade every the time going forward.
- Outlaw Formation. I played these horribly! The Brigand didn't fire a shot as I recall, due to bad positioning on my part. He was always hiding behind the units he was inspiring. The Bowmen were decent chaff units, but this formation seems way too situational and just not worth the points. Against any other small-arms shooting (or magic) it should just fold, as my stats are bad,. Against a melee army, it has potential to chaff things up I guess? But that is a lot of points that are probably better spent elsewhere.
No comments:
Post a Comment