Showing posts with label Dragonfall 2024. Show all posts

Friday, October 11, 2024

Kings of War 3rd Edition: #088 Kingdoms of Men vs Halflings in Double Kill


Intro and Lists

I recently attended Dragonfall 2024, a convention held relatively nearby in beautiful Lake Geneva, Wisconsin. The convention had a wargaming component, and the Kings of War event was hosted by Todd of Grognard Games, which has a pair of shops in nearby Illinois. It was a tiny one-day, three-game event at 1500 points. 

Records and rankings as we went were a little opaque, and with 8 players total, things were quite casual. Going into the third and final game of the tournament though, I believe we actually have the best score of the little group at 2-0. I think the next best was 1-0-1, due to Master-level player Grant Fetter drawing against Rob and his band of Ravenous Halflings in Game 1, when the Halflings catastrophically flubbed a late-game multi-charge that dealt no damage. I believe all the other attendees else had at least 1 loss as we went into the final game. So, we’re doing pretty good in our little corner of the ballroom.

For the third and final game, we got matched up with another familiar face from Wisconsin: the aforementioned Rob and his Ravenous Halflings. We’ve seen Rob numerous times before in the blog over the last few months. Most folks seem to have gone the Tinker route with the Halflings, but Rob’s Ravenous Halflings have been a tyrannical force in Wisconsin over the last year, making great use of layered auras from Saucerors and Muster Captains to enable some big and powerful plays. It is a strong army with a lot of synergies that’s beaten me multiple times, and has now held its own against two Master-level players. Rob brought the following:

The list is essentially just a downsized version of his usual list, with the same core units, and leaving a few of the bigger toys at home. The core has been regiments of Juggers supported by a Muster Captain with a Strider Aura. Heavy Cavalry that is both Striding and Nimble is incredibly tough to deal with, let alone beat. A kitted and upgraded horde of Stalwarts holds the line, with two troops around to block and protect it. A Sauceror is around to give off additional auras, like Lifeleech, Rally, Brutal and Wild Charge. The smaller Harvester is the toy of the day, Grenadiers are around to play the positional game, and Poachers have been a recent inclusion to threaten things at range. I expected him to bring something like, this, and expected it to do well today.

As covered a little more thoroughly here, I brought the Kingdoms of Men to Dragonfall, and leaned into a bunch of titans, with maxed out rampage Giants and a Monarch to lead them. The Halflings are very strong, so I'll probably be relying on Rampage to keep me in the game.

Table and Terrain

The terrain was pretty basic, and tables were pretty uniform in their selection, with no special rules, or weird, oversized pieces. The buildings were Height 7 blocking, Boulders also Heigh7 blocking, Forests were Height 10 Difficult, Hills were Height 3, Obstacles were the normal Height 2, and each table had a "rough spot" of Height 0 difficult terrain. I moved on to a new table for Game 2.

Scenarios were determined ahead of time, with the third and final game of the day being Kill, but the scenario was tweaked looked at who killed the most strength instead of points. Still, in addition to the Scenario Points, which was 15/10/5 for Win/Draw/Loss, we were also still supposed to compare the differential of points killed for an additional modifier, of up to +/- 5 Points, depending on what side of the differential you were on, so we'll call this scenario Double Kill, in the best Halo announcer voice I can manage. 

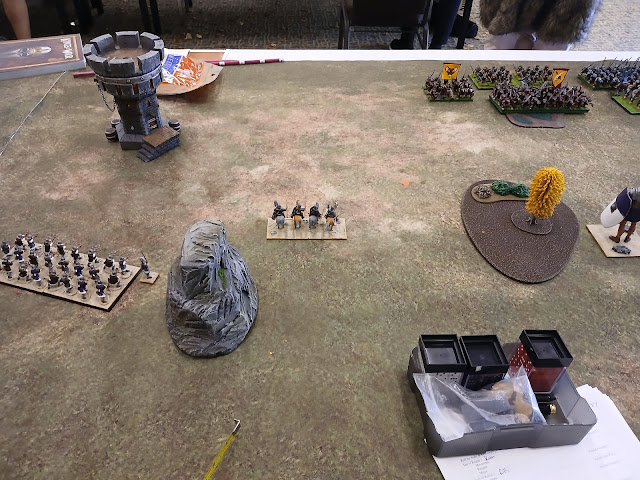
Deployment, at an angle.

We were apparently too slow to dibs a new table for our game, and we ended up at the table I had just played on. The Halflings won the roll for sides, and I ended up on not only the same table and the same side I had just played at. Once could argue that this could be good: I knew the ground. But against this army, I was hoping for the other side, to take all of the difficult terrain away from him. Alas.

The Halflings took the left corner, with the Grenadiers on the far flank, then both Poacher units, ready and eager to scout up into the woods. The Heroic Stalwarts formed a front line, with the Juggers as reserve units deployed very late. The Harvester sat near the Heroes, and the Muster Captain and Stalwart troops formed the center. Like before, the armies would likely be wheeling towards each other.

I figured the Halflings, most likely the Poachers, would deploy around the woods. I am definitely not going to win a shooting fight against them, so I mostly tried to avoid that corner with my own deployment. The Crossbowmen came down early, and angled, and I built off that. Again the Foot Guard came down on the other side of the rocks, with the ASBs accompanying their hordes. The Monarch arrived nearby. The Giants deployed near the obstacle, as their Strider should hopefully mitigate that for me. My last deployments were the Pikes and the Mounted Sergeants. 

I didn't have a strong plan going into this game, and I wasn't entirely happy with my deployment. I think I should have gone more reserved, too much is right on the line, against an army I don't really want to fight. I think everything should be back 6" or more, be angled like the Crossbows.

Scout Moves

The Halfling Poachers have Scout, and so hopped up through the trees, eager to get going.

Scout moves from the Poachers, gaining a lot of ground.

Those were out only Scout moves. The Halflings won the roll for determining the turn order, and chose to seize the initiative.

Top of Round 1: Halflings

With Double Kill being the scenario, the Halflings move out aggressively. They have a lot going for them in this match up, and seem eager to get to it! The Saucerer goes for Rally, and gets Rally 2 for her bubble.

Movement for the Halflings.

The Poachers don't have Steady Aim, so move and shoot with a penalty into the Giant, and will land 1 damage. 

Bottom of Round 1: Kingdoms of Men

I can't really compete with the charge range on those Juggers. They are already quicker than most of my units, and they can get Wild Charge as well from the Saucerer. I feel like my only path to victory is to try and force some awkward charges, and then punch back with the rampaging Giants, so that is what I attempt to set up for later in the game.

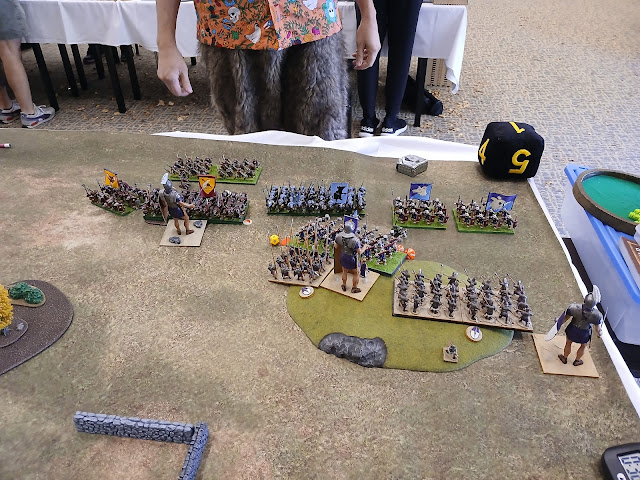
Awkward layering from the Kingdoms of Men.

The wild card are the Grenadiers. I can't really deal with them currently, so this is all to try and frustrate the Juggers. The Pikes move up, preventing a multi-charge into one Giant. That Giant is ahead of the other Giant, preventing another Jugger multi-charge. The Mounted Sergeants hop up to prevent charges into the Monarch, and the Foot Guard hops up to try and support.

View from the Kingdom of Men's corner.

On the right, the Crossbowmen move up and out, at the double. With an early deployment, they zoned out the difficult terrain ahead of them, but now need to try and swing out to contribute to the actual game, and with the Halflings being so aggressive, it seems that I'm going to struggle to get any shots in with them.

The battle lines stare each other down.

Passing the turn, the Juggers should have a few charges without even bringing the Sauceror into consideration.

Top of Round 2: Halflings

The Saucerer goes for Rally, and gets Rally 2 on her bubble again. With the charge range advantage, and my speediest unit already committed, the Halflings now delay, looking to get a more advantageous position before the lines close. 

Just the Stalwart Troop charges in. Charging off the hill, they get Thunderous Charge, and wallop the Mounted Sergeants for 4, and waver them. 

The nimble Juggers pivot move and pivot, starting a slow circle around the humans, but stay out of charge range of my Giants.

The Heroes get a leader point onto the hill, as does the Captain, and the Harvester.

The Grenadiers have charges, but want to be a force multiplier, and so fly over to look down the flank of the battle line for the Kingdoms of Men.

Bottom of Round 2: Kingdoms of Men

Had the Halflings committed harder last turn, I think I'd be in good position, and able to beat up on some overstretched Juggers. But my opponent is wiser than that, and is playing to his strengths very well. The Sergeants wavering is not great, but it's probably better than just dying. Having that roadblock around still seems like a net benefit for me.

Line up!

The Grenadiers are a bother though. I would have liked a staggered line to mitigate multi-charges, but experience tells me that I need to respect the Grenadiers. I line up the back line of my units, to just give up the flank of the Pikes. A little too late, I realize that my ASB with Lute is just hanging out.

The Crossbowmen move up, and fire into the Stalwarts on the hill. They land 1 damage, and I get very high check, but with Rally 2, the troop is entirely unbothered. 

Top of Round 3: Halflings

The Ravenous Halflings continue to play with their food. Mostly. With everything out of charge range of my Giants, the Sauceror goes for Wild Charge and options this turn, and gets Wild Charge 3, which is just enough to let a Jugger unit connect with the Foot Guard. The heavy cavalry go in, landing 10 damage, which Iron Resolves down to 9.

Some of the Halflings commit, others don't.

The other unit of Juggers continues to reposition, and the Grenadiers decline to charge the ASB, instead choosing to reposition along the rear of my line, making sure to stay out of the ASB's charge range even.

The second Stalwart troop will launch themselves from the hill, crashing down into the Mounted Sergeants and will both overrun to varying degrees.

The Poachers loose into the Pikes, landing 6 damage, and a pair of hot Nerve checks will unfortunately rout the unit unexpectedly.

Bottom of Round 3: Kingdoms of Men

The Crossbowmen take a flank charge into the stalled Juggers, with the Foot Guard counter charging as well (I do remember Lifeleech, taking them down to 8), and the unit will be devastated and routed, as is proper. The Crossbowmen will reform, to try to protect the Foot Guard from multi charges.

This is the chaos I was hoping for!

With the Pikes suddenly gone, one giant moves to shoo away the Juggers. They are quicker than me, and nimble, and I am not going to actually catch them, but this should force a reaction. For now, the Giant is both out of arc from the Grenadiers, and is safe from the Stalwarts on the hill. The Sauceror will need Wild Charge 2 to reach me with them, which seems like an ok gamble. 

The other Giant charges the Stalwarts, striding over the obstacle, and will thump them good. I leave things where they are, trying to protect the Monarch, because it is the only thing that can be really protected right now.

Top of Round 4: Halflings

The Sauceror does try for Wild Charge, but gets no successes. The Stalwart Heroes creep forward, and the Juggers nimbly charge around my Giant into the flank of the other Giant. Fortunately, this is a hindered charge, and only 4 new damage makes it through.

 A hindered charge? Take that Halflings

The Stalwart Troop charges the front of the Foot Guard, landing 2 damage, and the Grenadiers commit to the rear, contributing 4 and a Brutal 2. I'm at 14 damage, but another pair of hot Nerve checks do in my brawling horde unexpectedly, with Brutal 2 making the difference on the second check. Shucks.

The Muster Captain makes a long charge out into the Crossbowmen to tie them up, and lands 3 damage to disorder them and pin them down.

Reforms for the Halflings.

They've been cautious, and without Wild Charge, the Heroic Stalwarts don't have a charge this turn, so they just move up, ready to start bullying things next turn, and the Harvester does the same.

The Poacher units roll a smidge hot, and land 5 damage on the isolated Giant, bringing it to 6 damage.

Bottom of Round 4: Kingdoms of Men

On the left, the isolated Giant was ignored, so it moves and pivots, to go deal with the Poachers. I've got easy charges into either of them next turn.

The other Giant countercharges the Juggers, while the Monarch goes into the Harvester. In my head, I think I've boxed the Stalwarts out, but that's not how charges work. Neither is safe, though I don't know what else I could have done. I was hoping for a bit of a chaotic game, but am a bit uncertain what the best moves are.

The Giant rolls up 7 extra attacks, but flubs all the rolls, landing just 3 damage when the dust settles, which the Juggers then Iron Resolve down to just 2 damage. The Monarch does about as poorly, landing 3 damage into the Harvester, but secures a hot waver against the contraption.

The titans largely swing and miss.

The Crossbowmen countercharge the Muster Captain, catch a Bane Chant, and roll just outrageously, landing 7 damage against the Captain and will then shoo him away on the check. They will Lifeleech 1 damage, bringing them down to 2 damage. They will victoriously pivot, to get the Stalwarts and Grenadiers into their front arc.

The ASB with the War bow charges the Stalwarts, though I don't think lands any damage. 

Top of Round 5: Halflings

The Juggers countercharge, and shuffle over to let the Stalwarts in. The Juggers deal just 2 new damage. The Stalwarts are hindered (booyah), but it's a decent quality horde in the flank with the Hammer of Measured Force. The horde rolls amazingly well, and lands 17 damage on their own (they normally hit on 4's, so this is about twice what is expected?), to devastate and rout the Giant. The Juggers will sidestep and the Heroic Stalwarts will victoriously spin to spy the Monarch.

Some dreaded multi-charges from the Halflings.

The Poachers decide to stay still, so as not to incur a movement penalty. They roll warm again, landing another 5 damage into the Giant and take him to 11 damage. The luck continues, and we get a hot Nerve check to waver the titan. Shucks!

The Grenadiers nimbly hop around to threaten the Crossbowmen, and the Stalwarts counter-charge the ASB, landing 2 damage.

Bottom of Round 5: Kingdoms of Men

The Monarch doesn't have any good options. Charging the fresh Heroes alone and hindered seems foolish, so he goes into the Harvester again, with the Crossbowmen catching another Bane Chant and hitting the contraption in the flank. I forget that the Harvester only has Big Shield, so the Crossbowmen do some heavy lifting, and the tractor is smashed!

The Crossbowmen are on a tear.

The Crossbowmen (who Lifeleeched down to just 1 damage) spin to keep stuff in their front arc, trying to stay alive.

Reforms for the Kingdoms of Men.

The Monarch can't get away, so turns to get things into his front arc as well.

Top of Round 6: Halflings

The Poachers have a third round of good shooting, and now land 6 new damage against the Giant, and pick him up. 

Obstacles make alignment messy; we both know where the Juggers are.

The Monarch gets triple charged, with the Stalwarts and Juggers making hindered front charges (making this 4 hindered charges for the Halflings... I'll take my victories where I can!) and the Grenadiers making a rear charge, with Brutal 3. Sheesh! The Heroes land 5, the Juggers 3, and the Grenadiers 3... and while the check is good, it is not quite good enough, and the Monarch emerges from the brawl and is only wavered! 

The Stalwarts charge past the meek ASB, and into the Crossbowmen, landing 5 damage on my shooters, and disordering them.

Bottom of Round 6: Kingdoms of Men

The Monarch isn't a real Giant and doesn't have Fury, so it holds, and I pray to not roll up a Round 7.

The ASB with the Bow charges the Grenadiers. The unit is great but a bit fragile. No hit is rolled though.

End of the game.

The Crossbowmen get another Bane Chant, counter-charge the Stalwart troop, and pick them up. 

I get the honors, and do not roll up a Round 7. Loosing for sure, but preserving a good chunk of points by keeping the Monarch around.

Still, it is a strong victory for the Halflings!

Game Conclusions

All the games were very enjoyable, but this got my vote for favorite game / opponent. I just love playing against these ravenous Halflings. It’s a very strong, very synergistic list that is fun to behold even when taking a brutal beating like this.

As-ever, my opponent played a great game. Having the longer charge range and a better toolbox, he could really pick when and where he pounced, and delaying for that positional advantage was very wise. The relatively early charge with the Juggers could be considered a mistake, but we had to start sometime, and that put some early damage on the Foot Guard and prevented them from doing too much this game, so it definitely wasn't a bad call.

I usually need an ample helping of hot dice and good luck to compete with these Halflings, and did not get enough here. Both the Pikes and Foot Guard disappearing with warm Nerve Checks and without being able to utilize IW were bad bounces for me, as were cold dice for me in Round 4 trying to fight back with the Monarch and Giant. Multiple hot rounds with the Poachers to remove my isolated Giant iced out my best way back into contention as the game progressed. All my luck this game went into the Crossbowmen it seems, who couldn’t shoot much, but won four separate melee combats this game,  earning me the majority of my points for the scenario, and throwing me the lifeline I needed.

Testing Conclusions

  • Mounted Sergeants. I don’t think I used them particularly well in any game, but they were used well enough, generally-speaking. Games 1 and 2 they were able to distract, and had the Halflings more heavily committed in Game 3, offering them up as Chaff would have been wonderful. Still, they were a 100 Point distracting and instigating unit, and they did well enough in each game.
  • ASBs. I think the War Bow landed 2 damage all day, though the Lute had a pretty good success rate overall. In my more commanding positions in Games 1 and 2 I continued to forget about Lifeleech, but did remember in Game 3, though that still wasn’t enough to save the Foot Guard. Overall, the ASBs were good utility units for me, having a plan for each going into the games was a huge boon for me, and I am doing slightly better on remembering Lifeleech.
  • Rampage Giants. Rampage seemed to be the right call for the meta, and the only bad match up was against the Abyssal Dwarfs and the Lesser Obsidian Golems, though that was thankfully compensated by flank charges into the constructs. They had a number of great additional attack dice, were a bit inconsistent and seemed to have more flubs than hot streaks with their actual damage output. This might just be my biases though. They were still integral to my successes and seemed to be a good take for the tournament.
  • Monarch. The honorary third giant also felt inconsistent, but also did fine. Deployment was weird as I wanted to stick him with the more important Foot Guard, but they already had their Lute-carrying source of Inspiration. Lacking Strider and Fury, the Monarch kept ending up in weird spots. Still, I’d say he did ok, and was a fun pick even without any fancy upgrades.
  • Foot Guard. The stronger Foot Guard were the right call for this event, and they did well overall. Iron Resolve certainly helped a little, though wasn’t nearly as impactful as I might have hoped, and I probably don’t need it in larger games.
  • Crossbowmen. Conventional wisdom would argue that these should just not be taken, but the shooting horde proved to be a very important unit for me in each game. I want to say my Crossbow choice mattered (like against the Infernok), but I don’t think it was actually impactful overall. The dice seem to either be with them or not.
  • My Approach. With a small event, it’s easy to overstate things or extrapolate a bit too far, but I think my considerations with list-building and event prep were on the right track. I played some good games, put up some good results, and had a great time!

Tournament Conclusions

The tournament was small, with just 8 attendees, and only three new faces came up from Illinois, none of whom I got to play against this time. The Kingdoms of Men was actually the best represented army at this little tournament, with one other player bringing them! His army also utilized a lot of Warlord Games Romans, painted up just splendidly. He ran some Foot Guard regimental spam, though that didn’t quite deliver for him.

Recapping things a little bit, Rob and his Halflings had a bounce of bad luck which resulted had a Draw in Game 1 against Grant Fetter, a Masters-Level player in attendance. Both Grant and Rob went on the win their other two games. Rob wasn’t quite able to clean me out this time, while Grant very nearly tabled his opponent in Game 3, securing 1st Place through the tiebreaker attrition points, with Rob taking a very close 2nd Place. Being pretty informal, we didn’t run though the rest of the rankings. I took either 3rd or 4th place (not sure what one person's record was to know for sure, and not terribly bothered to figure it out) either of which I would be quite happy with.

A big thank you goes out to Todd and Grognard Games for running the Kings of War event for us. The event was a lot of fun and a good experience for us Wisconsin folks. Hopefully we'll have some more crossover events and meet-ups soon!

Thursday, October 10, 2024

Kings of War 3rd Edition: #087 Kingdoms of Men vs Abyssal Dwarfs in Hold the Line


Intro and Lists

I recently attended Dragonfall 2024, a convention held relatively nearby in beautiful Lake Geneva, Wisconsin. The convention had a wargaming component, and the Kings of War event was hosted by Todd of Grognard Games, which has a pair of shops in nearby Illinois. It was a tiny one-day, three-game event at 1500 points. 

Game 1 can be found here.

Game 2 at Dragonfall had another familiar face, Will and his Abyssal Dwarfs! We've only seen him across the table a few times, but he's been around, and had a good run with these Abyssals in his league games as I understand it. I really like the look of the Abyssal Dwarfs, so it's always a pleasure to see some across the table, and it's been great to see more of Will as well.

He's always brought interesting lists, and that definitely includes this one! The core of it was the two Decimator regiments and two hordes of Lesser Obsidian Golems, which had a lot of close-range shooting with Piercing. With Steady Aim as well, very little would be able to close with the evil Dwarfs without eating at least one potent volley of fire, and Mastiffs (with Throwing Mastiffs!) should be able to chaff and block and interdict as well. Anchoring the line was a titanic, Surge-able Infernok, an Iron-Caster to do the Surging, and an Infernox hero to support in a variety of ways, from shooting to combat to tanking. This hero doesn't Inspire innately, but the Talisman was taken, making him even more versatile. Definitely a neat pick in a neat list!

As covered a little more thoroughly here, I brought the Kingdoms of Men to Dragonfall, and leaned into a bunch of titans, with maxed out rampage Giants and a Monarch to lead them. The Ratkin in Game 1 were numerous, but we came away with a rather strong win against them. The Abyssal Dwarfs had a lot of strong, close-range shooting and not a lot of targets for my Rampage, so we'll see what we can do!

Table and Terrain

The terrain was pretty basic, and tables were pretty uniform in their selection, with no special rules, or weird, oversized pieces. The buildings were Height 7 blocking, Boulders also Heigh7 blocking, Forests were Height 10 Difficult, Hills were Height 3, Obstacles were the normal Height 2, and each table had a "rough spot" of Height 0 difficult terrain. I moved on to a new table for Game 2.

Scenarios were determined ahead of time, with the second game being Hold the Line from the Clash 2024 Rulebook. For the scenario, a 12" band runs down the center of the board between the players. This band is split into three zones to be controlled by Unit Strength. At the end of the game, the left and right are each worth 2 Points, and the center is worth 3 Points. In addition to the Scenario Points, which was 15/10/5 for Win/Draw/Loss, we were also supposed to compare the differential of points killed for an additional modifier, of up to +/- 5 Points, depending on what side of the differential you were on. 

The Abyssal Dwarfs won the roll for sides, and then got down to it. If memory serves, he started in the center, and then moved out towards the table edge, gradually committing harder and harder to that corner. 

Left-to-right we have Mastiffs, Decimators, the titanic Infernok, the Infernox, more Decimators screening more Mastiffs, then the Golems, the Iron-Caster, and then the final Golems near the center of the field.

Top of Round 1: Abyssal Dwarfs

It was a quick turn. The Abyssal Dwarfs had a lot of shooting, but not a lot of range on said shooting. 

Constrained by Shambling units, the Abyssal Dwarfs pace themselves as they move out.

Mastiff Packs jumped ahead, and the rest of the line meandered forward.

Bottom of Round 1: Kingdoms of Men

It's a quick turn here as well. I am not too eager to go charging in, so attempt more of a wheel for my battle line, with the center holding and the right moving more.

I opt to move the Giant in the corner at the double, slowing down the advance of the Crossbowmen. 

The Kingdoms of Men wheel about to fight.

The Foot Guard move up, as does a Giant. The Monarch, Pikes, and sneaky Mounted Sergeants stay put. Hiding behind the tower, I honestly forgot about the Sergeants, but don't really want to do anything with them anyways. 

Top of Round 2: Abyssal Dwarfs

The meandering continues! 

A slow, menacing advance.

Things continue to trudge towards the center of the field, but again, the Abyssal Dwarfs have no shots, so it's another very quick turn. We had clocks, though they weren't enforced. I think we are maybe 10 game minutes into the game at this point?

Bottom of Round 2: Kingdoms of Men

And the Kingdoms of Men continue to match the Abyssal Dwarfs move for mow, slowly repositioning before the lines meet. 

The Giants and Foot Guard ready themselves.

I realize that the Monarch doesn't have Strider, so the Pikes sidestep, and the Monarch Pivots, hoping to get a good clean retaliatory charge if they are charged. The Abyssal Dwarves are awfully shooty list  though, and I think I am being overly optimistic that the Pikes will be charged! 

The Two Giants and the Foot Guard plod ahead. 

The Crossbowmen move again, and are already in scoring position.

The Crossbowmen move and shoot into the nearest Golems, landing a hot 3 damage. The Crossbowmen are sitting in the scoring zone, facing the center field and are pretty content.

Top of Round 3: Abyssal Dwarfs

My opponent definitely remembered about my Sergeants, and commits a Mastiff Pack to throw a Mastiff at them, landing just 1 solitary damage with some cold dice, and the Sergeants hold firm.

The Sergeants are put on notice.

The rest of the line is a little better for dice, but can't quite focus fire. 

The volley from the Abyssal Dwarfs.

Cannons sing and shotguns blast, and 5 damage hits the Foot Guard, who Iron Resolve down to 4, and 4 damage smacks into the Giant, but both units hold.

Bottom of Round 3: Kingdoms of Men

Well, it appears to be fighting time! I check some angles, and one Giant has a clear flank into the maimed Golems. My opponent wisely held the Golems back, and the Foot Guard don't have the inches to join in, so I send the second Giant into the front while the Foot Guard move up awkwardly to support. I was only an inch short; I probably could have positioned these better.

Charges from the Kingdoms of Men.

My opponent does have access to Surge, so I feel the need to continue pushing down along my line of battle to prevent any shenanigans. The Monarch makes a hindered charge into the Golems, and the Pikes moves up to try and make spacing awkward for any reprisal charges. Things should be able to smartly sort themselves out on the charge, with the Golems shifting down to allow a cleaner flank... but this does complicate any Surge charges from the looming titanic Infernok, so I am hoping it is adequate to protect the Monarch for a turn.

Lastly, the Mounted Sergeants also charge the Mastiffs, hoping to best them and overrun, to gum up the Infernok and other units. 

The push goes pretty ok. The Giants don't have Rampage triggers, but are able to connect enough to best the first horde of Golems. The flanker overruns 1 inch, and the other Giant reforms, so they can both be staring down the flank of the Abyssal Dwarf line.

Reforms for the Kingdoms of men.

The Monarch lands 4 damage into the other Horde of Golems, but it easily holds.

The Mounted Sergeants deal 5 to the Mastiffs, but fail to even Waver them. Still, the Sergeants should delay things for a turn, and that should be enough.

Top of Round 4: Abyssal Dwarfs

One unit of Decimators backs up to allow the Mastiff Packs to ravage the Mounted Sergeants, which couldn't otherwise fit between the shooters and the building. Angles-wise, I don't think the scooching Decimators take any shots this turn.

The Mastiffs have a fantastic combat.

The other Decimators and the Infernox hero shoot into the Pikes, but the dice feel ice cold, and just 3 new damage is done. 

The titanic Infernok moves to be Surged in against the Pikes, and is. The Iron Caster then burns the Amulet of the Fireheart to attempt a Bane Chant into the Golems fighting the Monarch, but that spell unfortunately fizzles for the evil dwarfs. 

The Abyssal Dwarfs strike back hard.

The Golems land a strong 10 damage against the Monarch, who thankfully holds. The titanic Infernok brutalizes the Pikes in the flank, and easily routs them.

Bottom of Round 4: Kingdoms of Men

I have some nice long charges, and so try to threaten the Abyssal Dwarfs from multiple angles. One Giant makes a long flank charge into the Inferox hero. Rampage doesn't trigger, but in the flank, the Giant is able to paste him, and then turn to intimidate both Decimator regiments.

Charges for the Kingdoms of Men.

The Monarch continues against the Golems, with a Giant joining in the flank, and the second horde of Golems is picked up. The Monarch changes facing to get the rival titan into the front arc, and the Foot Guard hang back, ready to support.

The Crossbowmen hold and shoot, landing 2 damage into the towering titanic construct.

Top of Round 5: Abyssal Dwarfs

Having lost both Lesser Obsidian Golem hordes so swiftly, my opponent is on the back foot has some tough choices. 

Positioning as the turn begins.

The Decimators both turn and shoot into the nearest Giant. I believe the other Throwing Mastiff is tossed in as well. A total of 8 damage is done, but the Giant holds.

After some consideration, the Infernok opts to charge the Monarch. With more damage and less Nerve, my opponent is more likely to pick my titan up. 

Post-combat, for the Abyssal Dwarfs.

The Mastiff packs are not nimble. After besting the Sergeants, one backed up, allowing the flanker  to overrun. That flanker now swings down and towards the center of the field, while the other swings towards the left side of the table to look to score for the scenario. I believe the flanker still had their throwing Mastiff, which contributed to shooting against the Giant this turn.

Bottom of Round 5: Kingdoms of Men

The Giants continue their uh.. rampage. One makes a frontal charge into the left-most Decimators, dealing 7, but the shooters hold. The other Giant makes a flank charge into the other Decimator unit, devastating them and then routing them. Engaging and disordering both of the shooters seemed like a better call than charging the opposing titan.

Charges for the Kingdoms of Men.

With the Giants out of the way, the Foot Guard charge the Infernok, and catch a Bane Chant. They fail miserably, and deal just 3 damage. (8ish is expected.) I do remember Lifeleech to bring the Foot Guard down to just 3 damage, but with the opposing titan at just a pitiful 5 damage, the construct holds strong, and now I am a little worried for the Foot Guard.

Reforms for the Kingdoms of men.

The Crossbowmen don't have any shots this turn, and so move to get to the edge of the right scoring zone. They had the inches to make it into the center, but I figured hanging back to try and score either the center or right zone with them is the better call. 

The Crossbowmen survey the long battlefield.

It's a bloody game, but not quite done over yet!

Top of Round 6: Abyssal Dwarfs

The titanic Infernok counter-charges the Foot Guard, landing a staggering 9 new damage, and will waver the Foot Guard with a hot check.

Final charges for the Abyssal Dwarfs.

The Decimators countercharge the Giant, and deal 1 damage to him and forcing a Nerve check, but the Giant holds.

A Mastiff pack charges the other Giant, and lands 1 damage as well, bringing him to 5 damage, and this Giant holds as well. That was expected, my opponent just wanted to hold the Giant up and prevent me from flanking the Infernok this turn. A good call from my opponent.

The last Mastiff pack spins around, looking for options in case their is a Round 7 rolled up.

Bottom of Round 6: Kingdoms of Men

The Giants clean up, picking up the Decimators and the Mastiffs in front of them. One turns to face the last Mastiffs, and the other turns to see the flank of the Infernok.

Positioning for the Kingdoms of Men at the end of Round 6.

The Foot Guard pop Indomitable Will, but I don't think catch a Bane Chant this time. They deal 5 damage to the titan, but unfortunately can't best it, due to the cold rolling last turn.

With the Foot Guard alive this turn, the Crossbowmen hang out on the right, scoring that zone. They have no shots this turn.

I get the honors, and do not roll up a Round 7 for us.

In the Left Zone, my Giant (2US) bests the Mastiffs (1US) to score that for me for 2 Points. In the Center Zone, the Giant (2US) and Foot Guard (4US) bests the Infernok (2US) for 3 points, and in the Right Zone, the Crossbowmen (3US) lay claim and are uncontested for another 2 Points. It's an overwhelming 7-0 victory for the Kingdoms of Men, and we again killed a good deal more than we gave up, for another strong conclusion. 

Game Conclusions

Trying to play for all three zones has been a downfall of mine in the past. Both of us had the right idea trying to claim a side and then move in to compete for control of the middle. The angle of approach was more awkward for the Abyssal Dwarfs though, in part due to his Shambling. He still got a strong volley of fire off, and still did some nice damage. Unfortunately, he wasn't quite able to focus fire, and I was then able to get some charges in, including a nice flank charge, and was quickly able to start rolling through his Def6 Golems without getting caught up.

He was a little rough on himself for missing that incoming flank, but looking at the pictures, there might not have been much he could actually do. Avoiding the Foot Guard was important too, and he did accomplish that. My titans were all going to be able to charge something that turn, and even if he could get both Giants in the front, even without Slayer Triggers, that Golem unit would still be in for quite a beating (presuming, of course, that the Giants can roll up some hits. I will note though that we didn’t even burn through half of time allotted for our game. If we assume that this positioning was indeed an error, taking things a little slower could help in the future.

I love the look of the Abyssal Dwarfs generally, and quite like seeing Will’s army across from me. He’s not big on basing materials, choosing to paint stuff onto the base instead, which I just really dig the look of. The shooting focus of his list was really neat, and that quality of piercing fire would have been withering without the longer charges of my titans, and the odd angle of our battle lines to really help me out on the approach. It was a unique and interesting way to approach the game at this points value for sure, and I can't wait to see what he cooks up the next time we meet.


The records weren't really formal for this tournament. We were all pretty casual with only eight attendees. But with two games and two wins, I believe I am the only one with that record going in to the third and final game. Huzzah!

Wednesday, October 9, 2024

Kings of War 3rd Edition: #086 Kingdoms of Men vs Ratkin in Invade

Intro and Lists

I recently attended Dragonfall 2024, a convention held relatively nearby in beautiful Lake Geneva, Wisconsin. The convention had a wargaming component, and the Kings of War event was hosted by Todd of Grognard Games, which has a pair of shops in nearby Illinois. It was a tiny one-day, three-game event at 1500 points. We had eight players sign up, and opening pairings were semi-random. I started the day out against some silly costumed Ratkin player. He brought the following:


The Rats were piloted by a... creature deserving of a lengthy preamble. He's a fellow Brian; a fellow blogger (running the wonderful The Nerd's Tale); a dude who is also our local Mantic Pathfinder, and an all-around good guy. Yes, he wore a costume, complete with tail, and temped fellow players with offerings of cheese. Very sneaky stuff. He was hot off a great showing at the recent Wildcat GT (which you can read about here, from him), and continued running his beloved Ratkin.

Look at that! he can essentially go edge-to-edge with everything.

I was expecting double Mutant Rat Fiends Friends from him, but instead he was going even more against the grain of "orthodox" Ratkin play with a list he had dubbed "The Expendables." For a 1500 point game, there was a ridiculous 27 Unit Strength, and the list as a whole was designed to blunt charges with Plague Pots, and then just try to endure charges, grind, and play the scenario by swarming objectives and being too numerous to kill.


As covered a little more thoroughly here, I brought the Kingdoms of Men, and leaned into a bunch of titans, with two rampage Giants and a Monarch. We'll see what I can do against all these rats!

Table and Terrain

The terrain was pretty basic, and tables were pretty uniform in their selection. No special rules, or weird pieces. The buildings were Height 7 blocking, Boulders also Heigh7 blocking, Forests were Height 10 Difficult, Hills were Height 3, Obstacles were the normal Height 2, and each table had a "rough spot" of Height 0 difficult terrain. 

The scenarios for the event were determined ahead of time, with the first game being Invade, from the main rulebook. For the scenario, whoever gets the most Unit Strength into the opposing half of the board wins. Easy enough! In addition to the Scenario Points, which was 15/10/5 for Win/Draw/Loss, we were also supposed to compare the differential of points killed for an additional modifier, of up to +/- 5 Points, depending on what side of the differential you were on. 

The Rats won the roll off for sides, and kicked us off. Despite the incredible unit strength, there wasn't the big of a drop disparity, and it became clear early on that the Ratkin wanted to layer up in a corner and push on through. 

With so many units run in multiples, walking through the Ratkin deployment is a little too cumbersome to attempt in detail. Essentially we had a regiment of spears out on the flank, a Red Spear horde in front of a horde of Wretches, a horde of Wretches in front of a Blue Spear horde, and a final Purple Spear horde in front of two regiments of Spears. Characters all all support characters with Bane Chants and/or Heals, and were scattered around. They'll be in supporting roles, and were a little hard to track for reporting purposes.

Deployment.

Despite the army differences, I was the one to go far wider. Out on the left we had the Crossbowmen and ASB with the Bow, with the former angled to move up on the first turn. I believe the Sergeants were my final drop, placed out there to pressure and constrain. Early drops were the central Giant, Pikes, and Monarch. Once I realized the Ratkin were layering, I dropped the Foot Guard and other Giant out on my right, with the Giant nearer the table edge, due to my lessons learned from Trevor and Battle 085 when I was evaluating some options for this event.

The Ratkin are numerous, but since they are layered, if I can start fighting anything, their advance should suffer. At that point, I just need to hope that my higher quality of units can slay enough rats to win, and make it across the table.

I won the roll off for turn, and given the scenario, opted to go first.

Top of Round 1: Kingdoms of Men

Things moved up! On the right, the Giant moved up around 11 inches, gaining ground but not giving up a charge. The Foot Guard, Monarch, and Pikes moved up around 10 inches, with the Pikes and Foot Guard ever so slightly ahead of the Monarch. The Rats don't have the charge range to hit anything, but I was trying to build up some good habits with the new list.

Opening moves for the Kingdoms of Men on the very important right.

The central Giant also moved up around 10 inches. I wanted him to keep pace with the line, prevent the Ratkin from making a Round 1 charge and threaten some striding charges next turn, just like the other titans. With them spread around, I should hopefully be able to multi-charge something.

Opening moves on the left.

Out on the left, the angled Crossbowmen moved 10 inches, and the Mounted Sergeants zipped up as far as they could get while staying out of charge range. With Speed 9, they should have a few options next turn. The Crossbowmen moved at the double, and are actually still out of range of anything, so no shooting is done, and it is a quick turn.

Bottom of Round 1: Ratkin

The layered Ratkin line moves up, but is very wary of the rampage Giants. The central one has a nice range and good arc, and after some finagling, my opponent opts to just scoot some Wretches up, kinked, to prevent the central Giant from flanking anything. 

The Rats move up, cautiously.

Barkskin lands for 4 against the Wretches. I haven't used the spell before, and it's kind of neat! For those not in the know, like me, its "Hit" roll is variable, where you need to meet or beat the target's Defense Value, meaning on some 2+ Wretches, it'll be hitting on a 2+, and then each successful hit will block a point of incoming damage on the following turn. A neat pick to get just a little more usefulness from the Wretch hordes.

The Ratkin Spears in the front pop their Plague Pots, and brace for the oncoming charges.

Top of Round 2: Kingdoms of Men

Pots or no, I feel like I gotta go in. I'm at about the center line, and given the scenario, if I can keep the fighting over on his side of the board, I feel like that's good for me.

Charges from everything but the ASB.

On the right, the Foot Guard and Giant go into the Spear horde, with the Giant rolling up some good extra attacks, but landing only 6 damage due to hitting on 5's. The Guard catch a Bane Chant and contribute 9, and we do manage to pop the first horde in one go with a lucky Nerve check. The Foot Guard stays put, and the Giant backs up 3".

The Wretches don't have a Plague Pot, and the Monarch deals 5 and the Pikes Deal 7 to this horde. The Wretches hold. We later realize Barkskin should have been applied, so they are really only at 8 damage, and we correct this a little later.

Post-combat reforms.

I measured and we discussed, and the central Giant can get a pretty safe charge in against the Spears, so I take it, hoping to gum things up more. Spacing is awkward, and the very central Blue Horde doesn't have an arc to come in and support. He did have a charge into the Wretches, but I thought it better to gum up his lines here instead.

Over on the left, the Crossbowmen move up, and should be scoring at this point. I believe they and the ASB land 2 damage against the regiment of Spears on the far left. The Sergeants are safe, and opt to just nimbly shuffle about. I don't really want to commit against Spears, but as long as I was here, threatening flank charges and stuff should keep my opponent boxed in a bit.

Bottom of Round 2: Ratkin

Having layered his list, the Ratkin are a little traffic-jammed.

On the right, one regiment has the inches and space, but not the pivots to reach the Giant, so both regiments go into the Foot Guard, and both pop their Plague Pots. They'll land 4 damage combined, and I'll Iron Resolve 1 back to end the turn at 3 damage.

Combats from the Ratkin.

With this charge completed, the Wretches countercharge the Monarch, but can't really shuffle down very far. They'll roll  really well, and land 6 damage against the Monarch, and get a Barkskin 5 for their trouble from a nearby Ratkin spellcaster.

The regiment getting shot moves up, to create some space, and the Blue Spear horde in reserve shuffles over. Thanks to the Birthing Daughter's Aura, the Wretches in the backfield make a Striding charge against the central Giant, joining the Spears in their counter-charge against the towering titan. In retrospect, this might not have been possible, since the two hordes were pretty squarely layered? Needing to share frontage, and with the Spears sliding down to their final position first, I'm not sure now if the Wretches would have been able to connect against the Giant with just one pivot. I've gummed myself up with layered hordes before, so I might suggest that my opponent use a bricklayer approach to avoid any messiness like this in the future. Regardless, both hordes make it in in this game. The Spears deal 2, and the striding Wretches roll hot here as well, landing 5 more on the titan.

Top of Round 3: Kingdoms of Men

Out on the left, I have some time, so the Sergeants pivot once and gallop off towards a corner. I couldn't safely nimbly pivot and apply pressure, so we'll depart for now. I'm not entirely pleased with this. I should have just backed up or something to keep applying pressure, but oh well. It's early in the game, and if I can get behind the hordes next turn, this could very well be worth a turn of not pressuring.

Movement on the left.

The Crossbowmen land 3 damage against that regiment, bringing them to 5 damage, and will waver their target. I was hoping to just pick that unit off quickly, but being out of range in Round 1, it's taking a bit, though the damage is still accruing decently.

The Giant in the center continues swinging against the Spear Horde. He's not Ensnared by the Plague Pots this turn, but unfortunately lands just 3 of 13 hits, and then just 2 of 3 of those for damage. Yikes.

More grinding combats.

The Monarch and Pikes charges the Wretches again. I forget the Wretches are Def2, and Bane Chant the Pikes. Oops. The Monarch does 8, with Barkskin brining that down to 3 new damage, and the Pikes contribute 9 new damage, and we are able to pick the horde up on the second attempt. Victorious, the Monarch backs up 3" and the Pikes change facing, to protect him.

Reforms in the Top of Round 2.

The Foot Guard land 9 against their regiment, but the unit is Rallied, and just barely safe. The Giant flubs, rolling up 10 extra attacks, but only deals 4 damage total off those 18 attacks. Ouch.

Bottom of Round 3: Ratkin

The Ratkin Bane Chant several units this turn, though I do not keep track of what. On the left, the wavered regiment does nothing. Since the Giant wasn't able to break the Spears, the Wretches makes another striding charge, this time into his flank. The Giant starts the turn at 7 damage, ends at 19 damage, and is toppled. The Wretches victoriously change facing.

Two hordes have fled, but the Ratkin keep scurrying forward.

The Blue Spears pop their Plague Pots, and charge the Pikes, with the Ratkin War Chief (Colonel Hotpocket) contributing 1 in their flank. Even Ensnared, the Spears land 6, the War Chief contributes 1, and the Pikes are Wavered.

The Pikes falter.

The Ratkin Spear regiment lands 4 damage into the Foot Guard, who then Iron Resolve down to just 6 damage total going into my turn. 

Top of Round 4: Kingdoms of Men

I've lost a Giant, but I am feeling pretty good about things overall. On the right, the Giant charges back in against the regiment, but flub again, landing a just slightly better 6 damage, but then the Rats are found to be quite insane.

Combats in Round 4 for the Kingdoms of Men.

The Foot Guard do better, and no longer Ensnared by the miasmatic Plague Pots, bring the regiment up to 21 damage and dispatch them, devastating and then routing them, as is proper, and then pivot to face the rest of the field, trusting in the Giant to finish off the insane Rats next turn.

The Pikes pop Indomitable Will, and countercharge, scooting down to let the Monarch join in and share frontage. The Spears here just popped their Pots, and the Monarch contributes 2 and the Pikes 6 to take the horde to 8 damage, but definitely aren't breaking them this round.

Reforms for the Kingdoms of Men.

The Mounted Sergeants nimbly about-face, and are eyeing flanks and rears of the remaining Ratkin units in the middle section of the board.

The Crossbowmen finally stop moving, and patiently line up their shots against the regiment. And now they fail hard, landing just 1 damage against the Regiment, which holds just fine this time.

Bottom of Round 4: Ratkin

The Wretches that felled the Giant move as far as they can, just bumping into the obstacle, and should either be scoring, or just about. With them out of the way, the Red Spears in the woods make a hindered (and Ensnared) charge into the Pikes, I believe the Blue Spears countercharge the Pikes as well, trying to make sure those get picked up this turn. That does happen, and the Red Spears overrun, looking to score in the coming turns.

I believe the War Chief continues poking the Monarch, landing an additional 2 damage against my Inspiring titan. 

The Ratkin break through!

The regiment enduring the Crossbow fire is able to get into the woods, and thus into cover. Heals go out, and the regiment is brought down to just 3 damage.

The Birthing Daughter delivers! The Sergeants are disordered and stuck up.

Protecting this late scurry forward is the Birthing Daughter, who is indeed able to slip in 1 damage against the Mounted Sergeants, and disorder them. The Sergeants had several rear charges available to them next turn, so this is quite a good development for my opponent!

The insane Spears land 4 into the Giant, bringing him up to 6 damage, but the Giant holds strong.

Top of Round 5: Kingdoms of Men

The Monarch was charged by the War Chief, but has a charge into the Spears, so takes that instead, focusing on removing the opposing Unit Strength. The Monarch lands just 4 damage, I believe taking them to 12 damage, and now the Spear Horde is found to be insane. Ratkin.

Combats for the Kingdoms of Men.

Given the long overrun of the Red Spear Horde, the Foot Guard can see them, they are definitely within charge arc, and I do have a flank charge into them, which still seems cheeky though since I can only connect with about 1/4 of that facing. But I do take this, and will best the unit. I do forget about Lifeleech though. They horde will victoriously turn to face the Blue Spears fighting the Monarch.

The remaining Giant clubs the first group of insane rats down, and then changes facing to help the Monarch as well. It doesn't seem worthwhile to chase after the Ratkin.

Parting shots from the Kingdoms of Men. Nothing hits.

The Crossbowmen need to move to shoot at the departing regiment, and land no hits, since the Ratkin unit made it to the woods, and my Crossbowmen were shooting with -2 to hit. 

The Sergeants countercharge the Birthing Daughter, landing 2 against her.

Bottom of Round 5: Ratkin

The Birthing Daughter lands no damage against the Sergeants this turn.

The insane Blue Spears do charge back in, and do pick up the Monarch, but I should have enough to contain and best them next turn and prevent them from scoring.

The Ratkin Spear regiment and Wretches continue to flee.

Top of Round 6: Kingdoms of Men

The Foot Guard and Giant charge in to avenge the Monarch, and scatter the last Ratkin Spear Horde.

The Sergeants roll hot, and land 4 damage against the Daughter, and will rout her, overrunning a mighty 1 inch, and I'm not sure if they'll have the inches to get into anything if we do get a Round 7.

Bottom of Round 6: Ratkin

The Ratkin move more, just in case, but we don't roll up a Round 7.

End of the game, with game aids galore.

For the Ratkin, the horde of Wretches are scoring for 3, and the Spear Warriors regiment for 3 as well, giving them 6 for the scenario. 

The Kingdoms of Men have the Crossbow horde for 3, Mounted Sergeants for 1, a Giant for 2, and the Foot Guard for 4, giving us 10 for the scenario.

We won the scenario, and killed far more than we gave up. It was a strong victory for the Kingdoms of Men, and a great start to the tournament!

Game Conclusions

It is always a treat to see this army across from me. Everything is just so crisply painted and the army is overflowing with fluff! We have named units and characters to hand-painted banners. And that is without mentioning the man behind the scurrying and scheming! Win or lose, I know I am going to have a good time. He's done an unreal job growing community over the last year, so a massive thank you goes out to him for all he does.

Focus back on the game, usually, my opponent has two mutant rat titans of his own, and has also even started using the titanic Demonspawn Scud in his recent, larger games. I was expecting at least the friendly duo here, like we’ve seen before, and I think we got very lucky he went with his “expendables” approach, which played really well into my Rampage Giants, even if neither had a particularly stellar showing for their damage outputs. I think we also lucked out that he layered up and didn’t go super-wide and just try to blitz across the field, a potential approach that had me concerned while we were setting up.

Getting the first turn was huge for us, as we were able to box him in at the start of the game. We had some good advantages as the game started, and the Ratkin were certainly numerous, but we were largely able to endure the scurrying and come out of this with a strong win to start off the event.