Showing posts with label Terrain. Show all posts

Saturday, October 12, 2024

Hobby Update: Flat Terrain

The doubles tournament back in late June introduced the Wisconsin folks to low-height difficult terrain. As a Herd player, my joy was immeasurable. The Herd is hard to play as anything but an aggressive army, and it pays a premium for their Pathfinder rule, which only interacts with Difficult Terrain. Bumming around with a single forest is not a great time for them. The low-height stuff seems really interesting as it should break up the board while not further penalizing shooting. 

I have terrain and mats for four tables, but none of this nifty flat stuff, so I started hobbying on some new terrain in July, making a small detour to build up some other stuff to donate to the shop the league usually meets at. I am finally calling the rest of these done.

Each table has a little more than it needs, in order to run something unique in terms of terrain ratios, while being able to pare it down to the more official splits when desired.

My desert table gets one new piece of flat terrain. I was going for a bit of a "drying pool" effect, because of the desert. Eh, I think it works ok. It's terrain.

I have a verdant, forest heavy table which also gets a new piece, a circular pool.


I have two "spooky" tables, which I want to combine for any mega battles. I decided to make one of them more boggy for when it gets used on its own, so it gets two pieces. Here we have half pearl "bedazzlers" for bubbling muck, and a number of Ghoul hands leftover from previous conversions. 


Bridging the gab between the two tables is a combination of muck and debris, using a lot of spare bits.


And then for the other spooky table I wanted to go for more of an old battleground feel. I took a ton of old bits, basing paste, and skulls and just arranged things. Getting things more drab and muted was hard, so I eventually gave up on some of it. I wasn't quite sure what to do with the shields. For the Chaos shields, I opted to just run some fun colors, and for the more medieval ones, I was watching some AOE2 while hobbying, and decided to free-hand a few of the civilization symbols for fun. 

The spooky tables already had a bunch of graveyards that I had been using as Height 1 difficult terrain to try something different a few years back, so those tables in particular probably didn't need these additions as well, but it's been fun nonetheless. My terrain storage boxes have become black holes for miscellaneous hobby things the last year or two though, so we'll probably see more terrain soon as I do a bit of an inventory and reorganizing over the winter months. And hey, maybe we'll see some of these things on the board for some battles too!

Wednesday, July 24, 2024

Hobby Update: Donated Terrain

Up now is some extra terrain! A lot of the league games and meetups have been out at Oddwillows. It's a nice shop, but still finding their feet with wargaming. We've been bringing our own terrain for game days, and I figured it might be helpful to leave some terrain there, so folks didn't have to lug so much back and forth to the store.


I geared the terrain for Kings of War, fbut tried to make it a little generic, so the shop could get a little more use out of it. I went for a gross swamp theme to make this a bit unique.

I figured buildings are the easiest wargaming terrain to come by, so I slacked here, building up just an outhouse as a bit of a test piece. It's a tiny building, but I figured there might be a skirmish game that needs something smaller, or we might be able to play around with Height 3 blocking terrain or something. We'll see.

Both the outhouse and the obstacles came as extras from the Sprue Dude, a nice sprue shop online and on ebay. For both, I painted the wood up normally with some light browns, and then hit them with a tan drybrush, and then an ivory drybrush to get the aged wood effect. Once this was done, I went back with both a brown wash and then a green wash to get the bottom third of the structures “mucky” and discolored. The last step was going in with the Acrylic Glazing Medium (more on that in the Mud how-to post) to make is shiny and gross. I didn’t take too many pictures of the terrain, but I was really happy with how it all turned out. I’ll try to get some better pictures in some future battle reports.

The hills were all of my larger leftover foam insulation chunks. They were hobbied up like all my other hills, which you can read about here.

The trees were (I think) from a railroad kit, just spindly hunks of plastic. I took flat Wizkids bases, and then used plastic cement to bond the trees to it. Whittled sprues were used as roots and supporting pieces, and bits of green stuff were smushed in to hide the joins here and there. This got primed, dry brushed with all the colors already mentioned, and then some washes were splashed in between the roots to give it the same damp effect.

The larger forest parts were just blobby MDF bases. They were primed to seal them, and then I hit them with texture paste and then PVA glue and rocks, a thinned layer of PVA glue to harden everything up, and then more primer and lots of dry brushing.

The Doubles Tournament last month was fun, and made good use of flat / Height 0 terrain, so I wanted to duplicate that here, to get more terrain on our tables. Wanting the terrain to be a little versatile, I snipped some coffee stir sticks and added them as planks. This should give the terrain some more interest for use skirmish games and such I think? The bubbles were fun, and came from a half-pearl rhinestone “bedazzling” kit I bought online. It’s a neat effect. I had some hands leftover from the Abyssal Ghouls, and added a few in here for some more visual interest. The little bog got a green, splotchy paint job and then the Acrylic Glazing Medium was applied liberally and allowed to set overnight.


Overall, I was really happy with how these all came out. This collection was left at the shop and will hopefully see some use soon. I’m working on more height 0 or flattish terrain (apparently there is a difference, per my questions on the forum) for my existing personal collection and tables. Those pieces are a little more involved, but I will try to get those done soon too!

Saturday, July 2, 2022

Hobby Basics: Craggy Hills

This post has been a long time coming. I mean, what is a hobby blog without some foam hills? Yes, there are many ways to build up wargaming hills. Some methods are even more simple than this, but this is the method I have used for my table terrain. This has been a post idea for the blog since early 2019 apparently, so yeah, a very long time coming. I just haven't had the need to make hills since I got my first few done. Now however, I am trying to do up some more terrain for a "meet and greet" Kings of War day, and figured I'd document the creation of these new hills. So let's get to it! To make these hills you will need:

  • Pink Insulation Foam Sheet
  • Utility knife (longer is better)
  • Optional: Hot wire foam cutter (handheld or table)
  • Metal ruler
  • PVA Glue
  • Optional: Mod Podge
  • Newspaper
  • Disposable bowls
  • Optional: dark primer with matte finish
  • Sand and small pebbles 
  • Cheap craft Paints and large cheap brushes
  • Optional: flock and tufts
  • Acrylic Sealer with matte finish

Like any recipe, I'd recommend reading through this before starting on the project yourself. And instead of a step-by-step approach, I'll try to break the process into larger chunks, so you can focus in on what you want to do, as this is not a be-all-end-all kind of guide.

For example, the tops here are purposely more flat as this "plateau" style works very well for Kings of War and the big, ranked units that game uses. If this is for 40k or a skirmish game, or something that doesn't need or want a lot of flat spaces, break up this flat space when you get to these steps. Add some fun bits, or more layers of foam to bulk things up and make the piece more interesting and interactive. These plateau-style hills do make for a great building blocks for any hilly/rocky terrain you may want to make, which I why I wanted to showcase them. Onward, to the tutorial!

Making and Shaping the Hills

Like many wargaming hills, mine start out as pink insulation foam, which you can find at most hardware stores. One sheet goes a long way, so do not buy these in bulk! Once acquired, you will need to break down your large foam piece into your the basic shapes you want. You can sharpie on the rough shapes if that helps conceptualize and plan things out, and I'd suggest going slightly larger when in doubt. You can always cut it down to a smaller size later.
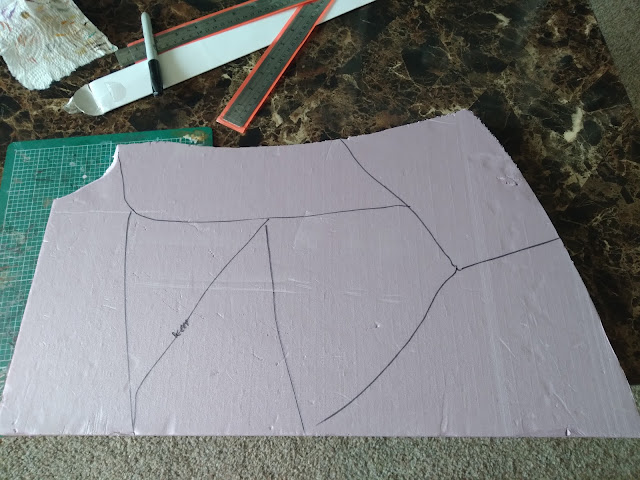
What will be 6 hills, roughly drawn in with a sharpie prior to cutting.

To get it into the desired smaller pieces, you can karate chop it, or otherwise brute force it, but I'd recommend a knife of some sort. A small x-acto knife can work, but it won't likely be long enough to be really useful. You want the blade to be able to go through most of, if not all the way through the foam, so it should be something more like this sturdy snap-blade retractable knife, or I've even used something smaller, like this smaller retractable knife. Heck, some crafters even use chef knives!  So use whatever you like, but the longer the blade the better. Also, be mindful of the sharpness of the blade, and where it is going, so you do not hurt yourself. If you are using a thin blade, be very careful of bending / breaking it as well as you work.

Optional alternative: if you have a hot wire foam cutter, either something simple and handheld, or something fancier like a Proxxon table, you can use that to break down your foam sheet into your basic hills sections. Your cuts will be very clean. I would highly recommend some tapered cuts near the top to give the hill a little more slope, and some more angles to work with when you get to painting. 

The cut hill. Here, I used a very shallow knife cut, and then broke the rest off. With a long knife or a wire cutter, you can have a nice uniform face, and could even call it good here.

With your hills roughly shaped out, you can continue some shallow cuts near to what you want to be the top, to give a more tapered look, or just proceed to using your all metal ruler. The ruler will be used to abrasively tear away at the foam, so you could just create the tapered edge with it and some brute force if you want. I still like to make the additional cuts to give some irregularities and additional facets to the cliffsides though. When working with the ruler, find a nice spot that is easy to sweep up, like a garage or tiled floor. A large trash bin should be used to ease the clean-up too. And I'd recommend one of the covid-era masks you likely have around still. This steps makes a lot of debris and fine particles, and you probably don't want to be breathing these in.

The final pro tip here is to use a new trash bag before you start this step. It makes this step more pleasant. But, as you can see from above, there is a lot of fine particles kicked up during this step.

Kind of like peeling carrots, or more like scaling a fish I suppose, take your ruler and scrape it along the sides of your hills. You want a jumpy, irregular effect here. You want the ruler to drag and catch on things, snag, and break pieces off. The metal ruler is nice as it should be sturdy enough to not bend, and you can go pretty vigorously with it. As said before, these flakes will go everywhere unless you are pushing the ruler towards the bin, and there is a fine "dust" that gets kicked up, so again wear a little mask and eye protection if you wish. Safety first and all that.

The top one here has had the tapering cuts and is ready to be roughed up with the ruler. The bottom hills are all done already.

Once "roughed up" use your fingers to brush away any weak flakes. You want to get all the tenuous and flimsy bits off, leaving just the rough but firm wall texture. If you do not do this part, the flimsy bits are likely to break off in future steps or in games, and you'll need to do a lot of touch-up work to fix and re-seal the piece. So, gently brush away those flimsy bits now to save yourself a lot of future hassle.


Protecting the Hills

Foam does not play well with a lot of things, and wargaming terrain also tends to take a bit of a beating, so next we need to protect what we've got done so far. There are a few ways to go about this, but the youtube channel Black Magic Craft has a great video covering the basics. Essentially we want to get a protective layer onto the foam, so it is protected and the paint will stick better to it. Find a working area that won't be disturbed for a day or so and put down some newspaper to protect that working surface. 

Get some PVA glue, like Elmer's, or alternatively get some Mod Podge, and add just a splash of water to make it slightly more runny in consistency. Thick, gluey gooey blobs are bad, you want this to apply more like a very thick paint. You could add some squirts of cheap craft paint too here, if you want. Doing so, particularly with a dark color like a black or a grey or a brown, will help cover up the pink foam and protect it in one step, and adding a color here also helps you more easily figure out what areas you have covered already!

Once your gluey substance of choice is mixed up, then use a cheap large brush, like a simple foam brush, to apply it to the foam. Just slap it down everywhere on the edges and then either on the bottom or the top side. Place the uncovered side atop the disposable bowl, so any excess will drip off (ideally onto the newspaper). Give it a few hours to dry. During this waiting period, you can either toss your glue away, or preserve it with some plastic wrap over your reservoir. Then repeat the process, covering up the other side with the glue now, and touching up any spots you might have missed. Again, adding a color lets you more easily identify missed spots.

It is important to wait and do just the top or just the bottom each time. Otherwise, the gluey hill will stick to the disposable bowl, and peel away much of your progress, as shown above.

With your gluey substance of choice dried, your hills should be well-protected for hobbying, and be a good starting point for just about any table style.

Hobbying on and Finishing up the Hills

I was trying to get these new hills to match up with some of my spooky terrain, which uses a lot of brown tones and greyish rocks, but these hills can be a good basis for any table style. I won't document this part too much, as there is too much variation to cover.

In my case, I used slightly diluted PVA/Elmer's glue to cover a section, and sprinkle sand and tiny rocks around. I'd wait a few hours for it to get completely dry, and then repeat the process in another section, usually with a different sized rock, as variation helps the piece look better. Nature is not uniform, after all. After the top was covered with "stuff" and fully dry, I then went on to prime the piece haphazardly with both a brown and a black primer, to get some color variation going as well. Then I used cheap craft paints to paint it mostly brown, overbrushed the edges with a dark gray, and then gave the entire piece a drybrush in dark gray and then light gray.

Brown hills for a brown, earthy table. 

I have also done this style of hill for a desert table, using super glue to affix some larger pebbles (the PVA or Mod Podge shell will protect the foam), and then spread PVA glue all around the top, sprinkling small small rocks and sand onto it, painting it up in more tan and sandy colors. 

Tan hills for a tan, sandy table. 

What you eventually do for this section depends on your table. You might go for something I did above, or opt for some static grass and flock, or even choose a thick, snowy plateau to hobby up. Take inspiration from your table and your miniatures and your play mat, as having a matching table for your army is a pretty nice nerdy flex.

Once done hobbying on and painting up your hills, the final step is to take an acrylic spray sealer with a matte finish (like Aleene's) to the piece. Go outside and spray liberally along the the edges and top, and give a few minutes for it to dry. Once dried, there should be a nice "clack" sound when you tap it. This last step add another layer that should protect your painting and such from the wear and tear of normal gaming. 


And that's it! A hopefully easy-to-replicate way to make yourself some interesting hills for your wargaming endeavors. Thanks for reading!

Saturday, January 9, 2021

Hobby Basics: Rivers

Many a historical battle has been influenced by rivers, whether securing a flank, circumscribing movement, or hindering the chance of safe retreat. They definitely have a place on a gaming battlefield, and back around April 2020, I set out to see what I could manage! 

You can of course just buy terrain if you want (the various Flames of War boxes do look pretty good, and reasonably priced), or maybe 3D print some, but if you're cheap, feeling creative, or a combination of the two, wargaming rivers are easy enough to do up on your own.

The pikemen attempt a crossing in the worst possible way.... maybe someone dropped something upstream?

Good terrain should be durable. While I think cardstock or thin cardboard could potentially work as a base, I've picked up a pair of PVC squares last summer, and have been using it for bases for my recent terrain bases. I've just been using a hobby knife and occasional saw to hack it into the shapes I needed. The PVC may be a bit overkill, but it's sturdy and working well.

For the river, I used a full 12" by 12" sheet, plus some 3" square scraps from the other sheet for the corners. I am least happy with the corners, but more on that at the end. While narrow rivers aren't necessarily safe, eyeballing it, approximately 3" wide terrain pieces and 2" wide rivers looked like reasonable but surmountable obstacles for Kings of War units.

Sketching helps plan stuff out, and line things up. 

I wanted the joining edges as flush as possible, so I used careful knife work to start, and a longer hobby saw for a more uniform cut. The edges on the banks I wasn't concerned with, so I roughly cut them with a hobby knife, and then carved out more interesting edges. Rivers don't flow in a straight line after all!

WIP with paste. In the top right, I added some pink insulation rocks, to create a section that would be impassable. I liked that 

Speaking of.... rivers DO flow, which creates a bit of a dilemma for this terrain. I didn't want to have easily identifiable directional flow like v's or eddies (if you do want that, check out this site here for some visuals). So I opted not to include rocks in the middle, for example, and paint up everything lazily, with cartoony current lines, so that I could orient the pieces in either direction.

The banks are Vallejo Rough Grey Pumice, painted gray as I wanted a kind of mountainous river look. I don't know why, I don't really have any mountainous basing or rugged 

The river's paint job is nothing too special. I did a base coat of GW's Temple Guard Blue, then a metallic teal from Deco Art to give it a glisten, and then current lines with some random blue paints. The intent was to try and show the speed without bringing eddies into the mix.

The finished result.

So, did it work?  Well, it's on the table, so yes, it counts! Are their ways to improve? Oh, for sure! Were I to do this again, the following things would be on my mind:
    • The PVC squares/sheets worked well as a base. It took a little extra work to get the straight cuts (when not on the edge of the sheet, har har), but the effort seems worth it. They seem pretty durable, and should last a while.
    • The basing paste worked too. Those various pastes have continually been pretty slick. 
    • Cutting the bends from one piece helps get everything lined up too. This allows the river to line up with a table edge. This is not of paramount importance, but you don't want things hanging off table edges if you can help it.
    • BIGGER IS BETTER. I think the pieces would look better a little wider, and would want to play around with some wider sections. I think slightly wider banks would also look good, and maybe going muddier rather than rockier would look good too.
    • MORE IS BETTER. You want more pieces than you'd think. This amount can bisect a standard KoW table, but barely, and only on the short end. With a good bend, I can carve out one corner of the table... which isn't really fair. I'd probably want at least 50% more pieces than I have currently, to give more terrain options in a game.
    • LONGER IS BETTER, at least for the bends. The tiny corners do not look great, to put it mildly. I think they have a place, but overall, longer and more curvy river sections should look better on the table, and I will not be making any more tiny bends.
Overall, this worked well though, and I learned a lot. Another sheet's worth of work and I should have a very passable, lengthy, and most importantly bendy river for the table!

Thursday, January 7, 2021

Hobby Update: Miscellaneous Terrain

In 2020, I wanted to beef up my available terrain in general; for KoW and potential things like Fistful of Lead or Grimdark Future. Prior to the pandemic breaking out, I made a few materials purchases, including "Granny Grating", toy pipes, chipboard, a few more bits from the Garden of Morr set via bits shops (finally picked up the statue).

Over the summer, my hobby space shrank more and more as working from home became permanent, but I did manage to get a bunch of terrain pieces done. The most complex piece was the river, and I'll have a separate, more detailed post for that coming up. With any luck, these will actually see the table in 2021! Apologies in advance for the pictures... all of the terrain is in storage right now, and I'm using what pictures I took at the time.

I always liked this statue. Glad I was lucky enough to snag one on its own. 

I had previously lucked out, and picked up a few tombs from online bits stores. This time, I was able to snag some fencing, and the great statue. Frustratingly, the statue doesn't have a flat base, instead having an odd V-base, meant to lock into the specific base from the kit. For a ruined setting though, that works fine! I stuck it on a lipped round base, and the statue leans forward slightly, and the terrain paste covers it up. Some brown paint and a little acrylic gloss makes it all look like the statue is teetering a bit in the mud and muck. Hard to see from the pic here though, so I'll try to point it out in a future battle report.

The fencing is frustrating delicate; the bends to the points all happened accidentally. Though, like the V-base of the statue, this can be an advantage, selling the ruined look. I snipped some of the metal fencing down too, and the result should be a nice, meandering ruined cemetery wall. 

Some potential points of interest for games. Plus some barriers.

In my bits purchase, I also managed to score a steepled tomb from the Garden. I had a previous, still unpainted, one as well, so I painted both up over the summer. The red/blue rooves look a little silly color-wise, but I rather like them. I think they would make great objectives for a skirmish game, or opposing ends of a huge cemetery zone.

The obelisk is from Reaper, and made an appearance back in 2018. Here, I managed to paint it up, and add a nice little glossy effect to it, like it is all damp and stuff. Damp is good for a Cthulhu obelisk, and this will make a nice objective or something.

Lastly in this pic, are some bits I picked up on their own, from the old Chaos Warshrine. I picked up the sides of the shrine years ago, and they've just been sitting around. The actual sides bits (the bit with the little demony face) may get turned into ramparts or fences at some point too, but for now, just the ornamental lattice is being drafted for terrain. A little green stuff was needed to get them more secured to the base, and then a basing paste was used to disguise it all. These make me think of the little energy shields from Halo? These don't seem to really offer much cover, but have a nice feel to them. 

Quick overhead shot of the river. More to come on that later... 

The statues are from a 3D printed graveyard kit I purchased back in 2018, and hobbied on that same year. I did up the tomb and tombstones then, but never got around to the statues. I did them up with the Garden of Morr statue, and this picture shows off the muddy effect a little better. The 3D prints are fine, but can look bad if you get into detailed painting, as the printer results in all the little layers and such. To compensate, I did some very messy painting and more of an "overbrush" for the lighter gray areas than a highlight or drybrush.

Roman barricades, and more statues.

I have picked up a lot of boxes of Warlord Romans over the last few years. One of the Legionary boxes comes with a bonus plastic scorpion, and related siege-y bits, one of those bits being a sudis fence. It looks like I've picked up at least 5 of these boxes to-date, as I found 5 of the fence pieces, and did up a pair of fence terrain pieces, which should look nice matching with my Kingdoms of Men.

Onto the industrial bits!

About midsummer, I started playing around more with industrial terrain, for Grimdark Future, or Fistful of Lead, with the hope that I'd get some kind of tabletop game in this year.

On the left is an oddly long can, turned into a kind of fuel tank with the help of some cereal box to cover the ends and some bendy straws. I think it needs some little warning/flamable signs or something to finish it off, but was my first attempt at an "industrial" piece, so it turned out well.

The pipes are kids "learning" toys, linked earlier. A simple hobby saw can cut through them, and I messed around with an angled cut and a rusted pipe for some light cover, and a more upright piping system spewing green gunk made of hot glue. Both worked out ok, and were good tests. I used up like, 3 of 64 pieces, so more piping terrain will be coming eventually. I think they'll look better incorporated into structures, or as kind of longer "pipe fences." We'll see...

The structure in the back was a cylinder of mixed nuts. If you remove the labeling, there is a kind of cardboard underneath. Adding some plasticard strips, and a Mantic up top, and it makes for a pretty convincing little supply depot. This was mainly a test for glues and paints, and turned out pretty good, considering I just snagged it from my recycling bin on a whim.

The mixed nuts cylinder turned out nice enough, and was a popular snack in the apartment, so I kept experimenting. Late in the summer, I was really deep into the youtube channel Wyloch's Armory. I liked his general approach to hobbying, and just found his videos quite informative. I bookmarked a lot for future use... Getting more into industrial terrain, I was really surprised with his modular terrain, and decided to try it out. Instead of soup cans, I decided to test out a big coffee tin, and that worked out well enough I decided to use up more of the squat mixed nuts things.

Not too bad.....

Mine are unlikely to be modular though. I don't know what it is, but my precision is just not there. While most of these have the 3-layers and space for tabs... my sections are all messy. Perhaps a small ground walkway, like tossing down plywood on a small construction site could be possible, but I'm certainly not going to be able to rock anything as good as Wyloch anytime soon!

Weird, DIY paper mâché.

The last things I played around with were some "bunkers" of sorts, using mushroom containers, which had the right approximate dimensions to seemingly protect a few minis. I snipped the lip of the container off as it looks weird to include it. By itself, the plastic is pretty thin and wobbly, so I tried to reinforce the interior with some PVA glue and a bunch of shredded paper towel, in a kind of odd paper mâché. I can't stand on it or anything crazy, but it can easily support some minis on top, and it doesn't bow or flex as much when handling the terrain piece, so I'm counting this experimentation as a win.


I scuffed up the exterior with some very coarse sandpaper as an easy weathering effect and to give the primer and paint something to adhere to. A juice cap and granny grating was added to make the tops more interesting, and some basic grey and metallic paints were applied. This turned out great for what is arguably "trash!"

The terrain making was a fun endeavor, though these kinds of pieces tends to take up a lot of space. I basically doubled the terrain storage space I needed over the summer! Still, it will be nice to have more fences and the ability to put more (and different) things on the table when gaming does eventually resume.

Monday, September 9, 2019

Hobby Update: 3D Printed Terrain

This past year I've tried to build up a wargaming table. I've had pretty decent success, even if it hasn't been used as much as I would like...

Back in November I started off on this terrain endeavor with some spooky terrain. In addition to some train trees and some actual models, I also tried out some 3D printed things, and was pretty pleased. I've since acquired a few more bundles, mostly as gifts, and have dutifully painted them up months ago.


The tall pieces in the back right are cool, but you only get two pieces in that bundle. Still, not bad!
I received two sets of ruined walls. They are a bit high for fences, but make good little bits of Blocking Terrain for sure. These were washed, dried, then primed black and then painted up in good stone-like grey tones. I'll be polling any opponents to see how they like the windows. I considered adding wood planks to really block line of sight too, but laziness won out. We'll see who folks want to play them, and they may be added to down the road.


Vampire for scale? Yeah, a few of these would break up a field nicely...
Additionally, I picked up some craters, which I thought might be some good height zero difficult terrain. I had considered kit bashing some spiky pit traps, but these were easier to just paint up. I have yet to test them out in game, but they are decently sized. I figure a few would add something interesting to the board, I doubt I'll ever run the full lot...

Overall, I've been very pleased with the 3D terrain. If you're cool and have a printer or know someone... you could probably crank these out for pennies. Still, going the more expensive route via Amazon wasn't bad. No bundle was more than $20, even the Graveyard, so this wasn't that expensive. I think trees and hills are better run with other materials, (and a how-to will be coming soon on hills) but for some small buildings and the like, 3D isn't bad at all, and a pretty easy way to populate a gaming table with passable (and durable!) terrain. 

Monday, December 3, 2018

Hobby Update: Tower Terrain

At the request of his wife, a friend was cleaning out some nerdy things a month or so ago, and I snatched up a wood tower. Not sure what it's original use was intended to be, but I figured it'd go good on a gaming table all painted up!

This is my first shot for the blog with my old camera. Not sure if the quality is actually an improvement on my phone. We'll see over the next few posts I guess. Anyways, tower! Guy on a 20mm Mantic base for scale.
This is "done," though as with much of my hobbying, I may touch up some parts later. (Some climbing vines would be a cool touch, though I don't know how I'd hobby that up yet. Also, there is a doorway, and I may add a door for kicks, since the open space looks weird.)

With the tower ready, my table terrain project is going good. I still need some hills, but I have a trio of buildings, a bunch of trees and some rough-terrain graveyards to make any potential home games more tactically interesting.

I also have a table ready for nerding and gaming! I picked up two folding tables last week, and my rolling battle mat arrived over the weekend. I'll try and get some use out of all these soon...

Monday, November 12, 2018

Hobby Update: Spooky Terrain

The new apartment is more spacious that my previous place, and I want to utilize that space and host some nerdy activities: MTG nights, D&D sessions… and hopefully even some wargaming! I’m hoping that having a table around and being able to play whenever will let me actually get some games in. I haven’t bought legit tables, or settled on how to do the board up yet, but I have hobbied up some terrain...

Trees! Skeleton for scale.
First up are some trees. Gotta have trees on a fantasy gaming table! I found some trees for train hobbying for cheap online (~$10) and placed an order. The scale ended up being a bit off, but it came with enough big pieces to be still worthwhile. These are the bigger ones... Attaching them to bases is proving a bit difficult. I'm also considering buying some metal washers to help weigh them down. And maybe some kind of thin adhesive spray to keep the foliage on better... Alright, so these aren't done. It's a start though.

For the remaining saplings, I’m thinking of essentially “unit filler” for forests: multibasing the smaller trees to "fill out" the forests without being too unwieldy on the table or truly obscuring line of sight for gamers. More to come on the trees…


I also wanted some buildings. The Garden of Morr always looked pretty neat to me, and I was fortunate enough to see the buildings on a bits site for a few bucks each, and picked them up. I also found this neat 3D printed graveyard scene and decided to bite there too. So far, I have two of four possible buildings/tombs painted up. More to come here too, but this will work for a smaller table.

Graveyards, for difficult terrain.
Lastly, I figured some “difficult” terrain would be easy enough to build, by utilizing all the gravestones. I bought a bunch of the GW tray making kits back in the day, and cut into started cannibalizing them to serve as bases for the terrain. I added some milliput to give a more rolling terrain appearance; added the gravestones; then Vallejo Paste. I painted it all up, and then added some of the Army painter ballast (to give a “fresh grave” look in a few spots. The final touch was some yellow foliage scraps to be either some kind of lichen or maybe nice fall leaves? Works well enough.

For terrain staples, I'm still lacking hills and fences, but there are a lot of diy guides out there for both. Will get to those eventually. It's not a bad start to a gaming table!