Intro and Lists
After a handful of missed connections, Trevor from the illustrious Data and Dice and I finally managed to meet up for another game. He wanted to test out the Sylvan Kin with the new Clash 2025 changes, and ran the following:

As-ever, the Kin are a frightening army for me to face. Aside from being very competently commanded, they are generally doing a little bit of everything and hard to predict or contain. Unfortunately for me, they have the stats to do well at all the different things they are trying to do! Facing off against me is a powerful scouting Wiltfather, three strong shooting heroes, two scouting Gladestalker Regiments, a troop and a regiment of Silverbreeze Cavalry, a pathfinding regiment of Stormwind Cavalry, three troops of Wild Gur Panthers to interdict, scouting regiments of Hunters and Forest Shamblers to gain early ground, and lastly a horde of Forest Guard to hold the line. As-ever, Trevor is running a competent and balanced list, looking to leverage shooting to maim threats first and speed to then charge them before the lines can really close.

- Skeletons with two-handers. As mentioned in their Hobby Update, these units are inspired by Trevor and his own Penitent-spam! I think the Undead version (Fearless, +1 Nerve, LL1) is worth the 10 points to remove the possibility of wavering them, but as I discovered last time, they can still be a bit rough to maneuver. These aren’t on Data and Dice’s list, but felt like a great inclusion here.
- Zombies. I didn’t have the points for a third smashy Skeleton unit, so we have a lowly regiment of Zombies instead for their unlock. We’ll see if there’s a token to carry or an objective for them to hold.
- Skeleton Spearmen Horde. I like Spear Hordes, but this one doesn’t have the output of my usual Tribal Spears, or even Spears from the Kingdoms of Men. Hitting on a 5+ to start from is rough! They are on the data list because hold well for their points, so we’ll try to protect them a bit and see what all they can hold up.
- Mummies. I’ve been bringing A lists with Revenant Cavalry and B lists with Mummy troops recently the last few time's I've tried the Undead, but not getting to play the B lists. Since both unit sizes appear on the list from Data and Dice, we’ll finally get to try the troops out, and then compare them to the regiment.
- Zombie Trolls. They are on the list, but I’ve used them (I think) once before, but poorly. Death has stripped them of their Regeneration, but Fearless and Def5 should hopefully help me anchor my lines for a few turns, and with CS2, they might even be able to grind out some damage too.
- Liche King with Celestial Restoration. A pet unit of mine that I’ve been trying across the Undead and Herd to supplement smashy Titans. With a number of Hordes here, I should have some good targets, and we’ll see how it does this game.
- Undead ASBs. I still like them, and I still want mine to be carrying items whenever possible, and I think that the Tome (Surge5) and Shroud (Heal 3) are decent items to default to. I haven’t been doing much with Surge moves, so this looks like my only Surge caster this time. We’ll see how that works for me, and how much Heal can contribute as well.
- Vampire on Undead Pegasus. I like my KoM Generals on Winged Beasts… but these cost more and somehow hit softer. These are definitely not on the list, but do seem like I unit I would run. I don’t think I can rely on these as actual hammers, but we’ll see what else we might be able to do with them. Just threatening blocking charges while I advance seems like it might be an ok use, so we’ll try to give that a try.
- Revenant Wyrms. They are also on the list from Data and Dice, so they’re back in my list again. Their output isn’t always great, but they’ve proven very useful in all my Undead games so far. We’ll see if the other units highlighted by the analytics are as impactful as this one has been.
- Command Orders. I like both of the ones for the Undead, but this will only be my second outing with the new optional rule. We’ll see how the Orders to this game.
- Command Dice. My first foray with the Orders and the dice was a little underwhelming, as I didn’t generate enough Swords to do much of anything, though it appears one should get about 4 successes per turn with just the base 3-dice, and I was just really unlucky. We’ll see if my luck is better this game, or if one really does need to buy extra dice to make this optional rule work.
- Lifeleech. I’ve been doing good at remembering this for the Undead. We’ll keep at it and see if that trend continues!
Trevor was kind enough to host us, and we were using his table and terrain. We were using our typical terrain rules, running the building and bones as Height 9 blocking terrain, the forests as Height 6 Difficult Terrain, stone fences as Height 2 Obstacles, and Hills as Height 3, and the ponds and field as Height 0.
We wanted to try out a new scenario, and settled on Compass Points. There are objective tokens on the table's main axes. The wording was less precise than we'd come to expect from Mantic. We read it is the side objectives are worth 1 point each, your "home" objective was worth 2, and your "away" objective worth 3.
My opponent won the roll-off for sides. I felt like the forest with the token would be a nightmare to dislodge Gladestalkers from, so I was very happy to get this side. I figured the Gladestalkers would end up in the opposing woods, and tried to plan around that, and I wanted the flying Vampires or Revenant Wyrms as my last drops. I had the slimmest of drop advantages, made ever-so-slightly better with my opponent deploying first.
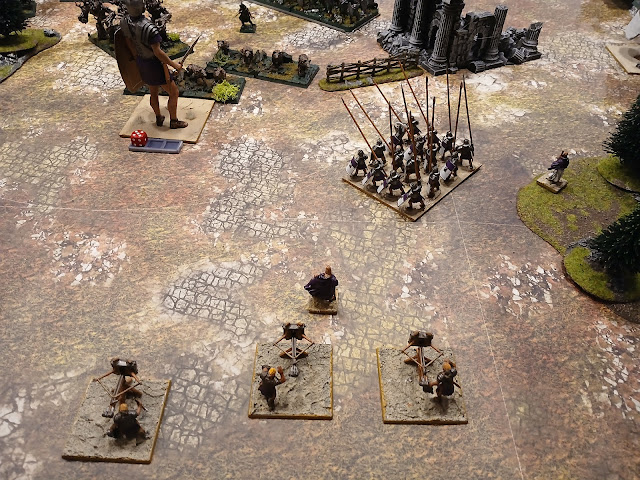
 |
| The table, and deployment. |
Left-to-right the Sylvan Kin had isolated Wild Gur Panthers out to harass the left token. A building and a forest gave both Gladestalker and the King a nice and protected nook. The Forest Guard were just outside the woods with Wild Gur Panthers and the Archmage in reserve. Hunters of the Wild, the Master Hunter, and the Forest Shamblers all hid behind the hill, ready to make use of Scout. The Wiltfather lurked nearby, with the Silverbreeze regiment behind, partially in the field. The Silverbreeze troop screened for the third Panther unit, and the nimble, pathfinding Stormwind Cavalry took the far flank.
 |
| View from the left. |
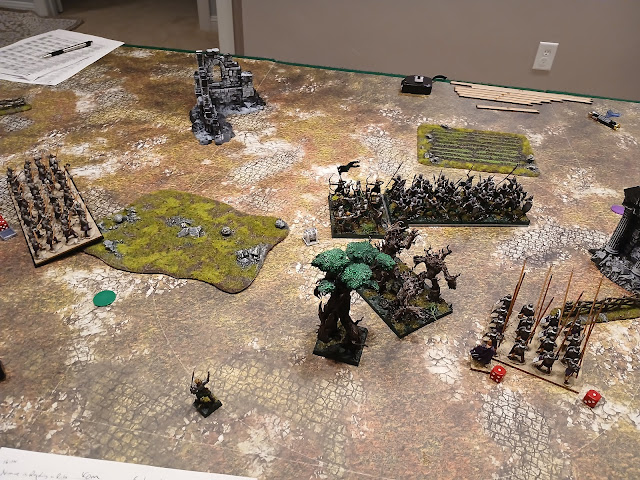
Left-to-right I have Zombies, Skeleton Warriors and the Surging ASB to fight for the left objective. A flying Vampire came down very late nearby, to either boop the Panthers to help win the objective, or help pressure the center.
 |
| View form the center left. |
I figured the Gladestalkers would take to the woods more than the field, and preserved my Wyrms until I knew that was the case. Both Wyrms ended up behind the pond. Celestial Restoration needs to target stuff more than 12 inches away, so the Liche ended up way in the back in case early shooting was hot.
 |
| View from the center-right. |
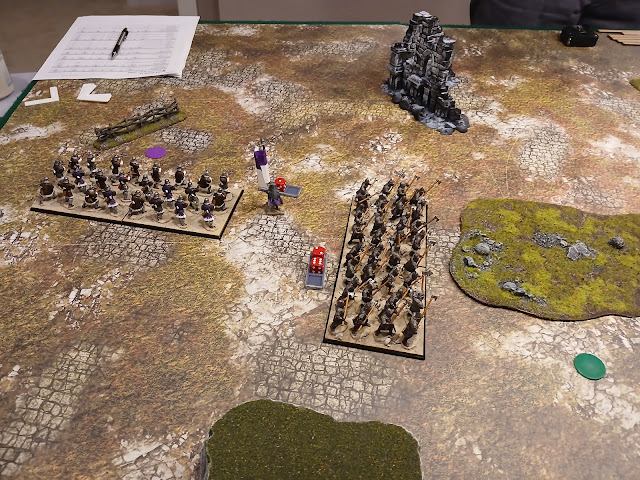
The center was going to be important, but I am befuddled as to how to deploy the Undead. The battle line continues with Skeletons to help support the Wyrms, Zombie Trolls to anchor, and the second flying Vampire to help interdict and dissuade the Kin from moving up too far too early. The Skeleton Spearmen ended up in the woods, as I figured it would be defensible. The second horde of Zombie Trolls ended up on the far flank with the Healing ASBm as I think I need to push (surge) on the left and hold (heal) on the right. I have no idea what to do with the Mummies. The blue troops were drops in the middle, and I just tried to “bricklayer” they so they could see around the units in front of them. The red regiment was a later drop. The Skeletons are my chaff, and I figured they’ve be moving up quickly to make blocking charges, and a regiment behind them and the Zombie Trolls to help reinforce and plug gaps in the line might be useful.
 |
| View on the right. |
I’m the shambling Undead, and need to play more compactly and reservedly. My overall plan is to ignore the objective on the right, claim the left one with Zombies or Skeletons, hold my home objective, and assault the away objective.
 |
| Scout moves. |
My opponent scouted up reservedly with everything, and then I won the roll for turn order. It’s just bow shots, but there are a lot of quality shots against me, so I opted to go first.
Top of Round 1: Undead
I roll up 2 swords for my Command Dice. We're off to another bum start, and I don’t need rerolls, so don’t do anything with them.
On the left, I am looking to zone out and control this objective. The Zombies and Skeleton Warriors shamble up, along with the ASB. The Gur Panthers should have a charge into either of them, but that’s fine. The Panthers can get around me, so as long as I am wary of the table edge, this push should work. I opt not to Surge anything, but probably could have safely surged the Skeletons up.
 |
| Moves on the left. The Wyrms have good charges next turn. |
The flying Vampire moves up, but hangs back. The Panthers have the inches, but cannot fit in against him.
The pair of Wyrms happily wade through the pond, and should have charges into both of the Gladestalkers next turn. With Gladestalkers on the left and Silverbreeze on the right, if I can quickly deal with some of the Kin shooting, I should be in a better position as the game progresses.
 |
| Moves in the center. |
I don’t know what I am doing in the center, and wasn’t feeling great about my deployment, so I am kind of winging it. On my center-left, the Skeleton Warriors, Zombie Trolls, and Mummy regiment move up an even 5”. The loose plan is to trade what I can and hopefully the Mummies can grind and survive in the late game, battling for the away objective.
The Liche lazily moves towards the right. With the Sylvan Kin largely ignoring the left, I just need to get a little to the right in order to have range for all the important areas.
 |
| Moves on the right. The Zombie trolls are exposed, but safe from flanking charges right now. |
I want the center-right to hold my home objective, but Shambling is tough. The Mummy troop hop the line, but that means the flaying Vampire and Skeleton Spearmen need to hold. The other Mummy Troop was also deployed back, and pivots and moves up, looking to support the Zombie Trolls out on my right. The ASB with heal tucks in out here.
Bottom of Round 1: Sylvan Kin
My opponent rolls up 3 for his Command Dice, and I think uses them on a variety of rerolls.
On the right, the Silverbreeze regiment swings wide, ending up by the objective token. Gur Panthers move up, screening the Silverbreeze troop. Both will shoot into the horde of Trolls, landing 1 damage. Everything stays just over 12 inches away from the trolls.
 |
| Shooting on the right. |
The Wiltfather moves up slightly, staying out of charge range, and the pathfinding Stormwind Cavalry hang back.
The Forest Shamblers take the hill, along with the Master Hunter and the Hunters of the Wild.
 |
| Shooting from the Kin. |
Shooting from the Gladestalkers will go very well, landing 13 damage onto some Skeletons. The unit is probably done for (and will be at the end of the phase), so the Master Hunter, King, and Archmage will fire into the Zombie Trolls, landing a surprising 7. With good Ranged stats plus Elite, the Kin can definitely deliver at range. With Piercing on the Lightning Bolt and shots from the Master Hunter, who has a lot of rerolls, so it’s some a great rolling out here as well.
The Forest Guard lurk, and the Gur Panthers hop up to prevent a multi-charge into one unit of Gladestalkers, who hold, shoot, and land 8 damage into the Skeleton Warriors. The other unit backs up, preventing a multi-charge into them as well, and will shoot with a penalty into the Skeletons as well, landing 5 damage. It’s hot rolling, and the Skeletons crumble.
 |
| Sneaky Gur Panthers. |
On the right, the Gur Panthers sidestep to hit the table edge, looking to zip up and around my line.
Top of Round 2: Undead
I roll up a fortuitous 5 swords on my Command Dice.
I pivot and then move the Zombies up, blocking the path of those Gur Panthers. The ASB will sidestep towards the Wyrms, but will surge the Zombies forward a few more inches to clearly deny that table edge path for the Panthers.
The Skeletons move up, and pivot slightly, to keep the Gur Panthers in the front arc. I’m feeling good about this token.
 |
| Movement, plus lots of solo charges over on the left. |
Due to backing up, the Gladestalkers are just out of charge range, and I needed to get the ASB over for the Wild charge. My opponent did a good job at preventing multi-charges. I don’t like making solo-charges, but feel it’s worth it here.
One Wyrm makes a Striding into the furthest Gladestalkers, the flying Vampire makes a hindered charge into the other unit of shooters, and the other Wyrm charges the Gur Panthers. I chose this because this puts the move vulnerable Vampire in between the titans, and he should survive and Inspire them to get me the best chances of holding.
| Close-up of the charges. |
I use 4 swords to cast a Drain Life into the Gladestalkers fighting the Wyrm. I think any unit can cast this, but just in case, the flying Vampire is the one to cast it. The spell does 3 damage, nothing needs healing here, but this does help tip the combat math in my favor. I should use the last sword on a reroll, but forget about it.
The Wyrm fighting the Gladestalkers flubs and does just 4, but at 7, I am able to get a lucky waver.
The flying Vampire lands 2 to disorder his unit.
The Wyrm fighting the Panthers decides to spike the dice and lands 10 against them, breaking them easily. I was hoping the Wyrms would perform opposite of how they did, as the units are tight here and wavering Panthers would prevent the Palace Guard from charging next turn.. Oh well. If I overrun more than 1 inch, that should put the Forest Guard into the titan’s flank, so it just pivots to face them.
 |
| Reform for the Wyrm. We'll see if he survives! |
The Mummy Regiment gets most of their Shambling move up, but is slightly blocked by the Zombie Trolls, who are moving up to support the Wyrms, as is the other flying Vampire.
The Liche lands a Celestial Restoration onto the Zombie Trolls, healing for 5, and bringing them from 7 down to just 2 damage.
 |
| The Undead center pushes out. |
My original plan was to camp the home objective, but I feel like I need to commit more to the upcoming fights. The Mummy Troop moves up, as does the Spear Horde. I believe the Mummies and the Zombie Trolls are just out of charge range of the Hunters of the Wild.
 |
| Good healing from the Undead. |
On the right, the other Mummy Troop moves up, looking to support anything that goes into the Zombie Trolls. The Wiltfather was wary of the Trolls, and my goal is to delay here, so the Trolls sidestep onto the obstacles. They don’t get close to the Wiltfather, so we’re safe from him next turn. The ASB with Heal lands 2 to remove the 1 damage from the Zombie Trolls out here.
Bottom of Round 2: Sylvan Kin
My opponent rolls up 4 swords for his Command Dice. A unit can only benefit from one Command Order per turn, and we adhere to that, but I can’t track what gets what for Orders. Suffice it to say, he spends it all on rerolls this turn.
On the right, Gur Panthers run up to block up the Zombie Trolls.
 |
| Lots of blocking units from the Sylvan Kin. |
The Silverbreeze troop dances around, with the nimble Stormwind Cavalry unit moving up and pivoting to see down the battlefield. They will shoot into the Mummies supporting the Zombie Trolls, but the armor of the Mummies proves too much, and only 2 damage slips in.
The Wiltfather moves up to now threaten the Zombie Trolls, and the Forest Shambler regiment leaves the hill in order to block for him.
The Silverbreeze regiment bides their time, and sidesteps onto the hill. I make a bit of a goof here, thinking the Stormwind cav are on the hill, and both shooters are out on the right-flank.
The Hunters of the Wild inch up, and should have charges next turn.
 |
| Shooting from the Sylvan Kin this turn. |
The Master Hunter, King and Archmage shoot into the Zombie Trolls again, and again roll well to bring the unit from 2 up to 9 damage, but it’s a Fearless, Inspired horde, and the unit doesn’t budge.
With a clear route to the Wyrm, the Forest Guard don’t even need Pathfinder. Elite pays dividends, and they hit 22 times, resulting in 12 damage. Two about-average checks are all it takes, and my first Titan is bested. My opponent feels like they need to face-forward. Doing so gets the Zombie Trolls well into front arc, but should deny the Mummy regiment the inches to join in.
The unfazed Gladestalkers fight the flying Vampire, with the King joining in. Together, they land 4 damage and ground him.
The wavered Gladestalkers fighting the Wyrm do nothing.
 |
| The Gur Panthers decide to depart. |
On the left, the Gur Panthers will pivot and nimble run away, giving up on the left token.
Top of Round 3: Undead
I roll up another fortuitous 5 swords on my Command Dice.
On the left, the zombies move and pivot to zone out the space between the building and the table edge. I don’t want the Gur Panthers coming back. It’s Round 3, and they’ll be able to move and pivot to control the token any point going forward.
 |
| Movement on the left. |
The Skeleton Warriors move up to secure the token for now, and will be around to contribute in the fights if needed. The ASB runs up behind them. I think I surge the Skeletons forward for a mighty 1 inch.
 |
| Lots of charges this turn. |
The Revenant Wyrm is untouched since it wavered its Gladestalker unit, and it uses 4 swords from the Command Dice to cast Drain Life into the Gladestalkers fighting the flying Vampire. The spells lands 3 damage, and heals the Vampire up nicely.
The Wyrm thumps 4 damage onto the Gladestalkers, to bring them to 11 damage. He’s done about half the damage he should have, but it’s still enough to rout the archers on the second attempt. The titan will back up, keeping the Panthers in front arc, and keeping an eye on the other Gladestalker unit.
 |
| Aftermath of the combats. |
The flying Vampire lands 4 damage onto his Gladestalker unit. With the Drain Life landing 3, the unit is taken to 9 damage, and I get a lucky rout against them. The Vampire turns to face the King. Between Drain Life and Lifeleech, he’s back to full. He’s mostly around to Inspire, so I don’t mind spending another turn here fighting.
The Mummy regiment impotently moves up towards the fights, as it cannot charge this turn.
The Zombie Trolls charge the Forest Guard, and deal 6 damage. Celestial Restoration hits again, healing 4 to take them from 9 down to 5, and Lifeleech 1 gets them down to 4.
In the center, the other flying Vampire and a Mummy Troop charge the Hunters of the Wild, and do a combined 5 damage. I spike the Nerve check a bit, and get a lucky waver against them.
The Spearmen make a hindered charge into the Forest Shamblers. I need 6’s to hit, 5’s to wound, and I am not going to move them. Thinking its the Stormwind Cavalry on the hill, with my spears pointed at them, I was fine with a blocking charge. I retrospect, just moving them up would probably have been a better call. Yes, the Shamblers could be surged into something, but it’s probably better to get the Wiltfather into the fight, so I think not charging would have been the wiser move.
 |
| Charges on the left. |
The Mummies and Zombie Trolls multi-charge the Gur Panthers, with my Zombies hindered. They each deal 4 damage, we take the unit to 8, and do get the rout.
The Zombie Trolls back up, and the Mummies I think hold, with everything in their front arc. Between Heal, Lifeleech, and Regen (I don't remember what actually contributed), the Mummies heal up their 2 damage, and end the turn healthy.
Bottom of Round 3: Sylvan Kin
My opponent rolls up 4 Command Dice, and spends it all on various rerolls again.
On the right, the Wiltfather makes a striding charge into the Zombie Trolls, ending atop the obstacle but not caring. We move his off-center for ease of play. Cloak of Death triggers, and the tree is able to land another 6 damage on the Trolls to bring them up to 7, but they hold.
 |
| Charges on the right. |
My mix-up between the Stormwind and Silverbreeze regiments is now realized as the Stormwind Cavalry make a devastating flank charge into my Spearmen. They deal 21 damage with the Shamblers contributing 3, and the unit is picked up.
The Silverbreeze troop shoots into the unengaged Mummy troop, but isn’t able to land any damage. They will take 1 from Cloak of Death though.
The Archmage throws a Lighting Bolt into the Liche, but only 1 damage makes it through, and the Undead Spellcaster shakes it off. He lost Regeneration in a previous Clash update, but with Inspiring, Def5 and -14, he’s still pretty resolute.
On the hill, the Master Hunter and the Silverbreeze regiment charge the Mummy troop, dealing 2 and 4 damage respectively. At 6 damage and Inspired, the Mummies hold. The wavered Hunters of the Wild do nothing, not wanting to give the flying Vampire free rein. Given we are fighting so near the edge of the hill, we elected to leave units off of it, rather that mess with stars for everything.
 |
| Combats for the Kin. I've popped a head and cape off of the Mummies, but they are at full health. |
The Forest Guard countercharge the Zombie Trolls, with the King disengaging from the other flying Vampire to join in. The hits from the Guard are amazing again, but without Thunderous charge, the damage is lessened. They do 6, the King does 1, and at 12 damage, my opponent needs a 5 to rout. He gets it the first time, but rolls up a 4 on the Inspired reroll, and the Zombie Trolls continue to stick around.
The Gur Panthers rear-charge the other flying Vampire, and viciously land 4 damage against him.
Top of Round 4: Undead
I Roll up 3 command Dice.
With the Gur Panthers committed, and now dealt with, the Zombies move up to secure the objective. They will spend the rest of the game here.
The Wyrm will flank the Gur Panthers and trounce them. It will then reform by pivoting 90 degrees to face the rest of the Sylvan Kin army.
 |
| Positioning on the left. |
The flying Vampire doesn’t need to withdraw from the Panthers to charge the Forest Guard, but will be hindered. He gets into their flank dealing … 2 damage. (5.8 expected, but c’mon, man.)
The Skeleton Warriors are able to get in and deal two damage as well, and the Zombie Trolls countercharge, making up for the Vampire and dealing 9 damage. The Forest Guard horde is on 20 damage, but I roll a 3, and they are just wavered, tying up three of my units. Still, the Vampire will Lifeleech 2 from 4 down to 2, and the Zombie Trolls will Lifeleech 1 from 12 down to 11.
 |
| Combats, with the Mummy Regiment eyeing the Archmage. |
The Mummy regiment can’t contribute with a legitimate charge, but pivots and moves close to the Archmage. I need 2 success with Surge on 5 dice, and the ASB obliges with 3. The Teutonic Mummies land 5 damage. The Archmage isn’t actually Inspiring, so one good Nerve check takes him off the field. The Mummies overrun, but only 1 inch.
The Hunters of the Wild are only on 5 damage, but I opt to send the flying Vampire in again. On 3’s and 3’s he lands just 2 damage, taking them to 7, and the Nerve check is low enough for them not to care this time. This is a bummer, but par for the course for the Vampire’s damage output. This does protect the Mummies from a flank charge off the hill however, so isn’t terrible for me.
After some hemming and hawing, I sent the Mummy Troop into the Stormwind Cavalry to disorder them. I land a surprising 5 damage, but the cavalry are fine. Regeneration doesn’t hit, but I Lifeleech from 2 down to 1 damage.
 |
| Good healing for the Undead again. |
I may have spent 1 sword on a reroll, or I may have forgotten about it. I do spend 2 on Endurance to heal up the Zombie Trolls fighting the Wiltfather, from 7 down to 6. I point Celestial Restoration at them as well, healing up the remaining 6. Topped off, the Healing ASB can’t heal them anymore, and can’t see past them to help the Mummies, but this is still great. I cannot complain in the slightest. They thump 2 damage into the Wiltfather, but again I am just trying to delay, and this is all going great.
Bottom of Round 4: Sylvan Kin
My opponent rolls up 4 for his Command Dice. I think everything is spent on assorted rerolls again.
 |
| Charges on the right, plus Cloak of Death. |
The Wiltfather counter-charges the fully-healed Zombie Trolls. Cloak of Death Triggers, he lands 6 and the flankin-but-hindered Forest Shamblers deal 3 to take the unit to 10 damage. It’s 7’s to rout the Fearless and Inspired unit, and he does it! I believe the Wiltfather will pivot fully towards the center, and Forest Shamblers will spin completely about.
 |
| Reforms, though I think the Wiltfather was pivoting even more. Silly fence. |
The Stormwind Cavalry will countercharge the Mummy troop, landing 3. Cloak of Death hits the unit, and the Silverbreeze troop flanks, but contributes only 1. The Mummies are Inspired, and do hold.
 |
| Fighting in the center. |
The Silverbreeze regiment charge the Mummy regiment, but only land 2. The high Defense of the Mummies has been working out nicely for me.
The now-unbothered Hunters of the Wild will countercharge the flying Vampire, with the Master Hunter joining in. The Vampire is taken up to 5 damage, but holds.
 |
| The second Zombie Troll horde falls. |
The King is able to poke the Zombie Trolls a bit, and is able to rout them too, and my opponent rejoices in removing both of these hordes.
The Forest Guard are wavered, and engaged on multiple facings, and do nothing.
Top of Round 5: Undead
I roll up 3 for my command dice. I believe I used Endurance on the remaining Mummy Troop, and when Regeneration doesn’t remove the last pip, the ASB with Heal will top them off. The last sword may have been a reroll, or may have been unspent.
 |
| Movement on the left. |
The Zombies will hold, protecting the token.
The flying Vvampire in the flank of the Forest Guard is wasted here, and fresh, he flies out of the woods and into the flank of the Hunters of the Wild, with the other Vampire counter-charging. The smaller trees are on 7 damage, and I deal another 7 damage combined, taking them to 14 and getting the rout. The flanker sidesteps Lifeleeches from 2 down to 0, and the counter-charging Vampire pivots, and Lifeleeches from 5 down to 3 damage.
 |
| Aftermath in the center. |
The Wyrm will flank the Forest Guard, and then devastate and rout them, as is proper. I overrun, but only my soon-to-be-patented 1 inch.
The Skeleton Warriors will withdraw to get the inch, pivot, and then be surged into the King. I should still take a Withdraw penalty, and am fishing for 6’s, and will land no damage.
I don’t have notes on the Liche. I thought I healed something, but can’t figure out what. I think I wanted to heal up the injured Vampire, but I think Celestial Restoration finally fully
whiffed.
 |
| The Liche finally misses it seems. |
The Mummy regiment counter-charges the Silverbreeze regiment, landing 4, and getting a very lucky waver.
The Mummy troop continues against the Stormwind Cavalry, looking to keep them disordered. They land a measly 1 damage to bring the cavalry unit up to 6 damage, but I get a second lucky waver this turn against the Sylvan Kin.
Bottom of Round 5: Sylvan Kin
My opponent rolls up 4 for his Command Dice.
Three is spent on the flanking Silverbreeze troop, letting them tactically retreat after they disengage and withdraw from the Mummy Troop. They zip backwards, and move far enough to get them out of charge range of the flying Vampires. Well done! However, it looks like they do shoot at the ASB with Heal, landing 2 damage after he gets hit with a Cloak of Death. If they use this order, they cannot shoot. This doesn’t impact anything, but should be pointed out.
 |
| The Silverbreeze troop tactically withdraws. |
The King flees from the Skeleton Warriors, and both he and the Master Hunter decide to commit against the injured flying Vampire instead of trying to ground both. Even if they disorder the second one, he’s still got some good charge options. The injured Vampire is at 3, each hero deals 1 (oof) but on 5 damage, my opponent rolls well and still gets a waver.
The wavering Silverbreeze regiment withdraws, and then backs up, trying to draw the Mummies out and away from my home token.
 |
| More backing up from the Sylvan Kin. |
The wavering Stormwind Cavalry withdraw from the Mummy Troop as well, and then look to have pivoted to get the flying Vampires in front arc. They are wider than they are deep though, and look to have backed up a bit far.
 |
| End of Round 5 with all the shooting damage and combat reforms and such. |
The Wiltfather and Forest Shamblers rear-charge the pesky Mummy troop, and will devastate and rout them, as is proper.
Top of Round 6: Undead
I roll up 5 for my Command Dice. Unfortunately, the Skeletons need to pivot so won’t benefit from any of the moving Command Orders, so won’t be able to reach my home objective. Likewise, the Mummy regiment could sidestep, but even moving their speed with an Order, would still be several inches short of claiming the home objective for me
 |
| The Wyrm grabs a token, the Skeletons move, and things fight. |
The unimpeded flying Vampire has some options. I consider flying over to contest the right objective, but the Stormwind Cavalry are nimble, and could easily wrest the away from me if they aren’t dealt with. So the Vampire charges into the Stormwind Cavalry. We place him on the hill for gaming simplicity again. They are on 6 damage, and I spend 4 swords for Drain Life, which fizzles and contributes nothing. The Vampire rolls well though, brining them to 10 damage, and I get a good rout against them.
The wavering Vampire does nothing, but gets hit by Celestial Restoration for 4, bringing him from 5 damage down to just 1. I think the ASB points a Heal at him to get him down to 0.
The Mummies countercharge the Silverbreeze regiment, taking them from 4 to 9, but the shooty cavalry are found to be quite insane.
The Wyrm moves to claim the away objective.
 |
| Positioning around my home objective. |
The Skeleton Warriors moves towards the home objective, but claiming it even in a Round 7 is not currently feasible. The objective is just over 3” from the forest edge. Even in a Round 7, using fancy orders, I’m not going to be able to move at the double to get close enough, and I’d need a crazy Surge roll to get there in Round 7. But we make the effort anyway.
Bottom of Round 6: Sylvan Kin
The Silverbreeze troop holds, securing a token.
The Wiltfather goes into a flying vampire, and goes hard. Cloak of Death triggers, and he damages with 9 of his 10 attacks, and gets a waver.
 |
| Both flying Vampires are grounded. |
The King and Hunter again double-team the other flying Vampire, and take him to 5 damage. He'll be fine, bust still disordered this time.
 |
| The Liche takes some hits but holds strong. Still, he cannot contest this token. |
The insane Silverbreeze disengage, and then withdraw to create enough space to pivot. They then go to move into the woods and claim my home objective… but this initial plan is thwarted, as they do not have Pathfinder, and will run into the same complications as my Skeletons. Still, they can see the Liche, and will make a very penalized charge into the spellcaster. A stunning 3 damage makes it through, but the Liche will hold. Still, routing is not the goal, and the cavalry are brought close enough to overpower the spellcaster for the scenario and secure he objective.
At the end of Round 6, it’s a tie game, with the Undead holding the left token with the Zombies; the Sylvan Kin holding the right with the Silverbreeze Troop, and each of us holding our respective “away” tokens. But my opponent rolls up a Round 7 for us.
Top of Round 7: Undead
The Liche disentangles himself from the Silverbreeze unit, and while the Skeletons can’t move close enough to claim the token, they do have the chance to charge. No damage lands, but we’re each US2 here, and no one controls this objective now.
The Mummies are just in range to try and pick up the Forest Shamblers for fun. We charge in, but don’t do it. These -/14 chaff units are surprisingly sturdy.
 |
| Final charges from the Undead. |
Likewise, the Vampire charges the weaker Hunter, but doesn’t best him. The wavering Vampire fighting the Wiltfather cowers.
Bottom of Round 7: Sylvan Kin
The Wiltfather and Forest Shambler fights are inconsequential, and neither are rolled, even for bragging rights.
The Silverbreeze regiment counter-charges, landing 5 damage into the Skeleton Warriors, but they are Inspired, and hold firm, keeping this objective unclaimed.
 |
| The Skeletons hold strong. |
With that, the Undead hold our away objective for 3 and the left objective for 1, while the Sylvan Kin only hold the right objective for the 1 point. It’s a 4-1 victory for the Undead!
Game Conclusions
Trevor’s analytical skills win out! It was really neat to take his findings and try to put them into action for a game. He's only evaluating units, so there was a good chunk of the list (sources of Inspiring, etc) open for experimentation, and I think I filled those chunks in well, and came away with something worthwhile.
We're both getting better at scenario play, and for better of for worse had similar ideas on how to approach this. The Celestial Restoration really came through for me though, keeping the Zombie Trolls in the game for much longer than they should have been. The Undead proved to be a bit messy for me to position, but getting a Round 7 let me take the win. If you've read all they through though, you know that the game was far, far closer than the final score represents.
Testing Conclusions
- Skeletons with two-handers. As before, their performance was on a spectrum, and that still seems fine for a chaff-like unit. One unit ate some very hot early shots, and the other charged in to contest an objective token and secure the win for me. These seem like promising units for me.
- Zombies. We found an objective for them to grab! Pretty mundane, but this was a great use for a Zombie regiment, especially against an army with a lot of bow shooting.
- Skeleton Spearmen Horde. Misused since I misevaluated the units opposing me, and they got flanked by the heavy cavalry! A clear error there, but not a bad unit though. I want my spear hordes to be cordoning off sections of the board though, and think this is best run in multiples. I could probably learn a thing or two from our local Ratkin player! It’s not going to grind anything out, and needs some hammers to support it, but it is still a decent unit to hold ground and seems to be at a good price.
- Mummy Troops. It was nice to finally get the troops on the table, and to get the regiment out again. I kept them Inspired, and the troops performed very well, contributing some damage while shrugging off a lot of basic attacks. The Undead have a lot of options around the 115-120 point mark (Revenant Cavalry troops; Mummy Troops; Zombie Troll regiments; and even Wraith troops). All look to be good options with slight niches, and I look forward to playing around with these smaller units more!
- Mummy Regiment. The Troops rated high than the Regiment, and that seems fair. You only get a few attacks and a few Nerve for the increased cost, both of which is handy, but neither of which feels really impactful. Run what you want; both sizes seem good and useful, but the troops look to be a better buy with a higher skill ceiling.
- Zombie Trolls. We were both surprised at just how effective these were, but the elephant in the room is that Celestial Restoration propped the units up very effectively, and they got lucky on a few Nerve checks too. At under 200 points, these seem like good units to have and build around as they can hold well with Def5, and grind ok with CS2. Lacking Regen like the living trolls, then can definitely be ground down though.
- Liche King with Celestial Restoration. I think this is the first really great showing of Celestial Restoration.
- Undead ASBs. As-ever, these are nothing fancy, but seem to be good generic takes. If you aren’t running skeletons I think these are far less interesting. Maybe on a horse with Trickster’s Wand (Hex) could be a third option? I donno. As-is the duo and the items still feel good and useful.
- Vampire on Undead Pegasus. I debated a bit whether to put them out on the flanks or among my line, and the latter seemed like a much better choice here. They are expensive, but not powerful enough to be real hammers, and they are prone to wavering, like we saw here. Being closer to your own lines and just threatening to charge out to block up some things up proved to be a good use for them.
- Revenant Wyrms. The analytics say they should do well, and indeed the Wyrms had another pretty good showing.
- Command Orders. This is my second game with Command Orders, and they felt more impactful for me this game. I had better dice, and was able to get three turns with 4+ successes to play with using just the basic dice. The army-unique orders were fun with the Undead, and we got to see the movement Orders in action to help the Sylvan Kin stay in the game. It's neat, not too impactful, but I think the Orders add too much complexity to an otherwise easy to pick up game, and I worry about barriers to entry if this becomes the norm. Very few people like having to buy system-specific dice. The dice were originally from Vanguard, so part of me hopes that this is just Mantic experimenting and trying to clear out old inventory, and this won't be the direction of the game.
- Command Dice. The Command Dice were nicer to me this game. I still think you need to spend 20 points or so if you want to make the Orders a focal point of the list, but that doesn’t seem like too steep an investment.
- Lifeleech. Damage still accrues, and on its own it doesn’t do a lot, but the rule still pairs nicely with other sources healing. It’s still not a rule I particularly like, but I am getting much better at remembering it, at least with the Undead.
A big thank you to Trevor for printing out the Zombie Trolls for me, the army review which gave me the idea for this, for the game, and for hosting us.