Intro and ListsThe holiday season is upon us! We've received our first big snowfall of the year last week, which has stuck around long enough to make it a snowy, picturesque Christmas. The snowfall did mess with a quick wargaming get-together, but we were able to reschedule that to the following day, and I was able to throw down with Joe and his Dwarfs. Joe ran the following:
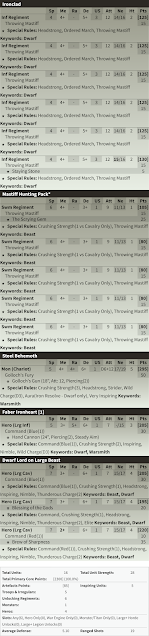
While he has quite liked all of his previous very high defense lists, he has been exploring "Ironclad Spam" more recently, running the cheaper Def5 infantry units, trying to clog up the board, and get CS from the Vengeance Command Order on the counter-charge. The bulk of the list is simple and straightforward, with Ironclad regiments and Mastiff regiments, all with Throwing Mastiffs. The rest of the army though is still Def6 nastiness, with Faber, the upgraded Steel Behemoth, and now three Lords on Large Beast, and most of those with items or upgrades. My notes say he purchased a red and a blue... but the copy of the list say a whopping 70 points was spend on Command Dice, with 2 Blues and 1 Red. Looking at the successes I tracked, I think he may have shortchanged himself on what he was rolling.
Joe provided the dwarf hammer and mallet bits for most of the newest skeleton regiments (hobby post here), and it seemed fitting to have their debut be against him. Up to test for me were:
- Skeleton Warriors with two-handers. Since I am running so many irregular units, these are actually serving as all of my unlocks! My little theory is that with so few Monster and War Machines, the Undead don't actually need the hordes one usually sees from them. Yes, you do get a discount for running a horde, but the idea is that these are similar to Brothermark Penitents, but with Fearless and better Nerve. They are not going to hold the line for long, but can stick around and cause problems, and my hope this game is that the flying units can really take advantage of anything held up to get in some Surging flank charges. We are putting these to the test and committing hard to taking 5 units, so we'll see how they do.
- Wraith Regiments. I think troops are probably better and more cost effective (you don't get much for the bump up to the regimental size) but as part of the idea behind the list, I really want to try out the “By the Master’s Will” Command Order to lose Shambling for a turn, and felt the Regiments would be a better test of that. The goal is to get at least one of these deployed out on a flank, and see what It can do as the game progresses.
- Wights. I have two similar hordes, and an initial horde from way back from 2nd Edition when these were pioneered as the flying, legendary Barrow Wights, a unique twist on the normal grounded Wights, who were previously just large, ogre-sized skeletons, similar to the Zombie Trolls nowadays. Given the modeling differences, I wanted to take an item, and haven’t played with the Boots in a while. We’ll see if they can secure a forest or something for me.
- Liche King. I liked the concept of a Celestial Restoration healer, but it was a lot of points tied up in a big, Inspiring caster with just one spell that was hard to use. I think Resto is going to be best on a cheaper Level 2 caster that you can just upgrade leave back. Here, I tried to take some advice and make the Liche more robust. I think there is a tension here in that if you overinvest into the Liche, just caving and taking Mhorgoth becomes more attractive. I think a normal Heal spell will be more effective, but points were slim, so we’re taking a baby step here, with Surge for the early game, and Drain Life to help in the late game once the Liche can get close. We'll see how this array of spells does.
- Undead ASBs and stuff. We’re taking the ASBs again, with items and some additional Red Command Dice. The aura doesn’t interact with as much in this list, but does work with the main warriors units, as well as the Flying Wyrm, so we’ll see if that feels like enough targets.
- Zuinok Iceblood. I think he has potential, and he could play nicely with the Skeleton Warriors, so we are continuing to try him out. We’ll see what he gets up to this game.
- Flying Revenant Wyrm. I like to explore things, and wanted to step away from the Undead Revenant Wyrms for a game. I like the flying tomb model I have going, and with so many other flying units, I figured this was the time to test it out again! This version does not have Strider, and has fewer attacks, so I think most of the game will be spent jockeying for positions and making threats until multiple Undead fliers can hit a units. The Trickster’s Wand could be a great take for this Height 6 Titan, but points were tight, so he got the last 5 Points with a Blade of Slashing... which I forgot about all game.
- Command Orders. I think the Undead have some neat Command Orders, but they are more situational, as Drain Life requires you to be very close, and Ignoring Shambling requires a lot of finesse to keep things Inspired, since it’s just one unit getting the buff. We’ll see how the Orders fare this game for the Undead.
- Command Dice. Of all my armies, the Abyssals and the Undead look to have the most interesting Orders, so I’ve been trying to buy up some additional Dice for them. Since I can’t double up on an Order, 20 Points seems about right to try and make sure I have a handful of successes each round, but we’ll see how lucky I am with the results this game.
Table and Terrain
We were out at Planet Chaos again, a nice shop full of character and a wide variety of nerdy goodies in Fort Atkinson, WI. Their wargaming is primarily 40k, so we were making so with a 6 ft long table, and a 4 foot by 4 foot table extender for the center. The corners will be a little precarious! I brought the terrain, as we knew we'd need some and I wanted to inventory my offerings.
I brought my desert table. We were using our typical terrain rules, running the tower as Height 9 blocking terrain, the three forests as Height 6 Difficult Terrain, fences as Height 2 Obstacles, and Hills as Height 3, and the pond as Height 0. This table is a little sparse, and it looks like I could do with another building!
 |
| Table and tokens. |
We wanted to keep it relatively simple, and rolled for a scenario from the Big Red Book, getting the humble Loot. There are other, more involved versions of it around these days, but the original will be just fine for us today! We have three tokens to pick up and fight over, all starting on starting on the center line.
Joe won the rolls for token placement (placing the one on the left), and for sides, picking the one without a building, and then kicking us off with the deployment phase. He had the Scrying Gem, and kept the Behemoth and three Lords on Large Beast for his last drops, out-dropping me.
The Dwarfs deployed in several distinct battle groups. On the left, we have angled Mastiffs, the Behemoth upgraded to Golloch's Fury, Ironclad, Mastiffs screening Ironclad. The center had a very weird box, with Mastiffs, and three Ironclad regiments all creating a nest for Faber. And the right had two Mastiff packs, all three Lords, and an angled Ironclad regiment. The left Lord should have the Blessing, the central Lord nothing, and the right Lord should have Brew of Sharpness.
 |
| Overview of the table, after deployment. |
The variable Scrying Gem was just one additional unit, but I was still going to be out-dropped. With all the tokens pretty centrally located, and this being a new list on a pretty new army, I tried to keep things pretty simple, with the faster Wraiths on the flanks to try and use the command, and skeletons centrally to gum things up.Left-to-right for the Undead we have Wraiths, the flying Revenant King, Wights with the Boots, Skeletons, and the Liche, behind some Skeleton Warriors. Centrally we have four regiments of Warriors spaced out, with Zuinok, the Healing ASB, then the Surging ASB. Way out on the right, we have an unsupported Wraith Regiment.
 |
| View of the tokens. |
It's a new army, and a new approach. It would probably be better to place the Wights on the line, but given the amount of Mastiffs opposite me, this awkward checkerboard still works ok, and overall, I am feeling ok with my deployment.There are no Scout moves, and winning the roll for turn order, opt to go first.
Top of Round 1: Undead
I roll up 4 Swords for my Command Dice.
I have a lot out on the left, and with the Flying Revenant King out here, the general game-plan is to push hard on the left, pressure the center, and delay as long as possible on the right.
 |
| A strong, flying push, using the new Command Orders. |
I use all 4 Swords to use "By the Master's Will" on the Wraiths, moving them 12" up, and then pivoting with Nimble. The Wights have Shambling, and move their 7" and pivot, and flying Revenant King moves similarly, splitting the difference. The Skeletons and the Liche move up to provide some addition unit strength and blocking power in the coming turns.
 |
| The Undead threaten the tokens. |
In the center, the Skeleton Warriors shift around, looking for good positions. On the left, the regiment moves up, filling the gap between the building and the forest. Zuinok gets central, but I forget to cast Veil of Shadows. Near him, the other regiments and both Wight hordes adjust, advancing while trying to get places to see around the hill.
 |
| Several long, threatening charges to hopefully slow down the dwarven advance. |
Prior to all the Lords all coming down here, the Wraiths on the right were going to be the prime target for "By the Master's Will." With the Lords out here, I just want to delay now. The max speed out here is 7, so I just want to be threatening from multiple angles.
I will note that the Wraiths out here made a pivot, and in retrospect, I did not like this. Yes, I am facing these scary things, but the pivot hampers my abilities to most effectively utilize "By the Master's Will" on the coming turns. Since I pivoted here, I'll need to use my future nimble pivot to align and zip down the board edge, instead of zipping up and using the pivot to threaten flanks, which would have been more effective.
Bottom of Round 1: Dwarfs
My opponent rolls up 4 Swords for his Command Dice. I do not know what he uses them on.
On the right, the Wraiths are proving to be a good distraction. The Dogs and Ironclad move up to screen, but stay out of charge range. The Lords all post up, moving and pivoting around.
 |
| The Dwarves cautiously move out. |
Centrally, the Dwarfs trudge forward. Faber takes a shot into some Skeletons, landing 2 damage. |
| The Dwarves scramble, trying to react to the fliers. |
On the left, Mastiffs move up, and the Dwarfs try to react to the Undead's fliers. The upgraded Behemoth ops to stay put and keep things in front arc. The contraption fires into the Wraiths dealing 3 damage, and some Mastiffs throw throwing Mastiffs, landing a hot 4 damage, and take the Wraiths to a very concerning 7 damage. I finally try out a little Def6 of my own, and this is what I get. Yikes!
Top of Round 2: Undead
I roll up 6 Swords for my Command Dice.
Out on the left, I need to be charging, and I want to avoid charging Mastiffs. I send the Wraiths into Golloch's Fury, landing 1 damage. It's a bummer, but I am just trying to tie the contraption up momentarily, so feel ok about that. I spend 2 on Endurance to bring them down to 6, and Lifeleech brings them down to 5. I'm hoping the larger regiment will be able to hold out for a turn or two.
 |
| Some charges. |
I don't have the frontage to charge with everything, so the Wights go into the Ironclad. I want to use 4 Swords on a Lifeleech from them, but my opponent calls me out, since I am in combat. I thought Host Shadowbeast and Drain Life were exceptions to the "cannot cast a spell while engaged" rule, but when we check, only Host Shadowbeast has the language, and checking on the forum afterwards, yeah, Drain Life can't do this, only Host Shadowbeast. Beans. I think I try a reroll on something, but most of the Command Dice will go to waste this turn since my plan was illegal.In combat, the Wights will land the expected 8 damage and will waver the Dwarfs. I was hoping to break them, but I did not know the math. The Ironclad are still tough, and we'll see what happens.
The flying Revenant King chooses to fly up and over the Dwarf lines, staring down the flank of all the basic Dwarf units. My mantra with fliers is to always be threatening something, so this seemed like a good use of it since not everything could fit in to make charges this turn.
 |
| The center. |
The Skeleton Warriors inch up. I want to be in a position to threaten the tokens, but I don't want to take them myself, since the skeletons don't have great staying power. With the ASB's around, I can manipulate things to charge 12" and we'll see what we can do. Zuinok pops the Veil of Shadows this time, and the nearby ASB will Heal 1 onto the Skeletons. The Wights bide their time.
 |
| Holding but still threatening out on the right. |
Out on the right, the Dwarfs avoided my threat range, so I have no charges, but that is ok. I opt to sidestep with the Wraiths, getting into the woods, but keeping my leader point out so I can see.
Bottom of Round 2: Dwarfs
My opponent rolls up 6 Swords for his Command Dice.
On the right, the Mastiffs hop up to take a token, giving a flank to the Wraiths, and the three Lords and Ironclad stand ready to retaliate.
 |
| Mastiffs do their job and start instigating. |
Centrally, more Mastiffs hop up to grab another token, with more Ironclad at the ready here too.Lots of throwing Mastiffs go out. All the Undead units stick around. We're finishing up the phase when we realize that Piercing 1 was not factored into any of my opponent's rolling. We're not on any time limit and only one unit had damage going into the round, so it's easy to check the pictures and wipe the slate clean and give the doggos another chance. When all is said and done on the redo, the regiment in front of the Healing ASB (green, center) takes 6 and stays, the one blocking for Zuinok gets up to double digits with 4 mastiffs thrown, and is routed, leaving my special spellcaster exposed.
 |
| Dwarven countercharges on the left. |
Out on the left, some Mastiffs screen, others run forward. More throwing Mastiffs go into this unit, and they take 6 and hold. On the hill, the wavering Ironclad fail their Headstrong check, and just hold.
Faber shoots and the yellow Ironclad throw a dog into the towering, flying Revanant King, but only 2 damage gets through.
The wavering Ironclad fail their headstrong check, and opt to do nothing.
Golloch's Fury belches steam, but only lands 5 damage onto the Wraiths, and at 10 damage, they hold, thanks to the Inspiring, flying tomb nearby.
Top of Round 3: Undead
I roll up 6 for my Command Dice.
There is no token on the left, so I am just trying to gum up and delay Golloch's Fury for as long as I can. The Wraiths go back in against the contraption.
On the hill, my Wights can see over the wavering dwarfs and into the Ironclad that threw into the Revenant King. They join the flying tomb in a charge, popping their boots. Taking their place against the wavering dwarfs is a damaged regiment of Skeleton Warriors, and another Skeleton regiment charges the Mastiffs.
 |
| Charges on the left. |
Combats go ok. The Wraiths deal a few and Lifeleech 1 back. The Skeleton Warriors thump on the wavering Dwarfs, landing another 2 damage and getting another waver. My notes say the Liche uses Command Points for a Drain Life into the Mastiffs, which would be an error since I have a better Drain Life on the caster already! Oops. I deal 2 to the Mastiffs, healing the injured Skeletons, who also Lifeleech down to 3 damage against the wavering Dwarfs. The Skeletons fighting the Mastiffs deal 4 damage to bring them to 7, but the dogs are unbothered. The Mastiff Pack has some great Nerve for their cost.
The Wights and Revenant King bring their Ironclad unit up to 13 damage, and to get the rout. The Wights overrun, and the King changes facing, to prevent giving Faber any accidental flank charges.
 |
| Reforms from the Undead. |
Centrally, my maimed Skeletons have a flank into the central Mastiffs with the Wights joining in the front to pick the unit up. I give the token to the uninjured Wights.
 |
| Charges in the center. |
The other Wights have the inches to move up and hop past the Lords. The Surging ASB will move them up a few inches, and Zuinok will do the rest to Surge them into the flank of the Mastiffs here. The dogs will be easily bested, and the Wights will reform to spy the purple Ironclad.
Over on the right, the blue Ironclad inched up, and all three Lord waiting I the wings. Instead of charging out, I sidestep into the woods, getting out of range of the Ironclad and everything else, while still being able to see around the terrain.
Bottom of Round 3: Dwarfs
My opponent rolls up 6 Swords for his Command Dice.
On the right, the Ironclad continue to inch forward and try to bait out a charge from the Wraiths. They throw a Mastiff at the Wraiths, but nothing connects. Two Lords wait in the wings now. The third Lord (I believe this has the Blessing of the Gods) goes in to help the Mastiffs. He does 4, the Mastiffs do 3, and at 7, the Skeletons hold. An Inspired, Fearless 15 unit is still decently hard to take off in one go, and I am happy with the performance of the regiments so far.
 |
| Skeleton regiments survive a charge. |
Centrally, some purple Ironclad change facing to get stuff into front arc. I don't think they had any charges. |
| The Undead start pushing through the center. |
Some orange Ironclad charge the Wights with the token, and do land 1 damage. The Nerve Check is a hot boxcar... but the Fearless Wights are completely unbothered. Faber hops into the drying pond to shoot, with his leader point in the terrain. This would impart a cover penalty, so talking through his intentions, we make sure Faber's leader point is out of the terrain for clear shots. He shoots at the Skeletons on the hill and lands a hot 5 damage, bringing them up to 8 damage, but they do hold.
The wavering Ironclad fail their Headstrong roll again, and backed up to let Faber shoot. Until this game, I don't think Joe's Dwarfs have ever failed a Headstrong roll against me, so I am counting my blessings that the streak is over.
 |
| Aftermath on the left. |
Some Green Ironclad join the counter-charging Mastiffs, and bring the Skeletons with the token to 4, but they hold.
Golloch's Fury kicks into into gear, rolling up some extra attacks and landing 7 more damage into the Wraiths, and will best them and then overrun this turn, getting right up to the Skeletons.Top of Round 4: Undead
I roll up 4 Swords for my Command Dice, it looks like it will be a big turn for the Undead!
Golloch's Fury is free, but rather far out there and on the flank. The Skeletons again charge the wavering Ironclad regiment, again land 2 damage, but at 14 damage, the inspired dwarfs finally succumb, and the Skeletons will overrun 5", getting out of arc of the dwarven tank.
 |
| Chages from the Undead. |
The Liche hops up to prevent too big a slide, and the Skeleton Warriors will counter-charge the Mastiffs. In retrospect, this is too fancy. If the unit fails, the Dwarfs are still in the flank, and the full slide would have been ok. Maybe I put him here to try and keep the regiment on the hill Inspired though.These Mastiffs started at 7 damage and are uninspired. The Skeletons add a few more damage, rout the dogs, and then change facing, and will be out of arc from the tank.
I now realize my error with Drain Life and the Liche and the Command Orders. He casts his normal Drain Life into the Mastiffs near the building, landing just 1 damage to heal the Skeletons. Zuinok throws a Fireball into them, landing 5 damage. The Mastiffs are at 6 damage, and uninspired, and with Shattering from the Fireball, I am able to pick the second unit of dogs up as well.
 |
| Aftermath on the left. |
Burying the lede a bit, the Undead make 3 different rear charges in the midfield this turn.
Faber tried to hide from the Revenant King using my Wights that had had the boots. Those Wights make a rear charge into some purple Ironclad, joined by some Skeletons in the front. I realize my errors with the Drain Life and the Liche this turn, and so this ASB attempts a Drain Life into the Ironclad landing 1 damage to help heal up these Skeletons, and the Undead will devastate and rout the unit.
 |
| All three glorious rear charges. |
Wights from the right will rear-charge Faber. They are hindered, but roll great, landing 19 damage which is enough to devastate and rout him too. Looks like expected damage is 13ish, so despite the good damage rolls here, this would still be bad new for the legendary lord most of the time.
The other unit of Wights counter-charge the Ironclad in front of them, with the Revenant King coming in behind, and we'll devastate and rout this unit as well.
 |
| Reforms from the carnage in the midfield. |
The Wights fighting Faber reform, to threaten Golloch's Fury and protect this token. The Revenant King changes facing to do the same. The Wights in that fight pivot to look at the right, and the other Wights and Skeletons also end the turn facing that way. |
| More delaying on the right. |
On the right, the Ironclad are a millimeter in against the Wraiths now, still slowly trying to convince me to charge. I sidestep the Wraiths again, getting their leader point into the woods so they can see out of the terrain feature, and this puts a few inches between me and the Ironclad to deny them a charge.
The Skeleton Warriors fight the Mastiffs landing 5 to get them to 7 damage. Inspired, they waver, but stick around. Bottom of Round 4: Dwarfs
The Dwarfs get 6 Swords for their Command Dice.
On the right, the Mastiffs and their token withdraw, and then back up. All three Lords make charges into the Skeleton Warriors. With just the flank attacks, the unit is completely trampled. One changes facing, one backs up an inch, and the third overruns strongly, hoping to trap the Wraiths. Joining the Lord on this endeavor are the blue Ironclad.
 |
| The Lords turn every which way to try and cover all the angles. |
The dwarfs in the center are gone, so on the left, the Ironclad fight on against the Skeletons and a token. The dwarfs bring them to 7 damage, and while the Skeletons are Inspired, the Dwarfs are able to get the rout on the unit, and claim the token. |
| The Tank shoots off one regiment, and the Ironclad ready to pick up another. |
Golloch's Fury wheels around, blasting into the maimed Skeletons trying to run away. The Skeletons will be shot off by the contraptions guns.Top of Round 5: Undead
I roll up 6 Swords for my Command Dice.
On the left, the Wights and the Revenant King will charge the Ironclad, beat them up, and take their token. I give it to the Revenant King. The victorious Wights are wider than they are deep, and so can change facing to get Golloch's Fury into front arc. The token-holding flying tomb faces similarly.
 |
| The Undead brace for impact. |
I use three Command Dice to let the token-toting Wights ignore Shambling this turn, and even slowed, they are able to make great progress towards the right. They are joined by other Wights, who have their leader-point in the forest, and can thus see out.The Healing ASB hops up, the the Skeletons charge a Lord, landing a damage and stripping Thunderous Charge from him. The other ASB hides behind the woods, safe and out of sight.
 |
| The Wraiths finally commit, to the dismay of my opponent. |
In a bit of an upset, the Wraiths now pounce. They can see the Mastiffs, and have flying, so will zip out and connect. I have the space to slide, but my opponent says it was his intent to try and block, so I just end up on the far side of the blocking Lord, thanks to Fly. The Mastiffs started at 7 damage. I only land 2, but thankfully still pick the unit up and then overrun.
Bottom of Round 5: Dwarfs
My opponent rolls up 7 Swords for his Command Dice, but it is looking pretty grim.
On the right, the blue Ironclad look for some revenge and move into the woods to threaten the ASB, and two Lords change facing.
 |
| Reforms for the Dwarfs. |
The third gets a heal from Endurance, and counter-charges the Skeletons. He's disordered, but goes 7/7 thanks to Blessing of the Gods helping with 3 conversions, which we discover next round, that he doesn't have the item, and the Lords got mixed up. Victorious, he ... holds.
We didn't catch it at the time, but writing the report here, there are two ways he could have positioned these better. First, the Lords are Nimble. So, instead of just changing facing, he could have gone forward 1" to get flush with the fighting lord, and then pivoted twice to still face the departing Wraiths. Second, the victorious Lord could have sidestepped to their right. He needs and inch to block, and it looks like the third Lord might be complicating a charge aligning on the other side.
 |
| Golloch's fury smashes through. |
On the right, Golloch's Fury is finally tuned up, and it smashes into the blocking Wights, landing 10 damage, and will beat the odds to best the unit and then overrun. Top of Round 6: Undead
I roll up 3 for my Command Dice.
I wrack my brain, but can't figure out a way to get out of arc. Since I am carrying the token I lose Fly and Nimble and have my speed reduced, so just don't have the inches to flee.
I consider dropping the token, regaining my fly and setting up a trap.. but even with a rear charge, I don't think I can break it with any sneaky play here, and would just be giving up the token for free. Going back a turn, perhaps instead of facing the tank I should have turned to the left or the right and prepared to run?
 |
| The Undead struggle to get through the armor of the tank. |
I try an Empowered Drain Life from the Liche, as the Revenant King charges in. It's flashy, but this is a dumb move. The Golloch's Fury is a chariot, with a very long base. I probably should have spent the dice on Tactical Retreat to move the flying Revenant King backward. The Liche isn't Mighty, but the contraption is not Nimble and has a long base, so there should be a way to cheekily prevent a direct charge and require a long overrun.
Very little damage hits Golloch's. I don't think Drain Life 7 accomplished anything at all, and the 4's from the King were swingy enough to trend low as well, and it is in no danger of fleeing.
 |
| Charges from the Wights. It's hard to align against those tusks, but I am in. |
On the right, I am more than 4 inches away, so if I had one more Sword on the Command Dice, By the Master's Will could let me escape with a non-shambling 10" move, and get away from the threat range of the nearest Lord. I can't do that, and carrying the token I no longer Nimble, so I think I need to turn and face.
Some Wights make a flank charge to that threatening Lord, dealing a warm 15 and picking the unit up.
 |
| Two Lords (and their beasts) fall. |
Other Wights, carrying a token, make a front-charge into the other Lord, also rolling hot to land 8 damage, and secure a waver on the Inspired check, until I remember I have Brutal, which is enough to best a second Lord this round.The Surging ASB just scoots around the threatening Dwarf infantry, denying them another charge.
Bottom of Round 6: Dwarfs
My opponent rolls up 6 Swords for his Command Dice, and the Dwarfs give it their all.
The remaining Lord has some overhang, and we were using a spare base for it. It is not in the woods, so makes a clean and scary charge into the Wights and the token. We realize here that the Blessing of the Gods had jumped between a few units, and just 4 damage is done as the dust settles, and the unit holds. I was expecting a hold here. The unit is definitely scary, but needs support and can only do so much with 7 attacks.
 |
| Final charge for the Dwarf Lord. |
The combat I am worried about is on the left. This tank has just ridiculous stats and we weren't even playing the Iron Resolve Aura correctly. Steam belches forth, and the tank rolls up its maximum possible attacks, landing 13 damage onto the Revenant King. The flying Tomb is Inspiring and Fearless, and both save me, with the second check being just shy, and the Undead retaining control of all three tokens.We don't roll up a Round 7, so it's a 3-0 win for the Undead!
Game Conclusions
My opponent had a very critical eye for himself, as he was considering taking the Dwarfs in this state to the upcoming, inaugural Northwoods GT. We chatted a lot about the game afterwards, as well as en-route to a meetup several days later when I had gotten through a bit of the report and had a few more insights to offer.
- He was relying on Command Orders to get CS for countercharge, so it seemed to me like he should be more aggressive with the infantry. You can screen with Mastiffs, etc. but if you are relying on a counter-charge, you need to be charged.
- I did not like the deployment of the three Lords, as the middle Lord cannot see anything, and their longer charge range is all concentrated in one area, which felt like a waste. I suggested spreading them out if he wanted to use them as counter-punching and dissuading pieces, and spreading them out against flying lists in particular to contest more landing zones.
- We played a few things wrong. Golloch's Fury has an Aura, and even though it has a Keyword, the unit should get the benefit as well. And it looked to me like he bought that second blue dice but wasn't rolling it.
Overall, I did like the concept of the Dwarf list though. We considered dropping the Throwing Mastiffs on the Mastiff Packs and such, so that one is more likely to use them as aggressive chaff, and so we'll see what the future holds for this style!
From my side, the Undead's list concept worked out alright, but I mostly just capitalized on some big tempo and positioning mistakes to give me a huge Round 4 with all those rear charges. If I don't get those rear charges, it's a very different game, because as we saw with Golloch's Fury, the Dwarf list still had a lot of fight in it despite the heavy losses.
Testing Conclusions
- Skeleton Warriors with two Handers. They did alright, and were still doing ok going into the midgame with positioning and such. I'm liking the unit overall.
- Wraith Regiments. I liked the Wraiths, and while I think the cheaper Troops will be more cost-effective generally, a regiment was definitely needed to hold back the dwarf tank.
- Wights. Any hammer that gets a rear charge is going to have a great game. These all did well, but again I think this is more me capitalizing on mistakes from my opponent rather then an inherent strength of the unit itself. My Undead need hammers, and these seemed very nice, as they can see over the Skeletons to chew up infantry, but Soul Reavers have been fun as well.
- Liche King with Surge and DL. I seem to struggle with individuals in list-building and in-game, and this was no exception. Using Command Order DL when I bought it was an error as well, and I think if one is using the Command Order, buying DL is less attractive. We'll try a Heal next time.
- Undead ASBs. I still really like these. Even without the Burrowing Wyrms here, they still change the math in infantry fights, letting my chaffy skeletons get the drop on other Speed 5 stuff, or Speed 4 Dwarfs in this case! Good picks, though I am not using Surge on the ASB very often.
- Zuinok Iceblood. He's quirky with a neat assortment of spells and stats and abilities. I want to like him, but I'm not sure he's a great pick.
- Flying Revenant Wyrm. I love the model, and the unit did very well here! Having a budget dragon around was lot of fun. I like the cheaper Burrowing version more as I like Strider, but this was still a fun pick.
- Command Orders. I appreciate the pushback from my opponent on Drain Life, and we played that right in-game. Since you need a spare unit, the Drain Life Order is a little less attractive, but overall, I still like the Orders for the Undead.
- Command Dice. I think 20 points is fine if you want to lean into orders. I think 30-40 is pushing it though, since they cannot be repeated. We'll continue to tweak and explore, but I think purchasing 2-3 Reds will be my go-to for the foreseeable future.
It's always a great and fluffy time trying to break Dwarven lines, and I am very glad were were able to fit this in despite the snowstorm! Thanks for the game!


