Showing posts with label Ratkin. Show all posts

Wednesday, October 9, 2024

Kings of War 3rd Edition: #086 Kingdoms of Men vs Ratkin in Invade

Intro and Lists

I recently attended Dragonfall 2024, a convention held relatively nearby in beautiful Lake Geneva, Wisconsin. The convention had a wargaming component, and the Kings of War event was hosted by Todd of Grognard Games, which has a pair of shops in nearby Illinois. It was a tiny one-day, three-game event at 1500 points. We had eight players sign up, and opening pairings were semi-random. I started the day out against some silly costumed Ratkin player. He brought the following:


The Rats were piloted by a... creature deserving of a lengthy preamble. He's a fellow Brian; a fellow blogger (running the wonderful The Nerd's Tale); a dude who is also our local Mantic Pathfinder, and an all-around good guy. Yes, he wore a costume, complete with tail, and temped fellow players with offerings of cheese. Very sneaky stuff. He was hot off a great showing at the recent Wildcat GT (which you can read about here, from him), and continued running his beloved Ratkin.

Look at that! he can essentially go edge-to-edge with everything.

I was expecting double Mutant Rat Fiends Friends from him, but instead he was going even more against the grain of "orthodox" Ratkin play with a list he had dubbed "The Expendables." For a 1500 point game, there was a ridiculous 27 Unit Strength, and the list as a whole was designed to blunt charges with Plague Pots, and then just try to endure charges, grind, and play the scenario by swarming objectives and being too numerous to kill.


As covered a little more thoroughly here, I brought the Kingdoms of Men, and leaned into a bunch of titans, with two rampage Giants and a Monarch. We'll see what I can do against all these rats!

Table and Terrain

The terrain was pretty basic, and tables were pretty uniform in their selection. No special rules, or weird pieces. The buildings were Height 7 blocking, Boulders also Heigh7 blocking, Forests were Height 10 Difficult, Hills were Height 3, Obstacles were the normal Height 2, and each table had a "rough spot" of Height 0 difficult terrain. 

The scenarios for the event were determined ahead of time, with the first game being Invade, from the main rulebook. For the scenario, whoever gets the most Unit Strength into the opposing half of the board wins. Easy enough! In addition to the Scenario Points, which was 15/10/5 for Win/Draw/Loss, we were also supposed to compare the differential of points killed for an additional modifier, of up to +/- 5 Points, depending on what side of the differential you were on. 

The Rats won the roll off for sides, and kicked us off. Despite the incredible unit strength, there wasn't the big of a drop disparity, and it became clear early on that the Ratkin wanted to layer up in a corner and push on through. 

With so many units run in multiples, walking through the Ratkin deployment is a little too cumbersome to attempt in detail. Essentially we had a regiment of spears out on the flank, a Red Spear horde in front of a horde of Wretches, a horde of Wretches in front of a Blue Spear horde, and a final Purple Spear horde in front of two regiments of Spears. Characters all all support characters with Bane Chants and/or Heals, and were scattered around. They'll be in supporting roles, and were a little hard to track for reporting purposes.
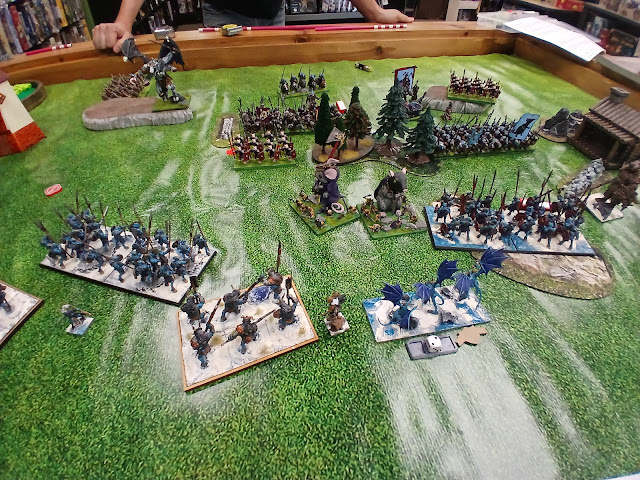
Deployment.

Despite the army differences, I was the one to go far wider. Out on the left we had the Crossbowmen and ASB with the Bow, with the former angled to move up on the first turn. I believe the Sergeants were my final drop, placed out there to pressure and constrain. Early drops were the central Giant, Pikes, and Monarch. Once I realized the Ratkin were layering, I dropped the Foot Guard and other Giant out on my right, with the Giant nearer the table edge, due to my lessons learned from Trevor and Battle 085 when I was evaluating some options for this event.

The Ratkin are numerous, but since they are layered, if I can start fighting anything, their advance should suffer. At that point, I just need to hope that my higher quality of units can slay enough rats to win, and make it across the table.

I won the roll off for turn, and given the scenario, opted to go first.

Top of Round 1: Kingdoms of Men

Things moved up! On the right, the Giant moved up around 11 inches, gaining ground but not giving up a charge. The Foot Guard, Monarch, and Pikes moved up around 10 inches, with the Pikes and Foot Guard ever so slightly ahead of the Monarch. The Rats don't have the charge range to hit anything, but I was trying to build up some good habits with the new list.

Opening moves for the Kingdoms of Men on the very important right.

The central Giant also moved up around 10 inches. I wanted him to keep pace with the line, prevent the Ratkin from making a Round 1 charge and threaten some striding charges next turn, just like the other titans. With them spread around, I should hopefully be able to multi-charge something.

Opening moves on the left.

Out on the left, the angled Crossbowmen moved 10 inches, and the Mounted Sergeants zipped up as far as they could get while staying out of charge range. With Speed 9, they should have a few options next turn. The Crossbowmen moved at the double, and are actually still out of range of anything, so no shooting is done, and it is a quick turn.

Bottom of Round 1: Ratkin

The layered Ratkin line moves up, but is very wary of the rampage Giants. The central one has a nice range and good arc, and after some finagling, my opponent opts to just scoot some Wretches up, kinked, to prevent the central Giant from flanking anything. 

The Rats move up, cautiously.

Barkskin lands for 4 against the Wretches. I haven't used the spell before, and it's kind of neat! For those not in the know, like me, its "Hit" roll is variable, where you need to meet or beat the target's Defense Value, meaning on some 2+ Wretches, it'll be hitting on a 2+, and then each successful hit will block a point of incoming damage on the following turn. A neat pick to get just a little more usefulness from the Wretch hordes.

The Ratkin Spears in the front pop their Plague Pots, and brace for the oncoming charges.

Top of Round 2: Kingdoms of Men

Pots or no, I feel like I gotta go in. I'm at about the center line, and given the scenario, if I can keep the fighting over on his side of the board, I feel like that's good for me.

Charges from everything but the ASB.

On the right, the Foot Guard and Giant go into the Spear horde, with the Giant rolling up some good extra attacks, but landing only 6 damage due to hitting on 5's. The Guard catch a Bane Chant and contribute 9, and we do manage to pop the first horde in one go with a lucky Nerve check. The Foot Guard stays put, and the Giant backs up 3".

The Wretches don't have a Plague Pot, and the Monarch deals 5 and the Pikes Deal 7 to this horde. The Wretches hold. We later realize Barkskin should have been applied, so they are really only at 8 damage, and we correct this a little later.

Post-combat reforms.

I measured and we discussed, and the central Giant can get a pretty safe charge in against the Spears, so I take it, hoping to gum things up more. Spacing is awkward, and the very central Blue Horde doesn't have an arc to come in and support. He did have a charge into the Wretches, but I thought it better to gum up his lines here instead.

Over on the left, the Crossbowmen move up, and should be scoring at this point. I believe they and the ASB land 2 damage against the regiment of Spears on the far left. The Sergeants are safe, and opt to just nimbly shuffle about. I don't really want to commit against Spears, but as long as I was here, threatening flank charges and stuff should keep my opponent boxed in a bit.

Bottom of Round 2: Ratkin

Having layered his list, the Ratkin are a little traffic-jammed.

On the right, one regiment has the inches and space, but not the pivots to reach the Giant, so both regiments go into the Foot Guard, and both pop their Plague Pots. They'll land 4 damage combined, and I'll Iron Resolve 1 back to end the turn at 3 damage.

Combats from the Ratkin.

With this charge completed, the Wretches countercharge the Monarch, but can't really shuffle down very far. They'll roll  really well, and land 6 damage against the Monarch, and get a Barkskin 5 for their trouble from a nearby Ratkin spellcaster.

The regiment getting shot moves up, to create some space, and the Blue Spear horde in reserve shuffles over. Thanks to the Birthing Daughter's Aura, the Wretches in the backfield make a Striding charge against the central Giant, joining the Spears in their counter-charge against the towering titan. In retrospect, this might not have been possible, since the two hordes were pretty squarely layered? Needing to share frontage, and with the Spears sliding down to their final position first, I'm not sure now if the Wretches would have been able to connect against the Giant with just one pivot. I've gummed myself up with layered hordes before, so I might suggest that my opponent use a bricklayer approach to avoid any messiness like this in the future. Regardless, both hordes make it in in this game. The Spears deal 2, and the striding Wretches roll hot here as well, landing 5 more on the titan.

Top of Round 3: Kingdoms of Men

Out on the left, I have some time, so the Sergeants pivot once and gallop off towards a corner. I couldn't safely nimbly pivot and apply pressure, so we'll depart for now. I'm not entirely pleased with this. I should have just backed up or something to keep applying pressure, but oh well. It's early in the game, and if I can get behind the hordes next turn, this could very well be worth a turn of not pressuring.

Movement on the left.

The Crossbowmen land 3 damage against that regiment, bringing them to 5 damage, and will waver their target. I was hoping to just pick that unit off quickly, but being out of range in Round 1, it's taking a bit, though the damage is still accruing decently.

The Giant in the center continues swinging against the Spear Horde. He's not Ensnared by the Plague Pots this turn, but unfortunately lands just 3 of 13 hits, and then just 2 of 3 of those for damage. Yikes.

More grinding combats.

The Monarch and Pikes charges the Wretches again. I forget the Wretches are Def2, and Bane Chant the Pikes. Oops. The Monarch does 8, with Barkskin brining that down to 3 new damage, and the Pikes contribute 9 new damage, and we are able to pick the horde up on the second attempt. Victorious, the Monarch backs up 3" and the Pikes change facing, to protect him.

Reforms in the Top of Round 2.

The Foot Guard land 9 against their regiment, but the unit is Rallied, and just barely safe. The Giant flubs, rolling up 10 extra attacks, but only deals 4 damage total off those 18 attacks. Ouch.

Bottom of Round 3: Ratkin

The Ratkin Bane Chant several units this turn, though I do not keep track of what. On the left, the wavered regiment does nothing. Since the Giant wasn't able to break the Spears, the Wretches makes another striding charge, this time into his flank. The Giant starts the turn at 7 damage, ends at 19 damage, and is toppled. The Wretches victoriously change facing.

Two hordes have fled, but the Ratkin keep scurrying forward.

The Blue Spears pop their Plague Pots, and charge the Pikes, with the Ratkin War Chief (Colonel Hotpocket) contributing 1 in their flank. Even Ensnared, the Spears land 6, the War Chief contributes 1, and the Pikes are Wavered.

The Pikes falter.

The Ratkin Spear regiment lands 4 damage into the Foot Guard, who then Iron Resolve down to just 6 damage total going into my turn. 

Top of Round 4: Kingdoms of Men

I've lost a Giant, but I am feeling pretty good about things overall. On the right, the Giant charges back in against the regiment, but flub again, landing a just slightly better 6 damage, but then the Rats are found to be quite insane.

Combats in Round 4 for the Kingdoms of Men.

The Foot Guard do better, and no longer Ensnared by the miasmatic Plague Pots, bring the regiment up to 21 damage and dispatch them, devastating and then routing them, as is proper, and then pivot to face the rest of the field, trusting in the Giant to finish off the insane Rats next turn.

The Pikes pop Indomitable Will, and countercharge, scooting down to let the Monarch join in and share frontage. The Spears here just popped their Pots, and the Monarch contributes 2 and the Pikes 6 to take the horde to 8 damage, but definitely aren't breaking them this round.

Reforms for the Kingdoms of Men.

The Mounted Sergeants nimbly about-face, and are eyeing flanks and rears of the remaining Ratkin units in the middle section of the board.

The Crossbowmen finally stop moving, and patiently line up their shots against the regiment. And now they fail hard, landing just 1 damage against the Regiment, which holds just fine this time.

Bottom of Round 4: Ratkin

The Wretches that felled the Giant move as far as they can, just bumping into the obstacle, and should either be scoring, or just about. With them out of the way, the Red Spears in the woods make a hindered (and Ensnared) charge into the Pikes, I believe the Blue Spears countercharge the Pikes as well, trying to make sure those get picked up this turn. That does happen, and the Red Spears overrun, looking to score in the coming turns.

I believe the War Chief continues poking the Monarch, landing an additional 2 damage against my Inspiring titan. 

The Ratkin break through!

The regiment enduring the Crossbow fire is able to get into the woods, and thus into cover. Heals go out, and the regiment is brought down to just 3 damage.

The Birthing Daughter delivers! The Sergeants are disordered and stuck up.

Protecting this late scurry forward is the Birthing Daughter, who is indeed able to slip in 1 damage against the Mounted Sergeants, and disorder them. The Sergeants had several rear charges available to them next turn, so this is quite a good development for my opponent!

The insane Spears land 4 into the Giant, bringing him up to 6 damage, but the Giant holds strong.

Top of Round 5: Kingdoms of Men

The Monarch was charged by the War Chief, but has a charge into the Spears, so takes that instead, focusing on removing the opposing Unit Strength. The Monarch lands just 4 damage, I believe taking them to 12 damage, and now the Spear Horde is found to be insane. Ratkin.

Combats for the Kingdoms of Men.

Given the long overrun of the Red Spear Horde, the Foot Guard can see them, they are definitely within charge arc, and I do have a flank charge into them, which still seems cheeky though since I can only connect with about 1/4 of that facing. But I do take this, and will best the unit. I do forget about Lifeleech though. They horde will victoriously turn to face the Blue Spears fighting the Monarch.

The remaining Giant clubs the first group of insane rats down, and then changes facing to help the Monarch as well. It doesn't seem worthwhile to chase after the Ratkin.

Parting shots from the Kingdoms of Men. Nothing hits.

The Crossbowmen need to move to shoot at the departing regiment, and land no hits, since the Ratkin unit made it to the woods, and my Crossbowmen were shooting with -2 to hit. 

The Sergeants countercharge the Birthing Daughter, landing 2 against her.

Bottom of Round 5: Ratkin

The Birthing Daughter lands no damage against the Sergeants this turn.

The insane Blue Spears do charge back in, and do pick up the Monarch, but I should have enough to contain and best them next turn and prevent them from scoring.

The Ratkin Spear regiment and Wretches continue to flee.

Top of Round 6: Kingdoms of Men

The Foot Guard and Giant charge in to avenge the Monarch, and scatter the last Ratkin Spear Horde.

The Sergeants roll hot, and land 4 damage against the Daughter, and will rout her, overrunning a mighty 1 inch, and I'm not sure if they'll have the inches to get into anything if we do get a Round 7.

Bottom of Round 6: Ratkin

The Ratkin move more, just in case, but we don't roll up a Round 7.

End of the game, with game aids galore.

For the Ratkin, the horde of Wretches are scoring for 3, and the Spear Warriors regiment for 3 as well, giving them 6 for the scenario. 

The Kingdoms of Men have the Crossbow horde for 3, Mounted Sergeants for 1, a Giant for 2, and the Foot Guard for 4, giving us 10 for the scenario.

We won the scenario, and killed far more than we gave up. It was a strong victory for the Kingdoms of Men, and a great start to the tournament!

Game Conclusions

It is always a treat to see this army across from me. Everything is just so crisply painted and the army is overflowing with fluff! We have named units and characters to hand-painted banners. And that is without mentioning the man behind the scurrying and scheming! Win or lose, I know I am going to have a good time. He's done an unreal job growing community over the last year, so a massive thank you goes out to him for all he does.

Focus back on the game, usually, my opponent has two mutant rat titans of his own, and has also even started using the titanic Demonspawn Scud in his recent, larger games. I was expecting at least the friendly duo here, like we’ve seen before, and I think we got very lucky he went with his “expendables” approach, which played really well into my Rampage Giants, even if neither had a particularly stellar showing for their damage outputs. I think we also lucked out that he layered up and didn’t go super-wide and just try to blitz across the field, a potential approach that had me concerned while we were setting up.

Getting the first turn was huge for us, as we were able to box him in at the start of the game. We had some good advantages as the game started, and the Ratkin were certainly numerous, but we were largely able to endure the scurrying and come out of this with a strong win to start off the event.

Thursday, September 5, 2024

Kings of War 3rd Edition: #082 Herd vs Ratkin in Plunder


Intro and Lists

I was lucky enough to get some games in over the Labor Day weekend. The second game of the day was against our local Mantic Pathfinder, the organizer of the Escalation League, the driving force behind Kings of War Wisconsin, the blogger of the Nerd's Tale, and a fellow Brian. He brought his wonderful (and growing!) Ratkin army, fielding the following for our game:


That's a lot of Rats! We had clashed once before in a larger game (Battle 045), but that was months ago, and there have been a lot of changes. Almost of the units have been given Spears and Plague Pots to increase their survivability. The units are numerous, but very basic. He's looking to focus on scenarios not violence, and use heals from the Tangle, two Warlocks and Birthing Daughter to hold things up and grind things out with all the rat bodies. The Enforcer is a nice general support piece, and the only really scary things in the list are Scud and the two Mutant Rat Fiends Friends. It's a lovely army, and every unit has a custom name, which I will not be able to do justice to. 

It's a basic army, but a pretty strong counter to me. The last few months I've been harping that high defense, obstacles, grinding combats and Phalanx really hamper the Herd. I don't have any cavalry here, but the Herd relies a lot on Thunderous Charge, so I might struggle to kill things quickly. 

As you can guess, I brought the Herd, and was looking to finish up some testing of the Longhorns as regiments. Up to explore and comment on are:

  • Longhorn Regiments. Trying the revised regiments out, and the intent will be to run them as a second line unit. They are pretty expensive for this role, but I am hoping Rally can help the Spears and Brutes, and these can survive untouched to the late game and do some cleanup work.
  • Spear Hordes. Tried and true! I am playing with just the two hordes for now still. I have liked the Brew on Sharpness a lot, on both these and the smashy Lower Abyssals, but I am giving them items to hopefully keep them in the fights longer (Headstrong, Fury), in order to test out the Longhorns just a little more.
  • Harpies. Like the September games, I just have one unit here. The more chaff I take, the more likely it is to all die. Just the one unit should stretch and challenge my threat assessment skills.
  • Guardian Brutes. I still like them, and still like them alongside the Spear Hordes, as together they can apply a bucket of dice to any problem! If I can get them into a combat, they have Fury and tend to do well, so that’s the goal with them as always! Hopefully Rally from the Longhorns can help prevent any wavering from chip damage.
  • Druid. Inspiring is a concern for my Herd, and I am still exploring options. The Druid is a cheap source with Bane Chant, so this has been my go-to. Only one of them this time, and no Conjurer’s Staff due to points concerns.
  • Double Herders. I like running things in multiples, and liked the flow and pressure they were able to bring in one of the September games. As pointed out on the Forum, they do everything the Greater Earth Elementals do, while Scouting, Inspiring, and not being a Shambling unit.
  • Silent Hunt Trappers. Trying them out again. We have a better grasp of the shooting rules and terrain nowadays, so I am not expecting much ranged output from them, but I wanted to see how they did supporting the Tree Herder anyways.
  • Silent Hunt Softhoof and Scythe. I haven’t liked them much before. I didn't see a [Melee] restriction on the Scythe when I was building the list, so added it to try it out. 
  • Scout. Scouting with the Tree Herders has been fun, but they are such an expensive commitment that I think I need to support them more.
  • Inspiring. Just 4 sources of Inspiring here. I want to squeeze in one more, but the Tree Herders are expensive! If I aggressively support the Tree Herders, I am hoping they can help me out in this area.

The list feels a bit light on drops again, so we’ll see how we do for deployment. The general goal will be to be aggressive with my scout moves, threatening stuff with the Tree Herder and Trappers, while the rest of the line moves up in round 1. If I can manage, the Longhorn Regiments will be kept in reserve, to go where they are needed, and will hopefully be helping out in the early game with Rally and in the late game by just being a healthy generalist regiment hanging around to help finish fights.

Table and Terrain

We were out at Oddwillows, a splendid little gaming shop in Mukwonago. My first game against the Halflings was very quick. My new opponent had some newer players rolling away, and having played often against the Halflings, he was eager to see how the numerous rats would do against the Herd.

We were at the same table, but mixed around a few pieces. We were using our typical terrain rules, running the buildings and big physical skull rock as Height 9 blocking terrain, the forests as Height 6 Difficult Terrain, fences as Height 2 Obstacles but counting the neoprene mats beneath as part of the terrain, Hills as Height 3, and the neoprene rocks as Height 1 difficult terrain again.

He unpacked and the Halfling player packed, then won the roll for sides, choosing the lazy-gamer side, and we got down to deployment. You might have seen a bit of this in the previous report, but during that game I realized that my new phone had a negative zoom, so I'll be messing about with that more in this game with the pictures. 

We got Plunder for our scenario. Five tokens would be spread along the center line, scoring at the end of the game. Center and center-right are worth 2 points, the others are worth one point.

From right-to-left, my opponent has a Horde with the Enforcer ready to run up and grab the far token (we checked, the horde can fit... it just barely). Then we should have a regiment of spears supported by the Birthing Daughter, then a horde of spears supported by the Tangle and a Warlock. The center was strong, with a spear horde flanked by both friends, and supported by a Warlock, another regiment of spears, and the hackpaws. Scud helped anchor that line, and the two warrior regiments sat out on the flank, with one mostly on the hill there.

A wide shot of a wide deployment!

I liked the central forest, but it was a little too far for me to scout into this time. Left-to-right we have the Trappers flanking a Tree herder, Guardian Brutes slightly back, the headstrong horde with Druid support, more Guardian Brutes with Harpies in reserve, Longhorns, the Tribal Spear Horde with Fury, then the second Tree Herder and the other Longhorns back. 

On the left, the plan was to Scout up, and use the Trappers to grab tokens while shooting at stuff. The center would push up to brawl. Out on the right, I wasn't sure if I should engage that horde or not, so the Longhorns were back to see what would happen. 

All the Scout moves that I remember to take. 

I had Scout moves, and remembered most of them. The stuff on the left all moved up. I believe the Herder is out of charge range of Scud, though the Trappers in the woods are giving up a frontal charge. The other trappers do need to pivot to get shots into the Warriors, but will be sitting on that token already for me.

I unfortunately forget to Scout up the Tree Herder on the right. 

My opponent then wins the roll for deciding turn order, and opts to seize the initiative.

Top of Round 1: Ratkin

The Ratkin move up with enthusiasm! On the right, the horde is able to squeeze in and grab a token, supported by the Inspiring Enforcer known as Titmouse.

Since he didn't scout up, the Tree Herder can only glare at the oncoming rats.

A regiment of Spear Warriors hangs back as a reserve unit, while the two other hordes move up as far as they can, each blocked the last inch or two by the woods, but otherwise making some speedy moves this turn.

View from the right. The Rats are less aggressive out here.

Out on the left, the two Warrior regiments back up, to get off the hill, and are safe from the bow shots of the Trappers.

Scud shuffles around and lands 2 damage against the far Trappers with Lightning Bolt. 

The central tokens are rather valuable.

Centrally, one Mutant Rat Friend moves into the woods. With Strider, they are looking to dissuade the Herd from moving up too far. The second Friend is out on the left, slowed by the obstacle, but looking to anchor down that flank while dissuading as well.

Bottom of Round 1: Herd

Given the scenario and the aggressiveness of the Ratkin so far, I feel like I need to move up as well. Unfortunately, I didn't plan ahead with Softhoof. Putting him in the front was probably a good idea,  but with the woods, he unfortunately doesn't have good targets. I prioritize getting him shots, kinking up my line to preserve a lane of fire for him.

Movement on the left.

The Tree Herder starts moving out on the left, with Radiance of Life still in range to heal the Trappers on the far left, who move up and get out of the woods, claiming a token and then loosing with a double penalty (moving, and cover from the obstacle) into the nearest horde, landing no hits. The other regiment stays put, shoots a penalty from the obstacle, but also lands no hits. Softhoof however, lands two damage and gets a lucky Waver with a boxcars on the check!

Boxcars!

I considered sending the Longhorns on the right after the Spear Horde, but didn't like my chances in a grind, and didn't want to commit more here. The Longhorns swing left, looking to fight in the center. The Harpies will swing right to block the horde up if needed.

Having forgot to Scout up the Tree Herder on the right, he makes it to where I wanted him to be at the start of the game, up on the obstacle. I was an error not to Scout him, but it is what it is. He has Strider, and will have at lease one charge next turn, so I don't feel the need to get too aggressive with him.

Movement on the center and the right.

As mentioned, the rest of the line shuffles about, threatening charges but everything a bit askew to accommodate Softhoof.

On the right, I opt to move the Longhorns up towards the center. 

Top of Round 2: Ratkin

Out on the right, the horde drops the token, and it's picked up by the Enforcer. The horde them inches up, but not far. I've played these Rats maybe twice? I was expecting them to grab it and back up, but the handoff and push does seem like a better call.

Other Ratkin units pick up both of the two 2-pointers this turn, and the nearest units to my line pop their Plague Pots, all gaining Stealthy and Ensnare.

Charges from the titanic mutants!

Scud takes the hill to get line of sight to Lightning Bolt my Harpies, landing 2 damage and wavering them. Thankfully the horde on the right isn't a danger on my next turn, so there is still time to gum them up, should the Harpies survive.

The Warlocks heal up the chip damage received so far, and the Tangle casts Weakness on my Wrathful Spears over on the right.

Reforms for the titanic rats.

The Two Rat Friends are able to both charge the Longhorn regiment, exploiting my kinked line, and they are able to pummel the regiment down. He had played them before, but spent most of that game pivoting to try and scare off my flying Generals with the Kingdoms of Men. Apparently that have some good combat stats! The Def5 of the Longhorns is actually great here, but both Mutants roll very well, and are able to pick the regiment up with ease. One overruns to create space, and the other pivots to get the Headstrong Spears and Brutes into its front arc. One must have gotten bumped or something, as an overrun couldn't create the space for that other pivot, but I think he could achieve the same results if he  just turned 90 degrees, so it's totally fine.

Bottom of Round 2: Herd

All my bows shoot into Scud on the hill, with each unit and Softhoof doing 1 damage apiece to take him up to 3 damage.

Out on the left, the Tree Herder moves up threatening Scud, the Warriors cowering behind the hill and the flanks of the Spear Warriors in the center. The Guardian Brutes nearby move up. Scud is dangerous, but with them Inspired, I think I can endure a frontal charge from him, and put some hurt back, since the Brutes have Fury.

Pivoting the wavered unit, to keep the Fiend in front arc of the Longhorns, so it charge the Harpies.

Most of the rest of the army is charging this turn. Safe for now, the Longhorns on the right make a flank charge into the one Rat Friend.

The Headstrong Spears charge the regiment of Spear Warriors. Phalanx strips my Thunderous Charge,  Bane Chant fails, but 6 damage still slips in against them. I made this charge to try and isolate the Rat Friends and deal with them.

The Guardian Brutes make a frontal charge into one Rat Friend, land 15 hits, which miraculously translate into 15 damage, and the monstrosity is felled on a good Nerve check.

The Longhorns make a flank charge into the other Rat Friend, only manage 9 damage (13 expected), and fail to best their titan in combatant. I rolled this one first though, so the Brutes are able to stay facing this to help out.

Post-combat in the bottom of Round 2.

The Wrathful Spears and Tree Herder charge the Spear Horde. Their horde popped their Plague Pot, so have Ensnare; have Phalanx to strip my TC, and my Spears have Weakness. They are hitting on 6's and wounding on 5's. It's not a great fight for me, but I wanted to try to accrue some damage here to force the Heals from my opponent. The Tree herder flubs, and we do a total of 6 damage here as well.

Top of Round 3: Ratkin

Out on the left, the Warriors offer themselves up to slow down the Tree Herder, and manage to land 2 damage though the bark. The other Warriors take the hill, ready to offer themselves up next turn.

Heals are tossed out, with a few damage healed up on the Ratkin's fighting spear units.

The horde of purple spears out on left are passed a token, and then they reform to form a second blocking line for my advance. The regiment of Spears countercharge my Headstrong Spears on the left, dealing 5 to my horde.

Grinding combats against the Rats.

My opponent waffles on what to do with Scud. He didn't want to fight the Tree Herder; wasn't sure he could best the Brutes with just a frontal charge; and didn't want to fight the nearby Tribal Spears with Phalanx and likely get flanked next turn. He has the inches to join the Mutant Rat Friend in a frontal charge against the Longhorns. He can also spot the sliver of the back flank of Tribal Spears around the woods, and ultimately opts to go into their flank, landing 14 damage, but the Nerve check is low, and they stick around, unperturbed. 

The nearby spears opt to charge the Tree Herder. The goal is to delay me, not kill things it seems. This does pen him in. They catch a Bane Chant from the Tangle, and manage to sneak in 5 damage, a bit more than usually expected.

The surviving Mutant Rat Friend has Radiance of Life to take him from 9 to 8, and then regenerates half his remaining damage to take him from 8 down to 4. He'll countercharge the Longhorns, dealing 6 damage to them, and they hold.

Post-combat in the top of Round 3.

Out on the right, the Enforcer was given the token previously, and turns, scurrying towards the corner, while the Horde of spears moves and pivots around the building.

Bottom of Round 3: Herd

Over on the left, I make a triple-charge into the upstart Warriors, and this lets the one unit Radiance of Life back their 1 damage, and the other unit end the phase on the loot token to pick it up. The Herder flubs, landing just 2 damage, but the regiments deal 7 and 8 respectively, and all together, this is enough to best the isolated and uninspired unit. I overrun with everything, and left-to-right we get 5" for the first regiment, 6" for the Herder, and 1" for the other regiment. 

Some big multi-charges from the Herd!

At Height 3, the Brutes can see the nearby Spear fight, and join in with a hindered flank charge. Along with my injured counter-charging horde, which catches a Bane Chant, we do enough to easily devastate and then rout the unit, and we turn to face down that purple horde with the 2-pointer token.

The Guardian Brutes rear-charge the remaining Friend, with the Longhorns joining in the front, and the Friend is felled. The Brutes victoriously pivot. The Longhorns are wary of the red horde of spears moving along my right flank, but Scud can charge them, so they turn to face the titan.

Reforms. The Brutes are holding things up.

There wasn't any way to get the Brutes into the rear of Scud. The units are just slightly too close together. I opt to charge Softhoof in, but he is unable to land a damage to ground the mighty flier.


Over on the right, Radiance of Life helps a little. Positioning is messy here. While the Spears could counter-charge Scud, there isn't physically space to change the units facing and positioning. Instead of countercharging Scud, and I chose to send the Wrathful Spears into the Warrior Spears, hoping for the weight of attacks to help me out. They ignore Scud and charge ahead while the Tree Herder swings. We actually land some damage this turn, but not enough to inconvenience the horde. 

The Harpies were unbothered last turn, and having gathered their wits, pivot and fly over to die and delay the incoming Spear Warriors. Totally sane behavior.

Top of Round 4: Ratkin

Over on the left, the Brutes have accidentally picked up the damage tracker for the Headstrong Spear Horde. I think I moved the tracker away for the reforms. Thinking they are on 5 damage, the Warriors intercept them with a flank charge, deal a ridiculous 7 damage (4 is expected...) and the Warriors pick up the Guardian Brutes. This is a pretty massive error, and entirely my fault, though dice are dice and the Warriors had a great run here. More power to them!

Moves for the Ratkin.

Neither of us thought of this last turn, but a Warlock hops up to prevent the Blue Horde from sliding down. The blue horde of Spear Warriors countercharge my Tribal Spears, can't scoot down, and so are still preventing my Tree Herder from breaking through. My Tribal Spears did get a Radiance of Life, but are still at 13 damage as the turn starts. They take 3, are Rallied and Inspired, but the Nerve checks are 10+ twice, and my Horde is bested this time.

The purple horde will pop their Plague Pot, and back up, this avoids a charge from the Tree Herder by about half an inch. They will handoff their token to the Hackpaws, who spin around and make ready to flee.

Positioning for the Rats.

Scud doesn't want to stay and fight. He nimbly flies and pivots around to land behind the Longhorns, and zap them with Lightning, and while 2 more damage is done, the Longhorns hold on 8 damage.

The red Spear Warriors trash the Harpies, and overrun a might 1".

The Tangle is passed a token, and it nimbly pivots around and moves to leave.

I should note here, that for the entire game, we believed Loot Counters could be dropped both at any time, and partially within a units footprint, enabling all the handoffs the Rats were doing. It wasn't until after the game that we read that section of the rules, stipulating that the drops must be done at the start of the unit's move, and placed entirely within the dropping unit's footprint. 

Bottom of Round 4: Herd

I opt to ignore Scud. Softhoof enters the woods, taking multiple penalties to shoot at the Hackpaws, landing no damage. One unit of Trackers moves along the hill at shoots at them with a movement penalty, landing 2 damage. It was a cover penalty if they stayed put, so it felt better to gain some ground. The Hackpaws hold.

Charges for the Herd!

The other Trackers can't contribute with shooting so charge the Warriors. Bane Chant fails, but the Trappers deal 6 damage. The Warriors endure it.

I move and pivot the Tree Herder. This is a mistake. I haven't really had to chase tokens before, and I think it would have been better to gain the ground now, and try to get around the purple Spear Warriors. I also pivot him too far towards the Spear horde, so... a double mistake here. I need to be moving up with him to chase down tokens, not gearing up for a fight.

Post-combat reforms.

We triple charge the blue Spear Horde near the center, and devastate them with the first batch of flanking Guardian Brute attacks, and then fast track the roll, and do indeed pick them up. The Brutes are out of Scud's arc. They stay put because Softhoof is there, preventing most reforms options.

The Longhorns spin around, ready to take charges from Scud and the red Warrior Spear horde, which has made it around the building and through the delaying Harpies now. The Tree Herder doesn't do anything. I didn't want to overrun because that would likely open him up to an easy flank charge from Scud if I don't roll high, and a rear charge if I do roll high. I'm feeling stuck still.

Top of Round 5: Ratkin

The tokens continue trekking towards the corner while the final regiment of Spear Warriors walks up to delay me, popping its Plague Pot. The Tree Herder can't scooch past in the nearby gap, and isn't nimble, so can't get around the far side of them either.

This is a really good move from my opponent. He is likely to rout the Longhorns, and free up space. He the spears charged the Tree Herder (they had inches to him, but not the Longhorns, if I recall correctly), they are likely to get flanked by the Brutes next turn, and would let the Tree Herder overrun safely and escape. Not charging makes my decisions harder, and keeps me gummed up.

Charges (and not) from the Ratkin.

Scud and the red Spear Warrior charge in, with the Birthing Daughter running up by the building, allowing the expendable horde to make a striding charge. The Longhorns are obliterated. 

Bottom of Round 5: Herd

The Ratkin don't give me any good outs, and early positioning mistakes are all catching up with me. A few heals go out from the Ratkin heroes. The Purple horde is brought down to 1 damage, as are the absconding Hackpaws. 

The remaining Guardian Brutes have a clear charge into Scud and a hindered charge into the red Warrior Spear horde. They also have a multi-charge into the delaying spear regiment. While I want to pummel Scud, the tokens are literally getting away from me, so I choose the latter, as I hope this will let the Herder break through to more effectively chase.

Charges for the Herd.

We are Ensnared to the Pot, and Phalanx strips TC1 from the Brutes, but it's an uninspired and unrallied regiment, and we do barely manage to break through. The Herder overruns a few inches, and then the Guardian Brutes spin around to block things up and deny a rear charge into the Herder.

Reforms for the Herd.

Over on the left, the Trackers land some more damage and rout the delaying Warriors. They turn to face the fleeing tokens, but there isn't much they can do.

The other Trappers on the hill aim and loose into the Hackpaws as does Softhoof. Just 2 damage is done, and I don't record who contributed. This is an error from me. My bows are short, with just 18"  range and I should not have the inches to take any of these shots. 

Since I angled the Herder awkwardly, he needs to pivot and move again to start getting around the purple horde. I think I was planning on Bane Chanting the Tribal Spears and charging in this turn... but they start the turn on 1 damage, I don't think I can break them.

Top of Round 6: Ratkin

The red spear horde is able to make another striding charge into the Brutes, but land just 5 damage. The hordes should be going about that much to Def4, and have been remarkably consistent this game with their output. The Brutes are inspired, and are even found to be Insane. Still the red horde pops their Plague Pots, and we're in for a grind here with the turns remaining dwindling.

Movement for the Ratkin in Round 6.

We decide Scud's best option here is to fly up and threaten anything that approaches the tokens. Neither Herder can reach anything this turn, so this should lock in for a strong Turn 7. Due to my positioning errors with the left Herder, the tree doesn't even have the inches to reach Scud, so he's even safe this turn, and even gets healed down to 0 damage.

Post-combat for the Ratkin.

The tokens are collected and the token-holders are cowering in the corner, but the Ratkin have this pretty well locked up it seems.

Bottom of Round 6: Herd

The left Herder moves 12, but won't have the inches or arc to contribute to a Round 7. The other Herder moves 12 as well, but is open to charges from the Enforcer and from Scud on a Round 7, making this a dubious move, and I can't really threaten any tokens.

End of Round 6.

Bane Chant fails in the spear horde fight, though my horde brings them up to 11 damage in the grind.. 

All the bows shoot into Scud with no penalties, but we land just 1 damage. We don't get a lucky waver, and we don't get a Round 7. 

Rats and their tokens.

It's 5:2 in favor of the Ratkin, and they scurry away with the win!


Game Conclusion

My opponent definitely had a better plan for the game, and began passing tokens back and scurrying away with them very early on, and going first definitely helped him get ahead early and stay ahead.

I have only played these Ratkin properly once before, and that was way back in December of last year, so it was a treat seeing them across the table again! Everything is crisply painted up and looks great. It was a heck of a game too, but unfortunately not our cleanest. Even with our rules goofs, I probably had a chance to win it, but I had a few positioning errors that caught up with me, and I wasn't able to cobble anything together as the game concluded due to my own errors.

The Ratkin started ahead and stayed ahead. My opponent did a great job delaying and keeping the scenario in mind. I'd say this was a well-deserved win!

Testing Conclusion

  • Longhorn Regiments Backline. From the previous game, I felt like they were ok but expensive generalist units, and I wanted to spread my line against all the rats, so one ended up on the front line, and then died quickly to the Mutant Rat Friends. This wasn’t bad per-se, but they weren't able to stick, and I wasn’t able to really capitalize on drawing two of the three titans out into early combats.
  • Spear Hordes. It was good to have them back, but it was a tough game for my spears and the opposing hordes really stalled me out. My hordes had a higher quality, but Phalanx is a weak spot for the Herd all-around, and really hurt here in the horde-on-horde fights. The Plague Pots were great for survivability, and the delay-and-scurry tactics were strong.
  • Harpies. With the Ratkin line being more tar pits than hammers, blocking stuff up centrally seemed like a bad call. With Scud having Lighting Bolt, dancing around him and looking to ground him also seemed like a bad call as the game went on. Ideally, they linger and hop the line to make some late-game charges, but being reactive and moving to block up that Spear horde seemed to be the best practical use for them as the game unfolded. It's hard working with just one reactive chaff piece, and I think I need to increase my troop count.
  • Guardian Brutes. I didn’t position them the best, but they did fine. The damage-tracking error was rough to discover while writing the report, but I am not sure if that would have changed much. With Pots, I don’t think I could break the Spear Warrior Horde quickly enough to roll on into the backline with stuff for the win. Sure I'd be in a slightly better spot, but I think I’d still floundering to put something together for a Round 7. My opponent played a solid game.
  • Druid. In retrospect, I probably should have swapped her positioning with Softhoof for my deployment. Bane Chant would have been more helpful in those grindy central combats. Overall it was the usual with her. Some good, but nothing fancy. Most of my kills near her were drastic overkills so Bane Chant wasn’t a big factor in this game.
  • Double Herders. They did ok, but just ok. I obviously had the positioning errors with the one on the left, and the one on the right forgot to scout and then got gummed up and neither rolled well in any of their combats. They did keep things Inspired more this game, and Radiance of Life did help out some stuff as well, so they still seem promising.
  • Silent Hunt. I want to like the formation, but they've never had a good showing. Deadly Snares is a very cool rule and neat design space to explore, but the Herd is aggressive, and the formation just hasn’t been working for me in any of my attempts to run it.
  • Trappers. Elf Gladestalkers, Northern Alliance Pack Hunters, and Halfling Poachers are all similar units, wanting to hide in terrain and land some plink damage all game. Unfortunately, the Trappers are only 5+ at range, and only have an 18” range. They aren’t going to win a shooting contest against these other units, and can’t effectively close the distance to fight them either, since everyone has Pathfinder and good combat stats. Non-piercing bow shots are also underwhelming most of the time, so these are in a odd spot, and don’t seem like a strong competitive pick. Troops of Trackers are 85-90 points though, on par with the rest of my chaff. That kind of unit could be helpful blocking for things, and could be worth exploring. 
  • Tracker/Softhoof. He had a Vicious aura I forgot about, that works with Keyword: Trackers, which the Trappers do have. For the formation, these should probably deploy together. It wasn’t a sure thing to ground Scud, and that is admittedly not is role, with no benefits to melee combat. I think playing around in the woods wasn’t the best call, but the dude still needs a pep talk or juice box or something. He was nice to have for Inspiring, and had a lucky Round 1, but didn’t so much after that. Shooting Heroes are just hard to use and justify in general I think. About the only good ones I have seen are the Brothermark’s with great stats and neat abilities. I tried to copy that here, and it didn’t work out, and his inclusion arguably even hurt me with the kinked line and his positioning complications. 
  • Scout. I forgot to move the Herder out on the right, so that was an error. We had similar speeds all along the line, so the big scary monster would have gained more ground for me early on, and maybe gotten me into fights with a little better positioning. The stuff on the left was decent though. Had I gotten first turn, the Trappers would have had shots into the Warriors on the hill, and the Herders would have both been slightly better positioned to start the game. Scout moves are going to be a constant head-scratcher for me though, but overall, I think this game was a step in the right direction for using it better.
  • Inspiring. Having Softhoof around for Inspiring was nice, and I don’t think I was ever too concerned with my coverage. With units operating close to the Tree Herders, they were indeed able to help cover my line more than they had been previously.
  • Deployment. I was out deployed again. Scud was a late drop, but other than that, the Rats didn’t have anything too scary to worry about. However, the Ratkin line was long and I had to abandon the token on my far right entirely. 
It was a great day, a great time, and a great game! Really tough match-ups today, but felt like I learned a lot, and losses like these are all part of the process. A huge thank you to my opponent here not only for the game, but for all his efforts to grow and support our growing community!