

I took some time off from work and was fortunate enough to play some weekday afternoon games instead! The first was a blog debut for Russ and his Orcs. It is a wonderfully painted army that I have been wanting to see across the table for many months now. He hosted the cookout and group games back in early June, and attended the Doubles Tournament later that month, though our paths didn't cross as the brackets shook out. He's been around, participating in the escalation league, but the typical weekend meetups have been a bit hard for him to make, and the weekday games he has squeezed in, a bit hard for me to make. We finally connected for a game, and he brought the following:

The Orcs are a fantasy staple, and I was very excited to finally play against them! I played against some Riftforged Orcs years ago, but seeing normal Orcs in a game would be a blog first. The list itself comes out of the escalation league. Units accrued accolades and upgrades month-to-month during the league, so the list was a little skewed towards regiments in order to preserve those boons (I believe there is a final event in the works to officially conclude the league), though we didn't play with them in effect for our game.

- Draugr. It has been a while since the Varangur hit the table, but having at least one unit of these to hold tokens and/or tar pit something for a turn or two was a good idea as I recall, so we’ll bring some Draugr along and see what trouble they can get up to.
- Reavers. Newcomers! I only brought one troop, but we’ll see what it can do. It comes with Tundra Fighters, which surprisingly works with the Cavern Dwellers and their Chilling Presence, so triggering that condition will be the goal of the game for them! Wish me luck.
- Night Raiders. I do want to try Scout with them, but chose to prioritize other things with this new list. We have a single unit to ease me back into their rules and into shooting, now that I have a better grasp of all the shooting rules and applicable modifiers.
- Human Tribesmen with Two-Handers. Newcomers to 3rd Edition! As mentioned in their Hobby Update, I ran them as Warbands in 2nd Edition, but am bringing them back as the unit seems interesting, as CS2 is hard to come by on normal infantry. We'll soon see if these are worth exploring or not! We'll try them first as more responsive regiments.
- Mounted Sons of Korgaan with Brutal. Mounted Sons are powerful, but can get bogged down. I opted to prioritize Brutal over other upgrades (like Scout on the Raiders), to hopefully smash from one combat to the next.
- Tundra Wolves. Newcomers! I originally had some trusty Snow Foxes enlisted to chaff and die, but the Wolves are wider, and will be able to more fully screen for the Mounted Sons. They also have some good threat projection, so yeah, we'll see what they can do.
- Cavern Dweller. One of the things I wanted to test way back when were Cavern Dwellers in multiples, so they got conscripted for these new lists. I’ve often felt like I have one chance to break a Dweller in a game before Lifeleech 3 really kicks in.
- Skald with Lute (and Ordered March). The Skald is the ASB-equivalent for the Varangur, with an Ordered Match Aura that I have yet to really try out. It’s Keyworded for Infantry only (not Heavy Infantry, so no zippy Hearthguard), but we should still have good recipients of it in this list with the Draugr, Reavers, Raiders and Tribesmen.
- Thegn on Frostfang. Nimble scoring units tend to be nice to have around, and I've gotten good use out of the cheaper Thegn before. I did have the points for the Snow Fox's extra attack, so we'll try that out here.
- Magnilde of the Fallen. The one-time fly can be very powerful, and Magnilde has proven to be strong and versatile in the past. We’ll see what she can do for me in this game!
- Kruufnir. I have really liked Kruufnir in the past as well, as his Rampage 3 tends to be very strong. With Duelist rumored to be tripling attacks against individuals with the new Clash, his “Bring Me Their Head” ability should be impactful in the coming months as well.
Table and Terrain
We were back at Oddwillows, making use of their wargaming high table, which was vacant on a weekday afternoon. I had left some suitable Kings of War terrain there a few months back (here), with the exception of buildings. Russ brought some terrain as well, and we utilized his buildings, which he had hobbied up for RPGs like D&D and for Frostgrave. We were using our typical terrain rules, running the buildings as Height 9 blocking terrain, the forests as Height 6 Difficult Terrain, fences as Height 2 Obstacles, and Hills as Height 3, and the bog of hands as Height 0.
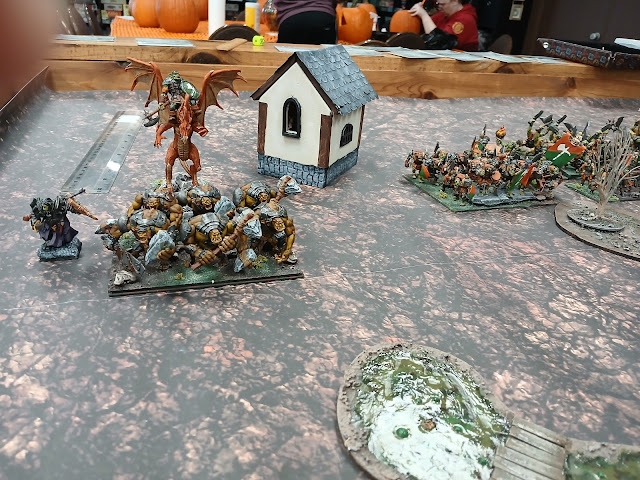
We got Plunder for the scenario. Five Loot Tokens start on the center line. My opponent nominated the center token to be worth 2 Points; I picked the one on the far left to be worth 2, hoping the building might dissuade him from deploying stuff there and picking it up. The other tokens are worth 1 Point, and you want to be holding tokens totaling the most points at the end of the game.
 |
| Tokens, and deployment. |
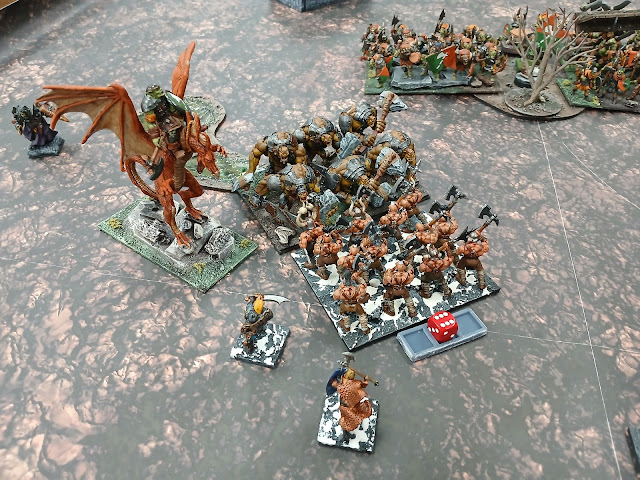
The Orcs had a lot of units and a lot of drops! From left-to-right was the Krusher, Trolls, and Winged Slasher. The building split his line a little bit. We then have Longax, the ASB and War Drum, Ax Troop screening a Greatax Regiment, Gakamak, another Ax Troop screening a Greatax Regiment, another ASB and War Drum, another Longax regiment, and a Morax Troop screening an Ax Regiment. On the far right was the Gore Rider Troop screening for the last Morax Troop, both uninspired.
 |
| Deployment again. |
Left-to-right for me we have Tribesmen, Skald, Tribesmen, Draugr with Wolves in reserve, then the Cavern Dweller hiding Magnilde, both Mounted Sons units ready to take the hill, the other unit of Wolves ready to try and block and chaff for both heavy cavalry units, the Thegn, second Cavern Dweller, and Reavers, hoping to make use of the monster's Chilling Presence. On my far right were the Night Raiders and Kruufnir.
My deployment goals were to just get Magnilde across from the Winged Slasher, to be ready to ground him, and Kruufnir across from Gakamak, so I could hopefully give a unit Duelist and take him down. The Orcs had a lot of drops, and I ended up being out dropped, with the Krusher, Winged Slasher and Gakamak all coming down late. Magnilde ended up more centrally, so she could help contain the Slasher where ever it happed to show up, and Kruufnir ended up on the right, as I think either this duo can bully the two troops, or Kruufnir should hopefully be quick enough to flee and regroup if the Slasher ends up down on this end of the table.
Top of Round 1: Orcs
On the left, the slightly speedier Trolls run up and immediately grab the two-pointer! The Krusher runs up alongside, and after some hesitation, the Krudger on Winged Slasher joins. Hopping up ahead of the Trolls would expose him to some hindered charges from the Tribesmen, and the warlord and his flying beast decides not to risk an early grounding.
 |
| The Winged Slasher hangs back while the Trolls grab a token. |
The rest of the Orc line moves up about 8". An obstacle halts one of the screening units, and the rest of the line opts to keep just pace and keep a tight line.

The ASBs, Drums, and Gakamak are tucked in between units, supporting but safe, as I have nothing that can fit in currently. As explained by their ASB, the Orc's strength is in their numbers, and keeping things tight and cohesive is a good call.
 |
| The Gore Riders play it safe too. |
Over on the right, the speedier Gore Riders even follow this logic as well. Kruufnir is over here, and the Riders opt not to temp fate, and halt out of the maximum charge range for the legendary troll.
Bottom of Round 1: Varangur
On the right, I think Kruufnir can handle either troop, so he moves up to dare a charge. I just moved and pivoted him. He's nimble, so I should have been more daring and moved him up more. The Night Raiders hold, and shoot into the Gore Riders with no penalties, and will land 2 damage, but the skirmishing Orc cavalry hold.
 |
| The Varangur hold back on the right, waiting for a chance to counter-attack. |
The Reavers hold. With Defense 3 I don't want to be aggressive with them, and want them to be getting a charge in any combat they enter. If the Orcs move up, I should have some good charges for them on my next turn.
In the center, the one unit of Wolves scampers ahead. The Orcs were aggressive enough that I'm not going to get a good charge off with them, so they hop up to bait charges and be chaff.
The Mounted Sons take the hill, each with a majority of their base on it for the extra TC when they charge off.
 |
| The Varangur take the hill. |
The Cavern Dwellers claw their way forward. The one on the left is safe, but the one on the right should be in range of a Morax troop. The Thegn takes a supporting position for this Dweller.I am very wary of the Winged Slasher. The Draugr sidestep, allowing the other unit of Wolves pivot, safe from a Slasher charge and blocking out good landing zones for the flier.
 |
| The Tribesmen brace themselves. |
Magnilde should have a charge into the flier, but without additional support... I don't want to pop up and ground him just yet. The Tribesmen arrange themselves to protect the heroes, and prepare a counter attack for the Winged Slasher. They best I can do is set some traps, and then pass the turn.
Top of Round 2: Orcs
My opponent takes the bait, and the Slasher goes in, Hindered. I don't think I measured the distance to the Trolls, but they do have a hindered charge into one of the other unit of Tribesmen. In retrospect, I probably should have just pivoted the unit instead of moving and pivoting.
 |
| The Orcs eagerly charge in. |
The hindered Slasher lands a ridiculous 8 damage onto the Tribesmen, and two hot Nerve Checks removes the unit from the field!
The Hindered Trolls deal 6, but the second unit holds.
 |
| Reform from the Slasher. |
Centrally, the Gakamak and a troop of Axes will charge the Tundra Wolves, landing 13 damage, and seeing them off the field. Gakamak should sidestep towards the Slasher to complicate my charges, and the troop holds to serve as chaff against the Mounted Sons.
The Morax Troop lands a very strong 7 onto the Dweller, but the monster holds.
 |
| Partway through the Wolves' combat. Gakamak has yet to swing. |
The Gore Riders take the bait against Kruufnir, charging in and dealing 4 damage, but the troll holds.
Tokens-wise, the Trolls have the 2 Pointer from the far left with the Trols, the 1 Pointer on the left is open, the center Two-Pointer is held by a Greatax regiment, the 1 Pointer on the right is held by the Longax regiment, and the 1 Pointer on the far right is open. The Orcs are off to a good start!
Bottom of Round 2: Varangur
Kruufnir regenerates 3 of his 4 damage, and countercharges the Riders. The Raiders opt to join in and the multi-charge punches through the Orc cavalry.
 |
| Varangur resistance on the right. |
The Raiders opt to overrun, and get a bonkers 6 inches, bringing them nose-to-nose with the Morax berserkers. Seeing this, Kruufnir elects to hold. The troll isn't going to be able to tank for them again, or sidestep to threaten a flank charge should the Orcs charge the Raiders.
 |
| Daring Raiders... |
Centrally, I need to try and smash some things. The maimed Cavern Dweller counter-charges the Ax troop, with my Reavers joining in. The Reavers will overrun well to stare at the Longax regiment, and the Cavern Dweller will back up to get the plucky troop into its front arc.
 |
| Varangur charges in the center. |
The Thegn can charge the Ax Troop in front of him, but I don't want to. Given his height, he would be multi-charged next turn even if he wins. I notice that the Thegn can make a pretty safe charge into the Ax regiment, so do that instead. I only deal 2 damage, but am still tucked in and relatively safe.
The big decisions are what to do with the Mounted Sons. With the Wolves and such, my list was trying to build around them, but there are a lot of orcs to hew through! Gakamak is going to be rough if I don't do anything, so opt to throw a regiment at him, and we are able to rout the legendary orc cavalryman and reform.
The other regiment charges down into Ax chaff screening the Greatax regiment. The Sons are joined by striding Cavern Dweller. The Dweller ends in the woods, allowing the charge of the Mounted Sons to be clean. The troop is obliterated, and the Sons are able to overrun to get out of arc of the other Greatax regiment and avoid a flank charge. The Cavern Dweller holds, as it should be able to get into anything.
 |
| The Varangur desperately try to contain the Orc's offensive. |
The Draugr roll well for their wild charge, and can get in to gum up the Longax regiment, so I send them in, even though they are hindered. I believe 1 damage slips in against them.
The remaining Tribesmen catch a Bane Chant, but they only hit 4 times, and then only deal 3 damage to the Trolls. The units are not off to an auspicious start today.
Magnilde is able to get into the Slasher without using her Fly ability. The leader point of the Wolves is to the left of the Tribesmen, so they can't get in against the Trolls like I had originally hoped, though with the performance of the Tribesmen, perhaps that is for the best! Instead they go in against the Slasher as well, landing 3 damage with Magnilde contributing 4. The Winged Slasher holds, but all things considered, this is a pretty good start against him.
Top of Round 3: Orcs
The Trolls roll well, and are able to pick up the Tribesmen on the second attempt. I definitely underestimated them! Their CS2 really let them do some good work against my Def4 and the unit looks like a fantastic pick to anchor a battle line. THank goodness my opponent only had the one!
The Slasher and Krusher choose to attack the Wolves, landing 8 damage combined, but the Wolves are not devastated, and are even found to be insane! The Tribesmen should take a lesson or two.
 |
| The voracious and insane Wolves, coming to my rescue. |
The Longaxe counter-charge the Draugr, dealing 3, but the Zombies hold, and will Iron Resolve down to just 2 damage. The delaying charge is working!
Working our way down from the left, the Greataxe and War Drum each make a hindered charge into the Sons dealing 5 damage, while the other Greatax regiment and an Ax troop charge the other unit of Mounted Sons. Those charges are clean, and they deal a combined 12 damage, and with the Skullpole, the Orcs are able to just get the waver against my cavalry!
 |
| Ouch! No brawling for this unit of Mounted Sons. |
 |
| Combats on the right. |
On the right, the Morax troop land 7 into the Night Raiders, but the bowmen hold under Kruufnir's supervision.
Bottom of Round 3: Varangur
Kruufnir is nimble, and he and the Raiders fight the Morax troop. I like my chances here, and things do indeed work out. The Raiders push through the orcs, making another long overrun (I think it was another 6), to land on the obstacle, and even claim the token nearby. Kruufnir is just within 12 inches away from the flank of the Longax regiment fighting the Reavers, so just pivots.
 |
| Combats on the right, but on the Varangur turn. |
The Reavers countercharge, dealing 8 to that Longax regiment.
The Cavern Dweller opts to go in against the Ax Regiment, trying to help out the Thegn and keep a source of Inspiring around The Cavern Dweller Lifeleeches down to 1, but the duo fails to break the opposing unit.
I opt to keep the wavering Mounted Sons where they are, as this prevents the Morax regiment from just flank charging the other cavalry regiment. With the trolls free, things aren't looking great, so I am trying to eek out advantages wherever I can.
 |
| Grinding combats in the center. |
The unwavered Sons countercharge the Greatax regiment, taking them to 6 damage. Unfortunately, the Cavern Dweller can't help out in this fight, as the Sons can's scoot over to let them in. It charges the War Drum instead, dealing 5 damage, but fails to break the unit. The Cavern Dweller lands atop the token, but I don't remember to pick it up at the end of any phase.
To keep things Inspired, the Skald runs up near the woods.
The Insane wolves countercharge the Winged Slasher, sliding down a bit, with Magnilde able to get in on this combat aas well, being a tricky individual. The Wolves land 5, Magnilde lands 4, and at 16 damage, the Winged Slasher is brought crashing down! Magnilde will back up, getting closer to the other combats, and the hungry Wolves will pivot to face the Krusher and the flank of the Trolls.
Top of Round 4: Orcs
The Trolls charge away, and the Krusher is able to land a few damage and put down the Wolves. The Longax are able to land some hits, and actually scatter the Draugr this turn, despite them being Inspired.
 |
| Mid-melee phase, the Longax scatter the Draugr and reform. |
The Greatax regiment breaks the unwavered Mounted Sons with some good rolling, while the second Greatax regiment, along with the Ax troop again, charges the second unit of Mounted Sons. The Trolls join in on the flank for a three-on-one fight. It's a rough turn for the Varangur, and the second unit of Mounted Sons is broken without having accomplished anything.
 |
| A custom Flagger. |
Centrally, the Flagger hops up to provide his Aura to as many units as possible. I really like the fluff of the orcs, and their ASB special rule is fun. This is also a custom model sculpted by a local player, which I wanted to highlight. A smart play with a cool model!
The Ax Regiment counter-charges the Thegn, landing another 3, and wavers him!
 |
| Insanity! |
Bottom of Round 4: Varangur
With the Reavers holding, the Raiders and Kruufnir are able to make hindered flank charges into the Longax regiment to join that fight, and combined, the spears will be put to flight. The Reavers pivot, ready for more! I think Kruufnir and the Raiders just hold.
 |
| Charges from the Varangur. |
The wavered Thegn will disengage, and then withdraw from the Ax regiment. He will change facing to steel himself for the next wave of incoming orcs. The Cavern Dweller will pick up the fight against the regiment. I didn't track the damage output well. The orcs look to have started the turn at 7 damage, but later pictures show them at 4, so it looks like a die got bumped or something. We didn't catch this at the time.
The other Cavern Dweller rights and beats the Greatax regiment, and pivots to face the lurking Trolls. The intent was to get both the Trolls and the Longax into front arc, but per the picture, it doesn't look like I did, and should have moved the Dweller just a little more.
 |
| Reforms for the Varangur. |
Magnilde pops her one-per-game fly, and makes a hindered charge into the injured War Drum, landing a few damage and picking it up.
Magnilde should be partially on top of the token, but not covering it fully. Being a three-dimensional token, this are messy. The idea here is to try to contest the token, and prevent a multi-charge into the Dweller, but not covering it completely, the first goal is difficult.
Top of Round 5: Orcs
The Longax Regiment makes a hindered charge into Magnilde, landing 2, which will Iron Resolve down to 1. Magnilde is great.
 |
| Charges from the Orcs. |
The Krusher doesn't have the inches to join in the fights this turn, but jogs up to try and help all the same. The Trolls make a hindered charge into the Cavern Dweller, and fail their rolls spectacularly, landing just 2 hits, and then just 1 damage.
The War drum moves to allow the Greatax regiment to charge and smack the Thegn.
The Ax regiment brings the Cavern Dweller to 4, but the monster holds.
The Ax Troop charges and bests the Reavers, choosing to then overrun and intimidate Kruufnir.
Bottom of Round 5: Varangur
The legendary troll has yet to regen his last point of damage, though the rest of the Varangur's dice are very hot this turn.
 |
| Charges from the Varangur. |
Kruufnir goes in against the troop, rolling all 8 hits, landing 5 damage, and scattering them. Still that little chaff troop accomplished a lot this game! At some point, it had grabbed the right token, which is now picked up by the victorious troll.
 |
| Aftermath of the combats. |
The Raiders are able to connect with the flank of the Ax regiment, roll hot and land 16 damage. The Cavern Dweller contributes some as well, and the unit is scattered. The Bowmen try to get away, and will back up 1" while the Cavern Dweller pivots to face the Greatax regiment.
Magnilde counter-charges the the Longax regiment, lands all 7 possible hits, all 7 possible damage, and secures a rout, protecting this token.
 |
| Another improbably great combat for the Varangur. |
The Cavern Dweller rolls up 5 extra attacks, hits all 11 hits, and then translates that into a hot 10 damage, securing an improbable waver against the Trolls. The Dweller will Lifeleech down to just 1 damage.
 |
| The routed units convene along the table edge. |
It is a blazing hot turn for my dice. There has been a lot of carnage this game (as desired!), but loot tokens matter most. The left token near Magnilde is still unclaimed. The Trolls and Greatax units both hold 2 Pointers, and the Raiders and Kruufnir each hold 1 Pointers, making this 4:2 in favor of the Orcs as we go into Round 6.
Top of Round 6: Orcs
We talk it out, and decide the best bet is for the wavered Trolls to disengage, withdraw, and then back up. This lets the Mighty Krusher sneakily charge the Cavern Dweller in an attempt to hold it up.
The Trolls regenerate down to 8 damage as they withdraw. The Flagger tries to hit Magnilde but misses, and the Krusher does indeed connect with the Cavern Dweller, but only lands 1 damage, bringing it up to 2 damage.
 |
| The Krusher does his best. |
Elsewhere, the War drum pivots, to block up the other Cavern Dweller, in an attempt to protect the fresh Greatax regiment. Likewise the Flagger moves to prevent the Night Raiders from just making charge into the corner of the unit, or just simply past the Flagger. I will need to go through the Flagger and make a long overrun if I want to make a play for the Greatax unit and their token.
 |
| The Orcs gum things up to protect the Greatax regiment. |
It's the best the Orcs can do, and they pass the turn in the lead.
Bottom of Round 6: Varangur
Unfortunately for the Orcs, the Trolls have a pretty wide frontage. The Cavern Dweller is able to withdraw an inch, and with the one pivot, connect with them for a penalized charge. Magnilde will ignore the Flagger and make a hindered charge into the Trolls to help. Both charges are penalized, but they each deal 4 damage, and we are able to break the trolls, with the Cavern Dweller picking up their 2 Point token.
 |
| Aftermath of Round 6. |
Making a good play for one token, I opt not to go for the other. The Raiders will back up, putting more than 10 inches between them and the Greatax regiment, loosing a volley with a penalty, and will land 2 damage as they meekly depart.
My brain is mush. I believe we rolled up a Round 7, but I took no notes on it. Nothing changes. With the Cavern Dweller besting the Trolls and stealing their token, the score flipped in favor of the Varangur. The Greatax can't charge anything to force me to drop a token, and Varangur will take the lucky win.
Game Conclusions
Well, the dice were certainly dice this game! Things started out strong for the Orcs by getting the first turn and securing a lot of ground, not to mention a lucky break against the Tribesmen! However multiple occurrences of Insane Courage helped the Varangur stay in the game, and then a ridiculously hot Round 5 turned the tables on the Orcs enough to get me the win. I didn't really have any right winning this, but so it goes.
As a big fan of regimental play myself, I liked the toolbox of units that he brought. The Ax Troops seemed like a great addition to protect his important units. Supporting everything with the Drums and ASBs was really neat to see in action, and the Orcs definitely did not disappoint today! They were awesome to play against and I hope to see them again on the table soon!
Testing Conclusions
- Draugr. I was hoping to get them a token, but they were forced in a delaying role. Still, holding for two turns against some Orcs is hard work, and they did fine.
- Reavers. Well, they did great! Insane Courage is really nice with a Fearless unit, and I did pull off some Tundra Fighter combats. Apparently the Morax have been run similarly, as a second-line unit, so this might be worth exploring.
- Night Raiders. I wasn't expecting much, but with a little support they were able to really do a lot for me this game.
- Human Tribesmen with Two-Handers. The Tribesmen are not little blenders, and this was not a great game for them! Getting dunked on by the Winged Slasher was disheartening, as was accidentally giving the Trolls a charge. The Trolls proved to be a very bad match-up, given the disparity in number of attacks and their extra armor.
- Mounted Sons of Korgaan with Brutal. Brutal can be good, but was not impactful here. Being out deployed, I couldn't give them great combats or support, and luck was not with them.
- Tundra Wolves. I really liked these. The insane unit was obviously overperforming, but Speed 9 with TC and Pathfinder was really useful, and should be a great way to screen and instigate.
- Cavern Dweller. Chip damage just fell away and they rolled up a lot of extra attacks this game.Yep, they proved to be very hard to take down, and it's not just me that has trouble against them! Without all the ranged synergies of the Northern Alliance, this seems like a good brute force take for the Varangur.
- Skald with Lute (and Ordered March). Bane Chant hit when it needed to, and he did fine otherwise. Not getting first turn I didn't get to make good use of Ordered March. I think as long as I am running infantry, this is a good take.
- Thegn on Frostfang. The Thegn was a little unlucky with that waver, and the extra attack wasn't really noticeable. It's nice to have since it's a good, quality attack, but not a must-have.
- Magnilde of the Fallen. Oh baby! I forgot how much fun she is to run! Definitely a great pick for the Varangur, and I'm going to struggle to make a list without her.
- Kruufnir. I really like this legendary pick as well. A straight Rampage 3 is really nice, and his better Nerve (relative to the basic Prime) is really helpful at keeping him around. Another unit I will have a hard time not taking.
No comments:
Post a Comment