

Intro and Lists
There is a "local-enough" convention coming up in early October (this weekend, actually, since it took a little extra time to finish the report up) with a small, 1500-point, one-day Kings of War tournament as one of the many events. The doubles tournament back in June was fun, so with this event close enough for a relatively easy day trip, it felt silly to not make the effort, and I eventually committed to going.
With the event on the horizon, I was hoping to stretch some analytical muscles, get some practice games in, and maybe even run something wild, like the Undead or Varangur to explore one of those armies more. Early September saw me getting in a good number of Herd games in, but before I could transition to any event prep, reality and various responsibilities fully reasserted themselves, dashing (almost) all of those hopes for any serious preparation. Very fortunately for me though, the stars and schedules miraculously aligned for one late afternoon game with Trevor from Data and Dice on the weekend prior to the tournament. I am not good at fine-tuning lists, so my goal wasn't to drill down on anything specific for our game, but to just play a game, and brush up on some rules and tactics so I wouldn't be as extra rusty going into Game One of the tournament. We played at 2300 points, with Trevor bringing the Sylvan Kin and the following list:

We run a lot of "near-mirror" armies, so when Trevor's Sylvan Kin hit the table, I take notice on behalf of my Herd. When I've run the Herd, it's always been exploring something, and doubling-or-tripling down on that something to get an idea of how that unit or tactics works. There is a lot to love about this list! At a high-level, above all, this list is balanced. It has just a small portion of everything, including Scout moves, which should gives it a lot of options on the table.
Running through the list quickly, we have three Gur Panthers as wonderful and speedy chaff, a horde of interesting Forest Guard to hold the line, Silverbreeze to harass, Gladestalkers to scout and shoot, Awakened Forest Shamblers to hold the line and scout, and the Wiltfather to beat face and scout. We also have the Quicksilver Lancers, the upgraded Stormwind Cavalry regiment, to hit hard on the charge, and a number of more unique picks. These include the Windborne, to push things around to take advantage of the good range and speed of the Kin units, keeping them safe from enemy charges, and two Elven Kings with Bows. One goes even harder, grabbing the Shardblade to hit on 2's in Melee, and Axe of the Giant Slayer, to get some Slayer triggers against monsters. With no piercing on the bow, and Just CS1, I'd prefer the Scythe and its Rampage trigger better (like I tried in Battle 082), but with so many other shooting units, a high volume of good, elite bow fire might just do the trick.
I’m just getting my toes wet with tournaments, and don't plan on traveling much at the moment, but I want to approach these events similarly to my usual games: that is, running a variety of armies like a maniac. I don't necessarily want to be testing things, or running a new unit for the first time at an event, but running a variety of armies and lists is definitely a goal. With less prep here than I wanted, I opted to run the simple and rather familiar Kingdoms of Men for this tournament. I wanted to use our game to mostly check back in with the army. I ran the following:

We’ll dissect the tournament list and my thinking separately, in posts for those reports. For this game, very little is “new”, and that's the point. I wanted to fall back on something mostly familiar, so I could just brush off the rust. Here, I wanted to see how the humans felt without their Flying Generals, as well as contemplating a few things for constructing the tournament list. Up to test is:
- Pole-Arms vs Foot Guard. The Pole-Arm Horde has rarely had a good outing for testing, so I wanted to try and compare my “smashy” hordes a bit on the table. Is Melee 3+ and Def 4 worth the price increase, or are cheaper Pole-Arms the way to go?
- Crossbowmen vs hypothetical Bowmen. Trevor has used a single Brothermark Villein Bowmen Horde to great effect against me. It contributes a little at range, but usually survives to the late game to contribute to scenarios and hold tokens. Getting only one game in, I didn't get to compare them to the Bowmen in an alternative list of mine, but we'll still see if Crossbows feel like worth the investment for that Piercing 1.
- Rampage Giants. I’ve been running Rampage on my Giants for a while now, and wanted to try that again here. With Crushing Strength 4, anything they touch should feel it, regardless of whether Rampage or Slayer triggers, but Rampage should help them cleave through tar pits better. We have three Giants, so we’ll see how much stuff we can actually chew through.
- Monarch (honorary forth Giant). Essentially the only new thing, though he has appeared with some other upgrades previously, like fly. With Melee 3, his output should be slightly better than a normal Giant, but still serve a similarly smashy role, helping me smash through any high-defense target.
- The Captain. I have always liked the concept of the Captain, but struggled to get any real use out of him with the lists that I tend to run. He's neat, but hard to use well. We'll keep a close eye on him, see what can be redeployed, and where Rally might be useful.
- Triple Ballistae. I’m bringing three here, just to get more experience with them and with evaluating firing lanes. I think war machines like these can be approached one of two ways: deployed early as area denial or deployed late for dedicated monster hunting. We'll see what seems appropriate.
We were out at his place, so I arrived to a table nicely set up and ready already. We were using our typical terrain rules, running the buildings as Height 9 blocking terrain, the forests as Height 6 Difficult Terrain, fences as Height 2 Obstacles, and Hills as Height 3, and the field as Height 0.
I won the roll for sides, and did the ungentlemanly thing and switched, to hopefully deny him good use of most of the woods. I didn't like the idea of having to dislodge two Gladestalker regiments from difficult terrain.
We got Raze for the Scenario. We'll take turns placing tokens 6" back from the center and 12" away from any other token. You burn tokens you place to score a Point, but can only contest the tokens your opponent placed. Ideally, things get whittled down to a fight over the center token in the late game.
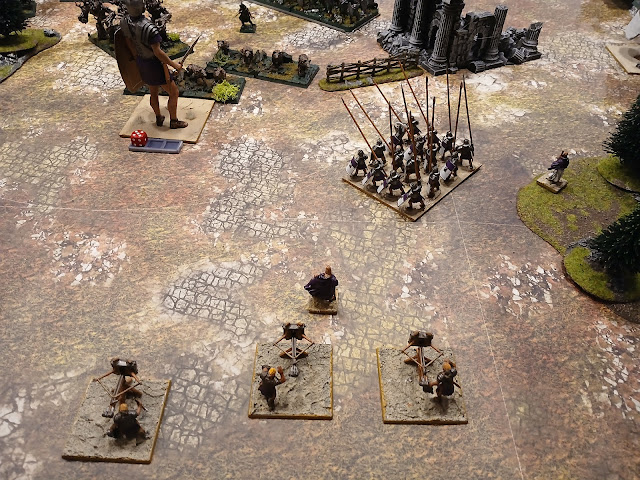
 |
| Tokens and deployment. |
I immediately donk up my token distribution. I wanted to do what my opponent did and do 2 on the left, but unfortunately, the left-most token was my first, and the spacing happened to preclude placing another token on the left, meaning I ended up with two on the right. I need to place one behind the building to get two tokens over here, so yeah, we are not off to a great start.
It's a friendly game, but since I am trying to do some mindful tournament prep, I'm largely rolling with things, to see where there might be weak points in my play, and places to improve on, and things to keep in mind. I think the way to do this next time would be to deploy from the inside-out. Unless there is blocking terrain complicating things, either side can generally handle two tokens, and going the minimum distance outward from the middle keeps you from donking things up like this.
Left-to-right my opponent had the shooty Silverbreeze Regiment, and a building isolating them. The center had the mighty Wiltfather, a Gladestalker Regiment, the Master Hunter, the Awakened Shamblers with Gur Panthers in reserve, a King, and the Forest Guard with more Panthers in reserve. The right had the Windborne, Quicksilver Lancers, King with the Shardblade, the other Gladestalker regiment, and some more Panthers in reserve.
Looking at the lists, I was going to out-deploy my opponent, but not by much. With Scout (and Def6), the Wiltfather would be hard to hunt. I'm am still learning war machines, but it didn't seem like we had any commanding firing lanes, so I chose to deploy the Ballistae centrally to get some early shots in and pressure the center as the game progressed.
Left-to-right we have Crossbows, angled, to be ready to hop up and fight for these tokens. The Foot Guard started behind the hill, with the Healing ASB, while two Giants and the Monarch watched the woods for signs of the Wiltfather. The Ballistae ended up centrally, with the Captain, the thinking being that his Rally might help them survive any early counter-fire. The thinking is that longer I can preserve the war machines, the more chances they have to spike some dice and deliver. My right had some reserve Pikes to go for the center or the right, and the Wizard with BC and Mindfog sat nearby as well. A Giant held the woods, more Pikes ended up nearby, with the BC ASB, and the Pole Arms were on the far flank, hoping to make use of the hill to help screen their advance.
Redeployment and Scout
I was largely happy with my deployment, but then rolled up 3 redeploys from the Captain. I tied myself in mental knots, trying to wring use out of the ability. My center was weak, so I wanted to get the Foot Guard Horde more central, but couldn't quite fit them in without blocking up the war machines. I ended up moving a war machine and the Captain more to the right, to shoot around the woods and let the nearby Pikes protect them more. This still didn't create good space for the Foot Guard to go centrally, so I ended up just angling the Foot Guard so they could more at the double and help zone out the woods for their first move.
In retrospect, with three redeploys, I think I take the middle-most Giant and swap him with the Foot Guard, and then can still move a Ballistae to maintain lanes of fire. This would have helped me contain the Silverbreeze and still zone out the forest with some nice striding charges, while strengthening my center, which, just being Ballistae, was a little concerning.
My opponent then had scout moves. which caused him about as much mental troubles as my redeploys did to me. On the right, the Gladestalkers got their leader point onto the hill, to get line of sight and some turn one shots. Centrally, the Master Hunter, Awakened Shamblers Gladestalkers and Wiltfather all moved a uniform 12" up, which I was initially really excited about.
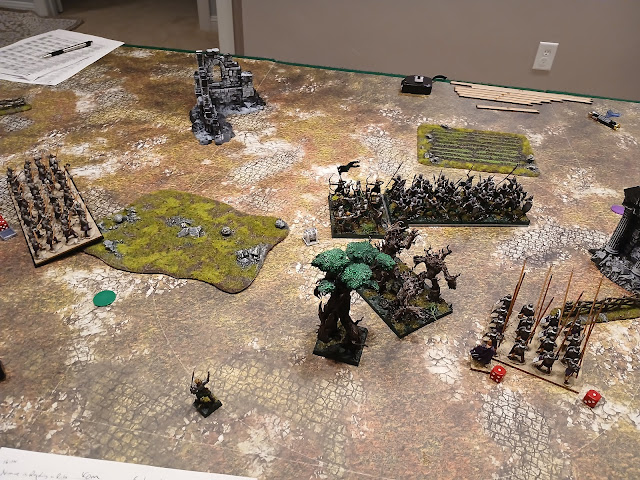
 |
| Final positioning, after the redeploy and the Scout moves. |
My Giants are Speed 7, so if anything entered the woods, I could see and multi-charge it. Slowly, my opponent realized this. Trevor inched back his Wiltfather, and then the Gladestalkers. He then double checked, and confirmed that the Awakened Shamblers were in charge range as well, and then inched them and the Master Hunter back too, to avoid the early charges. This was a bummer for me, but obviously the right call.
I won the roll-off for deciding turn order, and with war machines, opted to go first.
Top of Round 1: Kingdoms of Men
Out on the left, the Crossbowmen move forward their speed, and then fire with a penalty into the Silverbreeze regiment, hitting a wonderfully hot 5 times, but only pushing 2 of those hits into actual damage, bringing the final results back to something more typical. The regiment is unsupported, so I like my chances of bullying them over a few turns, and I just need to not give them a good out via a flank charge or something.
The Foot Guard move at the double to hop over the hill. With their charge range of 10 inches, they can reach anything hops into the woods to try and peak out. They are able to keep the Silverbreeze in their front, and while the nearby Giant moves up as well, he holds back a few inches, so as to not give the Silverbreeze a flank charge, while also pressuring the forest.
 |
| Movement for the Kingdoms of Men. |
With the Wiltfather, Gladestalkers and Forest Shamblers all holding back with their Scout moves, I opt to hold back a bit as well, with the aforementioned Giant, Monarch, and other Giant playing with angles and inches to make things messy and prevent many multi-charges from the Kin. Given the intervening forest, the Wiltfather isn't going to have a charge next turn unless I entered the woods, and delaying him feels like ta good thing right now.
It turns out the Ballistae might not have the best long-term shots. The Gladestalkers have Stealthy, and Forest Guard have cover from the terrain (and from the intervening obstacle for a few shots). The Ballistae all shoot into the Forest Shamblers, landing 1 damage apiece, which is consistent but felt underwhelming at the time! Rubbing my face in it a little, I get boxcars for the Nerve Check, which means nothing on this Fearless unit.
 |
| Straight to dice jail with you! |
The Pikes both move up, one towards the center and one towards the right. Both get partially through the woods. The Wizard in the woods attempts a Mind Fog on the intrepid Master Hunter in the center field, but the spell doesn't connect.
On the right the Giant moves up, but the woods stymies his progress, along with the Pikes. With first turn, the weak Pole-Arms moves at the double, looking to force some quick decisions around the hill way out here.
Bottom of Round 1: Sylvan Kin
Across the line of battle, the Gur Panthers get the zoomies. On the right, they zip up to mess with spacing, as the King, and Quicksilver Lancers all take the hill. Given the spacing, my Pole Arms can't squeeze past, so I am stuck hitting the Panthers. Likewise, the Giant will have the inches but not the space to slide in against the front of the Lancers. Great use of chaff. Well played!
 |
| Great use of chaff by my opponent. |
The Gladestalkers, King, and Windborne all shoot into the Pikes on the right, landing 4 damage in total, with the Windblast arrows pushing them back three inches, putting them out of charge range against the Gur Panthers.
Centrally, the Gur Panthers zip up as well, making things positionally very messy. They are currently gumming things up, while also threatening charges into the Ballistae next turn, since they are so darn speedy. If I want to keep the war machines around, I will need to react. The Wiltfather lurks, avoiding the woods still, and the Awakened Shamblers move slightly, with my opponent looking to reinforce and avenge anything that I decide to charge next turn.The Hunter, Slayer King and Gladestalkers all shoot into a Giant, landing 5 damage. This is all non-piercing arrows from bows, so is a little disconcerting!
 |
| End of Round 1. |
On the left, the Silverbreeze back up, getting out of shooting range of my Crossbowmen, while loosing into the Foot Guard, landing 2 damage themselves.
Top of Round 2: Kingdoms of Men
The Crossbowmen are forced to move again, but are firmly contesting my opponent's token. They fire again into the Silverbreeze, but land no hits this time.
The Foot Guard move up, cautiously still, as they are still wary of presenting a flank to the speedy Silverbreeze. They are still looking to swing around the woods soon if they can, but zoning things out of the woods is still ok.
The left-most Giant can't do much this turn, and so moves into the woods, daring a frontal charge from the Wiltfather, while pivoting to avoid a flank from the Silverbreeze as well. I think my thinking here is that I am about to start losing the Ballista, and need to start instigating.
The Monarch and other Giant have some options, but none feel particularly great. I don't like my odds, even in a multi-charge against the Awakened Shamblers. Last turn, with no potential reprisals, I would have taken it, but here, even if I win, something is getting hit, hard, and the something would very likely be the Monarch. I opt to hold the Monarch near the edge of the woods.
The other Giant goes into the Gur Panthers. Rampage triggers, and we get 7 extra attacks from 2d6, dealing .... 4 damage when the dust settles, and we just barely waver the Panthers. I forgot about Brutal, which I need to do better at, especially for these flub combats, but I'm at the lower-end of the Nerve here, and the bonus would still have resulted in a waver. Not impactful, but still something to try and do better at remembering.
 |
| Efforts to protect the war machines. |
The Pikes are about a quarter inch shy of flanking the other Panthers, so they just move up. The mighty Captain moves up as well. The Panthers are nimble, but should have trouble shooting the gap, and this should (hopefully) limit their charge options. I think these were some of my final moves, so I probably didn't need to move the left-most Giant just yet.
I Mindfog the Panthers, and then evaluating my options, shoot the Ballistae into them. This is a large procedural error on my part. I should have shot first, and then figured out what to Mindfog, since nothing is really damaged and I am fishing for boxcars. One Ballistae lands 3 damage, the others roll up nothing, and the second unit of Panthers are only Wavered.
On the right, I don't need Bane Chant against the Panthers, so don't attempt it. Over on the left, I do forget to attempt Heal on the Foot Guard though, which is an error. I am not used to having that spell around.
On the right, the Pike's can make the charge, so I opt to send both the Giant and the Pole Arms in, risking the Insane Courage and mostly just looking to gain ground. The Panthers are devastated and then routed, as is proper, with this Giant actually doing work.
 |
| Combat on the right. |
For reforms, I want to overrun and get onto this hill. I overrun Pole Arms a mighty 1 inch, just getting their leader point on the hill. I consider backing up with the Giant, but the Quicksilver Lancers are nimble. I can't hide him behind the Pole Arms at all, so I choose to overrun with the Giant as well.
 |
| It's the dice jail for you as well! |
Bottom of Round 2: Sylvan Kin
The Lancers eagerly flank charge the Giant, with the nearby King joining them, and the Windborne hitting the Giant's other flank. Looking at the pictures, I maybe could have contested the Windborne's positioning, but with the more important Lancers already in the flank, the Windborne don't matter much. The King here went 7:7 per my notes, and the Giant is devastated and routed when we get to this combat.
 |
| Not a great start for combats. |
The Gladestalkers charge the Pole-Arms horde, landing 3 damage.
Centrally, the Gur Panthers relax while the Forest Guard move up, getting ready for combats once the Panthers scatter.The central Gladestalkers back up, and are able to see around the forest and into the Foot Guard. On the left, the Silverbreeze sidestep, and both units loose into the Guard, landing 5 more damage and bringing them to 8 damage (the original, unhealed 2, plus 1 from Cloak, plus the 5 new damage), and we get a second, unfortunately more impactful Boxcars for the game.
 |
| That's two giants triple-charged and easily dispatched in nice and early in Round 2. |
My positioning with the other Giants was equally sloppy, and I can't blame the dice out here! The Wiltfather does take the frontal charge, with a King joining in the front too. The Awakened Shamblers were right there, but I blanked on factoring them in, and it turns out they have a flank into the Giant as well, able to squeeze in against a corner. Cloak of Death triggers, hitting a bunch of things, and this Giant is brought up to 18 damage and then dispatched. Definitely a huge blunder here on my part.
Top of Round 3: Kingdoms of Men
I brought a physical token to help me out, but didn't place it with the Foot Guard, and I forgot about Indomitable Will. They are staring at the flank of the Wiltfather, but Wavered, the Foot Guard just reposition. After forgetting about it last turn, Heal is attempted, but nothing connects.
 |
| Two hordes on the left. |
The Crossbowmen don't need to move this time, and fire into the Silverbreeze. I've managed to deny them flank charges all game, keeping them pretty isolated. The Crossbowmen overperform this turn, landing 7 new damage and will rout the uninspired unit with a good check.
With two Giants down for basically free (one did help beat some Gur Panthers), I am not liking my odds for this game.
The maimed Giant continues against the Gur Panthers, and bests them this time, turning to get the Wiltfather and the Awakened Shamblers into front arc, as he cannot get away.
 |
| Lots of fighting in the center. |
The Monarch doesn't have good options. I didn't like his chances against the Shamblers with a Giant, so don't want to send him in now all alone with the Wiltfather still right there. The safest charge is into the Forest Guard. Unfortunately, there is no Rampage trigger for the Monarch, but he does hit them for a splendid 7 damage, and will strip them of their Thunderous Charge.
 |
| We finally clear the Gur Panthers up. |
The Pikes protecting the Ballistae make a front charge into the other wavering Gut Panthers, and will best them, but I forget to reform them in victory. The Captain doesn't have the inches to join in any fighting, but runs up to try and support this central push with his Rallying.
With all the combats in the main firing lane, the Ballistae all shoot into the Awakened Shamblers, who are in the woods, and have cover. I deal a total of 2 damage, bringing them to just 5 damage.
On the right, the Pole Arms counter-charge the Gladestalkers, but I forget about Lifeleech 1 from the ASB. They will land 9 damage, and do secure the rout result against the shooters.
The Kingdoms of Men are finally fighting back, but they still have quite the points deficit to dig themselves out of!
Bottom of Round 3: Sylvan Kin
Centrally, the Palace Guard counter-charge the Monarch, with the Gladestalkers hitting the flank. The Monarch had taken 2 from Cloak of Death. With no CS but just an overwhelming quality attacks, about 10 new damage would be expected normally, not great for the longevity of the Monarch by any means, but likely survivable. The Elves overperform, and the Monarch is brought to 17 damage, and dispatched as well without issue.
 |
| The Sylvan Kin flee the forest, easily avoiding my Foot Guard. |
The Wiltfather and Shamblers charge the maimed Giant in the front. Cloak of Death triggers, and then 13 new damage is done in the melee, about as expected, and the fourth and final titan for the humans falls! The Wiltfather turns to face my left flank and the token there, and the Forest Shamblers pivot.
 |
| The Pole-Arms are scattered as well. |
On the right, with the Giant gone, the Windborne, Quicksilver Lancers and King triple-charge the Pole Arms, land 17 new damage, and best the unit with ease. The King will overrun, and both cavalry units will turn to face the Pikes.
Top of Round 4: Kingdoms of Men
I have lost all the titans, which are close to 40% of my army? Given the scenario, I do try to play it out though. Battling the Wiltfather is out of the question now, but there might be something to salvage since I still have the war machines operational.
 |
| The Pikes try to charge uphill. |
On the right, the ASB can't escape the King's Line of Sight, but is able to cast Bane Chant on the Pikes, who charge the Windborne. I again forget about Lifeleech for the infantry, as I have never been good at remembering the rule, despite badmouthing it so frequently. I deal 4, and do manage to pick the unit up with some hot Nerve checks! The Pikes will sidestep 2" blocking the King's line of sight to the ASB, and stalling out this side just a little longer.
 |
| Let's try the Awakened Shamblers again, eh? |
Having not victoriously reformed last turn, the central Pikes aren't in a good spot this turn. They pivot, making sure that anything charging them will land on the obstacle when things shuffle to center.
The Ballistae shoot into the Awakened Shamblers again, finally spiking some dice, dealing 6 total and bringing them to 11 damage, but they are Inspired and thee Nerve Check is a flimsy 3, so they stick around.
The Foot Guard pivot, getting their footprint out of the woods, and getting the Wiltfather out of charge range. The forest will complicate things a bit, but they should be decently protected, and be able to battle for the two nearby tokens in the coming turn. It is around this time that I realize that they have Indomitable Will. I'll hit them with a Heal for 1.
 |
| Nuts. All I can really do is delay. |
The Crossbowmen move at the double to secure a token, and burn it for the Kingdoms of Men, making the score officially 1-0 in my favor.
Bottom of Round 4: Sylvan Kin
The Wiltfather will move up to control and then burn the token in front of the Foot Guard, getting just close enough to hit them with Cloak of Death. The score is now 1-1.
The remaining Gladestalkers turn to shoot into the Foot Guard. I'll have a charge into them as well, which will also take me out of arc of the Wiltfather. That's the new goal, the get the Foot Guard around the Wiltfather, and into a position to contest the central token for the late game. The Gladestalkers land 3 damage, with the nearby King landing all 7 hits, and that results in a spicy 6 damage. I've since remembered Indomitable Will, but am routed here and won't get to use it, putting an end to to most of my scenario plans.
The Forest Guard make a hindered charge into the central Pikes, landing 5 damage while the Master Hunter charges the Captain, dealing 3.
The Quicksilver Lancers don't like it, but they charge the Pikes on the right, joined by the King. The Lancers struggle, but even Ensnared, the King helps greatly, and 4 damage total is done, taking them to 8, and besting them.
Top of Round 5: Kingdoms of Men
I took notes, but not great pictures it seems. With not much to do in-game, I guess I am just moving too quickly and not filling the thinking time with picture taking? I'm not sure what the impediment is, but will try to just take more and more pictures in future games.
The Crossbowmen pivot, and can shoot into the Gladestalkers, but I forget to do so. Moving, and against Stealthy, I'm hitting on 7's, which means I'm hitting on 6's with just half my dice. That doesn't feel great.
The Ballistae shoot, and struggle, but manage to land a few more damage onto the Awakened Shamblers and finally pick them up.
The Captain lands a few hits against the Master Hunter, and secures a Waver.
The ASB with the Lute is all alone, and opts to charge the Quicksilver Lancers, in an attempt to disorder and hold them up. His single attack misses; it is a long-shot.
Bottom of Round 5: Sylvan Kin
We're still talking things through. With the terrain, the Crossbowmen aren't going to be able to make it back to the center, as the woods will slow them down. It's 1:1, but I have nothing to really reach the center, or grab anything on the right.
We are overthinking things. I can't get close enough to score the center, so his Guard just need to hold for a turn (very likely), or he just needs to burn one more token to secure the win (also pretty likely).

Since he stopped a little short of the token here, the Wiltfather can't reach or contest the other token on the left, so turns around to help fight for the center as the game concludes.
The Gladestalkers and a King will shoot into one Ballistae, land a frightening amount of damage on it, and will secure the rout.
With the ASB having failed to land a strike, the Quicksilver Lancers have a very free hand. Again, we are over thinking things. They could just go grab the token, but I point out that they have the speed to hit the Pikes in the flank, and in Round 6, they'll still have the inches to turn around and grab the token for a commanding win. So the Lancers hit the flank of the central Pikes, with my Wizard preventing them from shuffling down for a Hindered charge. The Forest Guard join in as well, in a strong attempt to clean them up. The Guard alone take them up to 14 damage (not quite devastated, but close enough), and we opt to fast forward, and do get Insane Courage! We'll count the Pikes as devastated, as rolling all the dice seems silly.
Top of Round 6: Kingdoms of Men
The devastated Pikes counter-charge the Forest Guard, landing just 1 damage, and bringing them to 10 damage total. They hold.
Popped out of combat, the two Ballistae shoot into the Lancers, dealing 3 damage, but the cavalry holds as well.
I'm not used to having shooting, and skip over the Crossbowmen again after firing all the war machines. We do back this up, in case I can Waver the Gladestalkers, but I land no hits with the horde.
Bottom of Round 6: Sylvan Kin
Again, we are over thinking things.
The Wiltfather and the Gladestalker move in to help control the central token, and the Forest Guard counter-charges the Devastated Pikes, and will pick them up.
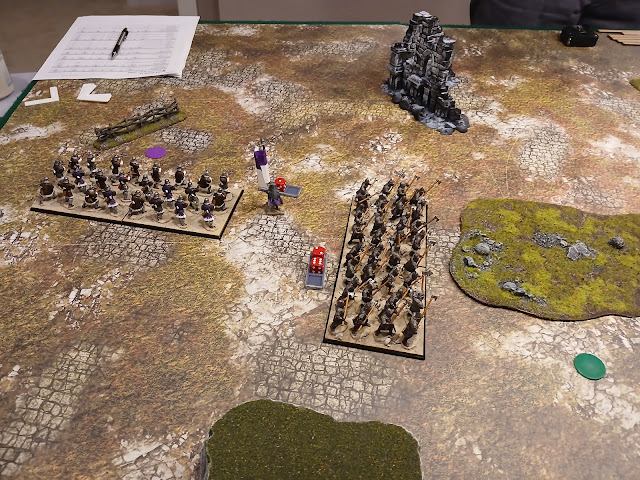
 |
| Final picture of the game: damage on the Pikes is approximate. They are beyond saving. |
The Nimble and unengaged Lancers can just run and burn a second token, putting the Sylvan Kin ahead 2:1. Then controlling the center at the end makes it 3:1 for a strong Sylvan Kin victory!
Game Conclusions
As-always, I enjoyed myself immensely, but as you can see, I absolutely did not play a good game, and had much more rust in my play (not to mention reporting) than I was expecting after just a few weeks away. We both had errors, but the difference was Trevor caught and corrected his, like with the overly-aggressive Scout moves, before moving on to the next phase or passing turn. Hopefully, this debacle puts me in a bit of a better spot going into the tournament!
Token placement was an issue, but not the end of the world at our skill level, and I wanted to see if I could make it work still. I think playing it cagey was the right approach, but I had compounding tactical errors in Round 2 that quickly put the game out of reach. Losing two Giants in Round 2 put me in a very desperate position, and things did not get better for me from Round 2 onward.
Sylvan Kin Lessons for the Herd
These armies do have some unit overlap via the options from the Nature list, and that's why I've taken notice when they are across the table. Aside from those shared units though, these are pretty radically different armies otherwise. That is to say, that any direct comparisons can only go so far, and really only be applied to the shared units. The Herd just can’t play the Gladestalker / shooting game, nor do they have bananas individuals like the Wandering Kings, nor do they even have access to heavy cavalry. The only unit-specific takeaway I can really glean is that I should probably give the Forest Shamblers another try. I used them many months ago, and was not really impressed, and other units and styles have continually cut in line for testing the last few months. However, in my last few battles against the Sylvan Kin, they have often caused me headaches. I used them more as my main-line unit, which was not a good role for them, given their lower Nerve relative to a normal infantry horde like the Tribal Spears. However, having them as a supporting piece seems to be a great way to use them.
There are a number of general takeaways though, the biggest being the value a more balanced list, if I can used a very imprecise term. Yes, Trevor’s list had a lot of versatility, but I am more drilling down on the unit variety as the lesson: he’s not spamming stuff. With the exception of maybe Penitents, he doesn’t really spam things, and that’s been a hallmark of his list building. I have found some fun stuff and some effective stuff for the Herd, but am still experimenting wildly with the Herd to see how some units even work, unwieldly doubling or tripling down on a unit to try and test it out, ie. Spamming a unit to an extent. Here, Trevor took a variety of units with differing roles, and used them all well. I have a handful of “unwieldy” lists to test out still for the Herd, but a more measured approach could be good to keep in mind in the coming months.
Testing Conclusions
- Pole-Arms. Placing them near the table edge was a positional mistake, as my opponent showed me with that protective pocket, but trying to be aggressive with them was the right call. I still like the idea of the cheap unit overall, but they continue to not have the best performances on the table. At Def3, so much damage just lands against them, and as-such, they don't seem able to really function as your main line unit, and definitely can't do it alone. Running multiples seems like an option, but they aren't quite bad enough to get the points discount for a trash-style army.
- Foot Guard. I won't dwell on forgetting IW. A hindered flank into the Wiltfather would be amazing, but probably wasn't going to break him. Had they survived or just been wavered in Round 4 I could have made up for forgetting it early on. Positioning is where I failed with them. Given the scenario, I know the center is going to be up for grabs, so I should have had them more central from the start, and planning that way.
- Crossbowmen vs hypothetical Bowmen. About the only thing that went well and according to plan for me this game was containing the Silverbreeze with the Crossbowmen! Unlike the Villein unit, I don't have Phalanx or anything to help my survivability. If I have the points, and want to run a 5+ shooty horde, giving them Piercing does seem worth it.
- Rampage Giants. I wanted to try a strong push with the Monarch, ideally against the Wiltfather, but didn't have a good way to instigate a piece trade. None of these were supported appropriately or used well.
- Monarch (honorary forth Giant). They got in one desperate charge, and then got really unlucky on the retaliatory charges. I couldn't trade my titans for anything this game, and just lost them all, which felt really bad. The base Monarch seems like a fine unit, but was not used well here.
- The Captain. I didn't plan my Inspiring coverage well, but putting him with the Ballistae seemed best call, and I am not displeased with how I played him overall. I had some decent ideas, but not the experience to take advantage of the generous Redeploy. Redeploy is a lot of fun, but if you aren't really familiar with your own list, it seems as likely to trip you up as your opponent! Not used well here, but should pay dividends the more you run them.
- Triple Ballistae. With Scout, I figured I was never going to be able to hunt the Wiltfather effectively, so area denial was the right approach, and targeting the center was the right call too., but this still didn't feel very effective. As mentioned, I could probably have found some better angles. Good ideas, but the execution needs some work.
No comments:
Post a Comment