

Intro and Lists
Game 1 was behind us, and we were on to Game 2 of the Interstate Doubles Kings of War Tournament 2024! Opposing us now were essentially our sparing partners? Trevor was the Wisconsinite, appears in probably half of the battle reports in this blog, is known as Cartwright on the KoW Forum, and runs the Data and Dice blog. He ran some Northern Alliance:

As-ever, it is a very sensible and a very tight list from Trevor. He had 25 points to spare, and opted to prioritize the Trickster's Wand. It's not a bad choice, especially since I am an avid user of Bane Chanting ASBs, but I would have gone for Spears on the Naiads instead. Taking a guess at the meta, I figured there would be a lot of Defense 6 out there, but I was most afraid of Rob's Halfling army, which we have seen before in the blog, most recently as my ally in the cookout game (Battle 067) from early June. That's my own pontificating though. Again, as-ever, it is a very thoughtful list with great unit strength and a variety of tools to support the team.

His Minnesotan partner, Alex, ran Ogres, with a list very similar to the one we just faced! As before, this approach to Ogres is simple but strong, and this seems to be a great way to run the Ogres. I had recently hobbied up some Bullies for my "Stormcast Ogre" army, and was eager to see what they could do! Alex is apparently about as frequent an opponent for my partner, Leif, as Trevor is for me, so we should be in for a very cunning game.
Leif had apparently won his Abyssals army at a tournament, with it all painted up already. While are are not complimenting him directly, I absolutely loved the scheme and the green coloring really looks amazing in person, and think my reddish Abyssals are a bit bland by comparison. He unfortunately did not have printouts of his list, but thankfully it did look to be one of the draft ideas we had been looking at previously, and was what I had been aiming to support with my own list. Leif ran this:

It's 5 points shy of the points limit, but nothing could make use of a Staying Stone or anything. This is not the way I play the Abyssals, so I was eager to study up! The Manifestation and Zaz have been good picks for me before, and work quite well together, rewarding good positioning and target priority if you can focus up their Lighting Bolts. Our own opponent Trevor had recently praised the Lower Abyssal horde in his own blog, and that seemed like it should be a good anchor for us. The Succubi were the wildcards for me, but Leif swore by them, so I was eager to see what they could do! His list had a lot of shiny toys and several unique picks. My concern with the list was it had no chaff whatsoever, which is why I was running my list the way I was:

I figured that my list was speedy enough to fly around and support, and hopefully I had enough healing (via Lifeleech, Drain Life and the Temporal Ruptures of the Chroneas) to hold on if I needed all of Leif's hammers to come and rescue me. Up to evaluate were:
- Gargoyles. Leif had no chaff of his own, so I felt I needed to bring some. I kept it at one, and we'll use this to try and block the scariest thing when the time comes.
- Tortured Soul Regiments. They are decent little fliers, and ultimately disposable. Having Fearless on so many units, I felt I could live with just one source of Inspiring, and maximize the chaff and disposable units to help support my partner.
- Tortured Soul Horde + Hann's Sanguinary Scripture. I struggled with unlocks, and this felt like the least-worst option, as it was pretty cheap, was on-theme, and provided all the unlocks I was looking to have. A Defense 4 Swarm Horde doesn't seem all that durable, but I was hoping LL3 and the Chroneas and Drain Life could let it stick around and do some work.
- Chroneas. This was the linchpin of my list. I figured we'd have a fair amount of Defense 6 at the event, so Cloak of Death and CS3 would be nice to have, and Temporal Ruptures should play very nicely with the Lifeleech of all the Tortured Souls.
- Abyssal Warlock and Drain Life. The Warlock seemed like a good source of Inspiring. He also scores, has a small 18" shooting attack to help out, and then I took Drain Life to test out. Ideally, once the lines clash, with Height 3, he can start to cast the spell to swing the fights and keep everything topped off.
Table and Terrain
We followed our usual terrain rules, playing the buildings as Height 9 blocking terrain, the forests as Height 6 Difficult Terrain, the fences as Height 2 Obstacles, the Hills as normal Height 3 hills, and the odd neoprene blobs as Height 0 Difficult Terrain. Again, the addition of the Height 0 difficult terrain felt very nice as a way to better break up the battlefield. I made notes to add more to my terrain piles, and I hope this continues into the league setups!
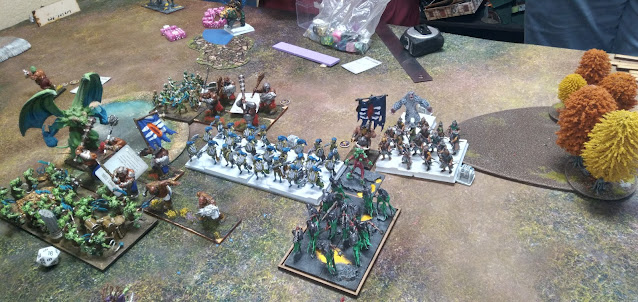
Our opponents deployed pretty compactly. Right-to-left we have two Dwarf Clansmen regiments, looking to slink past the building to score; two Pack Hunters in the woods with the Hexing Prime to support, and then the horde of Naiads centrally.
 |
| Deployment, for the Arch-Rivals. |
The Ogres layered up again, with Warrior Regiments screening the Siege Breaker hordes. The Sergeant miniature is the one with the banner, and is nestled behind the Naiads, while the Bully is out on the flank. The Thegn was a late drop, loaned out to help mitigate the Manifestation of Ba'el.
 |
| A long shot of the Deployment for Team Double Trouble. |
Team Double Trouble has the Manifestation of Ba'el out on the far left flank. He was a later drop, and is pretty far out there, but is at least angled a bit. I had offered up my Gargoyles to my ally to help block for and support the flier, and that ended up nearby. The Succubi start in the woods, with the Lower Abyssal Horde and Zaz nearby.
I took the right-hand side of the board because I figured I could fly up and over the obstacles as-needed, as I did in the last game. In the center we have another stack, with a Tortured Soul Regiment eager to screen for the Tortured Soul Horde and Warlock. The Chroneas sits behind the obstacle, I have another regiment of Tortured Souls ready to play around the building, and the final regiment is out on the flank as an early drop.
We have three choices for the scenario. We win the roll-off, so our Arch-Rivals veto something, and then we pick Invade.
We also win another roll off and get to determine the turn order. My opponent says he usually plays reactively, but I convince him to have us go first, to try and make use of our fliers and overall greater speed. Given the scenario, if we can keep them from moving up really early, that's good for us.
Top of Round 1: Team Double Trouble
The Tortured Souls on the right move very far up, but stay out of charge range of the Dwarfs. I am trying to dissuade the Dwarfs from moving up too quickly. If they advance, I should have some charges; if not, this unit might be able to make it into the flank of the Pack Hunters.
 |
| The endless swarms of Souls speed forth. |
Having Strider, I want to consider getting the Chroneas into the woods, and hop the fence. Inches-wise, the Obstacle should be slowing me down though I think. Apologies!
One regiment of Tortured Souls holds behind the obstacle. If the Dwarfs do advance, I am hoping to get lucky with a sneaky flank charge or something. I don't recall if they could reach the Pack Hunters as an alternative. I was using the obstacle as cover, but with the other regiments moving up aggressively, if these didn't have a charge into the Pack Hunters, I should have moved them up father, and pressured with everything.
The Tortured Soul Horde takes the hill to wait, with the formerly screening regiment moving up aggressively as well, while respecting charge distances.
 |
| View from our left corner. |
The Manifestation of Ba'el seems to be looking for the enveloping moves, and Leif flits him up to peek around the other side of building to toss lighting into the Thegn, landing 3 damage.
The Gargoyles hang around, staying out of range.
The Lower Abyssal Horde moves up, but is stymied by the Height 0 Difficult Terrain. Zaz shoots into the Naiads, but with the heights involved, the Naiads have cover, and even boosting the spell, the Betrayer lands 0 hits.
One Succubi regiment hangs back while the other moves up at the double. My brain was too busy melting over my own moves, but I think my partner should have been more aggressive here, with both Succubi regiments moving up. The Thegn could charge one, but that seems ok to me? He'd be ensnared, and if that's the only thing charging in, the Succubi are likely winning that fight.
Bottom of Round 1: Team Arch-Rivals
The Dwarfs do move up a bit.
The Pack Hunters shuffle about but still roll hot, landing 8 damage onto the Tortured Souls regiment out on the flank, but the Nerve check is one shy, and the Fearless unit holds!
The Naiads move up, staying out of charge range of the Lower Abyssals.
The layered Ogre line moves up as well, looking to protect the Naiad's flank from the plucky Succubi regiment.
I think the Thegn sidesteps or backs up, avoiding a charge from the Manifestation.
Top of Round 2: Team Double Trouble
With the Dwarfs moving up and me taking a lot of unexpectedly hot arrows, my Tortured Soul regiments start looking for charges.
I don't think I had the inches to make it into both of the Pack Hunters. The Chroneas should be just out of range as well.
Under pressure, the Dwarf units feel like the least bad option? Ideally, you commit to just one, but like the Pack Hunters, if you don't engage both, you're going to be flanked and have a bad time. Math-wise, they should deal about 3 damage a turn, and with Fearless and Lifeleech 2, I can hopefully grind out the Dwarfs here.
 |
| The Dwarfs take some charges. |
I hang back with the Chroneas. I didn't have a charge into the Pack Hunters, and wasn't sure if charging the Naiads would be a good call long term. It would depend on where the Chroneas would end up relative to the Siege Breakers, and if they could have joined in on that fight.
 |
| The Tortured Souls start Lifeleeching. With some luck, they can hold this position for a while. |
I also consider charging the Naiads with the Tortured Souls. The Naiads usually have spears, and I think I blanked, thinking they had them here as well. Instead I move the Tortured Souls up, and pivot, looking to force a charge from the Naiads and expose their flank to the Lower Abyssal Horde. The Pivot gets me too close to them, so I wind it back... and I guess never finish my thought here. They end several inches away, and we realize this in the the melee phase. It's not ideal.
It's still a messy situation, and we opt let the dice decide, and the dice say that these Tortured Souls are not close enough to prevent the Naiads from just turning and flanking the Succubi.
 |
| A mess. My fault. |
Speaking of, the Succubi make a charge into the Warrior Regiment, and punch through. I don't know what they do for the victorious reform. I think we realized the positioning error of the Tortured Souls at about this time, and realized that they were pretty doomed.
The other Succubi regiment moves into charge range against the other Ogre Warrior Regiment.
The Lower Abyssal horde have no charges, and don't do anything. The Warlock takes the hill to shoot at something, probably the Sergeant. Again, even boosting the spell, nothing hits.
The Manifestation has no charges, so moves up to cast more Lighting Bolts, this time into the Bully, if memory serves.
I think Zaz betrays the Lower Abyssals, and shoots into the Sergeant, though I don't think much sticks.
Bottom of Round 2: Team Arch-Rivals
We are subjected to some devastating charges. The Naiads take the flank into the Succubi, with some Siege Breakers hitting the front cleanly. They are Devastated and then Routed, as is proper.
The remaining Warrior Regiment declines to make a hindered charge into the Ensnaring Succubi, and instead charges the Lower Abyssal Horde. I believe the Siege Breakers behind them could see around the Warriors and over the Succubi and spy the right corner of the Lower Abyssals as the turn started, because the Breakers go in as well, also Hindered. Combined, they deal 10, which is close to the expected output.
 |
| Sorry, Succubi! |
The Dwarfs countercharge their respective Tortured Soul regiments. Pack Hunters charge out of the woods to help. I thought I was out of charge arc and charge range, but had just eyeballed it. The Pack Hunters can spy the rear corner, and have wild charge, so just meet the criteria. Shucks. The Hunters hit me in the flank, and combined, the units bring me to 10 and rout the Tortured Souls.
The regiment that failed to block the Naiads takes a charge from the Sergeant and some Pack Hunters. They take 7 damage combined, and the Nerve check routs them by 1 over.
The Final Dwarf regiment lands 2 into the damaged unit, bringing them back to 8 damage, and then Routs them with a 7 on the dice. This apparently wasn't a great tactical turn for me with the Tortured Soul regiments, but the dice were very unforgiving on these fearless units.
Elsewhere, the Bully runs up to pressure the Manifestation, and the Thegn on Frostfang inches around, I think moving backwards to keep safe while threatening the landing zones nearby.
Top of Round 3: Team Double Trouble
Thankfully, out Arch-Rivals made similar tactical errors! The Naiads had victoriously spun around, but this was still all jammed up. When we go to check things out at the end of the turn, the Tortured Soul Regiment can get into their flank!
I send the Chroneas into the Sergeant, as I didn't want her to be ensnared fighting Naiads, or wasting a bunch of CS against the Pack Hunters. Some damage is dealt, and I think the Sergeant is wavered. In retrospect, ensnared against the Naiads could have been the call to really maximize our changes of picking these hordes up? Or into the Pack Hunters to tie up more attacks? Losing so many units, I am on the back foot and second-guessing my moves even while writing. Cloak of Death hits the Breakers, Naiads, Prime, Sergeant and Pack Hunters though, and I think even gets the Warrior regiment in front of the Naiads as well, so I at least have that going for me.
 |
| Many flank charges! |
The Chroneas didn't spike, but the Tortured Souls are in the flank of the Naiad horde. Running the math now, they should deal about 15 expected damage. They do 10, so the Cloak of Death brings them up to 11 damage total, which is a bit heartbreaking.
I fail, but my partner's hammer units deliver!
The remaining Succubi opt to ignore the Bully and hit the more powerful Siege Breakers in the flank, making use of the Lurker upgrade to slide right in. The ladies feast and they will reform to see the Thegn on Frostfang.
The Manifestation makes a hindered charge into the flank of the other Siege Breaker unit, with the Lower Abyssals joining in the front and shuffling on down. This Breaker horde falls as well, with the Lower Abyssals spinning to get the Warriors in their front arc.
 |
| Leif delivers, and picks up both Siege Breaker units. |
I don't have time to talk him out of it, and my partner opts to sidestep the Manifestation towards the far side of the table. A pivot would have been fine. This move gets the Manifestation just into range of the Thegn, and also gives up a flank charge. A mistake, but the die had already been rolled by the time I objected, so Leif was a gent and rolled with it.
Bottom of Round 3: Team Arch-Rivals
The Bully spins around to look for stuff as the Thegn gladly takes this striding charge. I am quite worried, but the Manifestation does stick around.
| The last of the Tortured Souls are scattered. |
I believe the Naiads just disengage from the Tortured Souls in their flank, trusting in Regeneration and presenting their rear to my unit as they turn to face the Manifestation. The disrespect!
The Pack Hunters are able to charge the flank of the Tortured Souls. I was thankfully just out range of a rear charge from the other unit. Still, as-always, the Pack Hunters continue to deliver for Trevor. While, 8 damage is expected, they deliver 9, and the Nerve check is 9 and then 9 to Rout the horde by 1. Oof. I am almost out of units!
One Dwarf unit moves over to score, while the other had moved up to accompany the other Pack Hunter unit to try and support the center.
The Snow Troll Prime Hexes Zaz the Betrayer. He hasn't routed anything yet, but has been landing enough damage to be concerning I guess.
I believe Zaz pushes through the Hex to cast something. I would have gone for Bane Chant on the Lower Abyssals to try and reliably remove the Warriors, but I think Zaz betrays them to instead cast some boosted Lightning into the Pack Hunters. I try a Drain life into the Hunters as well, dealing 1, but have nothing to heal. The Pack Hunters are taken to 7 damage and wavered though, so that's a small win for us. The Lightning Bolt must have connected well this turn. Still, not Betraying the Lower Abyssals, letting them heal, and Bane-Chanting them to best the Warriors seems like the better play.
 |
| Believe it or not, this picture is not AI generated. No clue what that wrist is up to. |
The Chroneas thumps the Sergeant. In addition to Cloak of Death, the Chroneas has been putting out a pretty respectable 5 damage a turn. Victorious, he turns to face the Prime and both Pack Hunters.
The Gargoyles flit up to score, and the Succubi just turn to face the Naiads. I don't know the logic here and think they should have been charging in.
The Manifestation opts to fight the Thegn, but doesn't best him. I think he's wavered though.
Bottom of Round 4: Team Arch-Rivals
Betraying the Lower Abyssals was characterful, but probably not the best tactical choice. Winning the grind for the scenario seems more important that shooting at the shooters. The Ogre Regiment is joined by the Naiads and the Ogre Bully in a big charge into the Lower Abyssals, and our horde is routed. All of the rival units will spin around to fight for another turn.
The wavered Pack Hunters just hold, while the other unit shoots into Zaz, landing some damage, and get the retaliatory Waver, as Zaz took some damage from casting through Hex.
Both Dwarf regiments look to ignore the fighting and commit themselves to getting around the building to safely score. Their 6 Unit Strength is going to be hard for us to beat.
The Snow Troll Prime charges the Chroneas, and lands 2 damage.
I'm not sure what the Thegn does as I think he is wavered. He ate some Lightning Bolts in the early rounds, and is sitting on a fair bit of damage after that last melee combat.
Top of Round 5: Team Double Trouble
The Manifestation thumps the Thegn, with the Gargoyles joining in with a surprisingly effective rear charge. The Thegn is routed. The Gargoyles are scoring, and are safe, so just stay put, and the Manifestation is able to get the Warriors and Bully into his front arc with an about-face.
 |
| The Succubi charge in now. |
The Succubi charge the Naiads now, and are themselves Ensnared. Some damage is done, but not nearly enough. The Naiads have been regenerating well, and they are just now brought back to 11 damage.
My Warlock tries a Drain Life into the maimed Pack Hunters, lands just 1 damage, which heals the Chroneas. Still, I am lucky, and able to get the rout against them.
The Chroneas counter charges the Prime, rolling up some nice hits that result in 6 damage. Cloak of Death has hit the Prime twice, and I am able to pick him up with some lucky Nerve checks.
Bottom of Round 5: Team Arch-Rivals
The Manifestation takes a double charge from the Bully and the Warriors. Thankfully, the Manifestation has been regenerating well, charges are hindered, and the Manifestation takes a few damage and ultimately sticks around.
 |
| Charges from the Arch-Rivals as the game starts winding down. |
The Naiads are regenerating well too though, and I believe countercharge the Succubi. Math-wise, it's a pretty even match. We should have the edge here, but Regeneration could easily swing it.
The remaining Pack hunters shoot into Zaz, bring him to 10, and waver him again.
Both Dwarf regiments are now firmly scoring for the scenario.
Top of Round 6: Team Double Trouble
My Warlock tries Drain Life, landing another 1 into the Naiads, but has nothing to heal.
The Chroneas charges out and into the remaining Pack Hunters, brings them to 7 and secures a waver. This feels good, but isn't impactful. The Chroneas is scoring, but the Pack Hunters are not.
 |
| A Waver! But it only serves to disorder the Pack Hunters in the final turn. |
The Succubi charge the Naiads again. They are essentially fighting along the center line, and each are scoring. The Succubi secure a waver, but it is not quite enough.
The Warriors charge the Manifestation again, but it's hindered again, and the Manifestation holds again, thanks to terrain. These Height 0 difficult terrain pieces were nice to have around for gameplay.
 |
| A final, luck waver against the Naiads. |
The Dwarf units are both injured (one at 7, one at 3), but both hoof it into our deployment zone to score for the scenario.
The wavering Naiads regenerate down to 8 but don't move as they are scoring, and the wavering Pack Hunters do nothing as well.
As the round concludes, the Arch-Rivals have Dwarfs (US3), Dwarfs (US3) and Naiads (US4) scoring, for a very strong total of 10.
Team Double Trouble has the Succubi (US3), Manifestation (US1) Gargoyles (US1), Chroneas (US1) and Warlock (US1) scoring for a total of 7.
We don't roll up a Round 7, meaning this is a win for our Rivals! Team Double Trouble did have the advantage with Attrition Points though, and while the scoring isn't done relatively, we killed enough to snag a few more points when we went to submit our scores.
Testing Conclusions
- Gargoyles. I figured they would block and die for the benefit of the Manifestation. Instead, they were around and scoring at the end of the game, so I’d say Leif still put them to good use!
- Tortured Soul Regiments. Shooting is sneered at a bit, but some hot early dice really amped up the pressure and I felt forced to gamble. Fearless mitigated the lack of inspiring for my list, but I got baited a bit and then outplayed, and then luck was not with them to hold on any of their checks. I lost all of the regiments for no real gain, and this put us in a bad spot.
- Tortured Soul Horde. They had terrible luck this game. I didn’t know the quick math at the time, but they should have had pretty even money to break the Naiads on their own, but didn’t even come close. They then took an odd flank charge, and then got unlucky twice on the Nerve rolls there. They indeed a bit of a fragile unit, but the dice really screwed them over this game, unfortunately.
- Chroneas. She definitely tried, and delivered all she could, but with all of the Tortured Soul units evaporating, there was only so much she could do. I think my call to include her in the list and build around her a bit was a good one though. She's done some good work so far.
- Warlock with Drain Life. As in Game 1, I was rolling without Piercing on the Drain Life due my own silly oversight. Still, the Warlock did ok here, and was scoring and supporting things otherwise. Not impressive, but definitely good enough.
- Blinged-out Succubi. Well, I did not do my job to protect them in Round 2, so that performance is on me. The other unit did well though, so I’m intrigued, but still confused by the unit. Just adding the Lurker seemed like a bad call to me, since you are just preserving a 3+ to hit but no TC. Just adding items also seemed like bad calls to me, since the unit can be fragile. Running both then seemed like a doubly bad call since it is such a hefty investment in just a regiment. But, these did ok this game, and hit better than I thought.
- Manifestation of Ba’el. I have run the Manifestation a few times, but am always a little wary of it. It’s a big investment, and despite a lot of special rules, the Nerve is pretty low. I think that I’d probably still prefer him to a flying Archfiend though, and side-stepping reform aside, Leif made good use of him this game.
- Zaz the Betrayer. I don't think he should be deployed behind the Lower Abyssals, as the horde is going to be giving cover to things from the lighting bolts. Here, deploying Zaz to their left would have been better, and let the unique picks focus fire things with their big bolts. Lighting Bolt 15 will put the hurt on something, especially over a few turns. There are some possibilities between these two unique picks though, so I do like them being run together.
One of the points of the overall event was to get folks playing with different people. It was the slightest of bummers to run into folks we were so familiar with, but with only 8 teams in total for the event, familiar faces were bound to be encountered. It was still an awesome and tactical game, as all of my games with Trevor tend to be. The game was emotional whiplash in the early turns, but they were able to outplay us and get the win.
With their victory here, our opponents moved up to the top table, and were up against Bob’s scary Halfling list! His original partner had dropped, and the replacement was one Jeff Schiltgen, who is currently the best-ranked player in the Midwest, I believe? My hope was not face that pairing, as our lists had nothing to stop Striding, Wild-Charging halfling cavalry, so we picked a good time to lose a game!
As for Team Double Trouble, we were 1-1. The loss here was against good friends and a close one, so we had good spirits going into the final game of the day. Onward, to Game 3!
No comments:
Post a Comment