

We were still out at Oddwillows for a bit of a club meetup, and I hopped over to another table to play my second game of the day against the wily and ravenous Halflings! Rob was coming off a win at our first Interstate Doubles Tournament (my Game 1 can be found here, with links there to the other games and some of the results therein), and brought the following:

Rob runs a "Ravenous" Halfling list, making use of the Muster Captain to provide Striding charges to almost everything in his list, while the Saucerer (now two of them!) provide Aura support, usually Rally to keep things around and Brutal to secure Routs. Supporting the heroes was a Pride of the Shires Iron Beast to anchor the line and inspire, and a horde of Stalwarts with the Hammer of Measured Force to do the same. Two troops of Stalwarts with two-handed weapons were around to each charges and support, and two potent regiments of Juggers were around to make use of the Captain's striding aura. A unit of Wild Runners with Fire-Oil and Black Powder Weapons as well as the halfling Grenadiers were were around to harass, and a Volley Gun was carted out to zone things out on the battlefield.

I had again erroneously built my lists for 1600 points, but was able to drop the Forest Warden's item to add in a second Centaur Chief and a Staying Stone for the Guardian Brutes. I wasn't able to test the Warden's out as much today, but this was still preferable to playing down in points against strong players and strong lists. Up to evaluate for Herd was everything:
- Tribal Spears with the Brew of Strength. The Tribal Spears have been great starting picks for my lists, and I want to try out some items with them. The Brew of Sharpness last game was nice, and now we'll give the Brew of Strength a try.
- Harpies. I tend to lose all my chaff at once, so I trying to my play by running less chaff and more units, thinking that if I can block the scariest thing at the best time, the rest of my list should be able to function. I think this is improving my threat assessment a bit, so we'll keep trying it here, and we will see what one unit of Harpies end up doing.
- Guardian Brutes. The feel like one of our few hammers, so I continue to feel obligated to run them. They do pretty nice if they don't get shot at, so we'll continue to play around and see what we can learn.
- Centaur Bray Striders. Testing them out again. From their Hobby update, they seem like great Medium Cavalry, but that's hard to intuit. So I'm thinking of them more like a speedy infantry block. Quick, but not able to break anything on their own.
- Centaur Bray Hunters. I like the concept of these shooting cavalry units, but have had troubles making them work. These are expensive, but Ra4+ and Thunderous Charge 1 gives them much more versatility than my old Kingdoms of Men Mounted Scouts. I doubled up on them here, so we'll see what thy can do.
- Greater Earth Elemental. The Herd struggles against high armor, obstacles, and things with Phalanx, so the hope is the GEE can help me against all three, all while being a Fearless Def6 anchor for my lines.
- Druid with Bane Chant. My staple, if boring and somewhat unreliable.
- Forest Warden. Sources of Inspiring have been a shortcoming for my Herd. Alongside the GEE, I think these should work nicely, providing Surge, Inspiring, and some Unit Strength. At Height 3, they should also be able to carry some magic items as well, though I needed to drop those tests today do my goof in only building to 1600 instead of 1700.
- Centaur Chief(s). Last game was a fluke, and I haven't been too impressed so far, but I needed to add in the second hero in due to my list-building goof. This does mean that I have four sources of Inspiring though, so I can continue to use these more as sacrificial disrupting units this game.
Table and Terrain
The Herd returns to the home turf for the Halflings, and Rob's wonderful and thematic farm setup. We followed our usual terrain rules, playing the buildings as Height 9 blocking terrain, the forests as Height 6 Difficult Terrain, the fences as Height 2 Obstacles, the Hills as normal Height 3 hills, and the field as a Height 0 difficult terrain.
 |
| Rob is a quick player! My camera can't keep up. I have a token in the edge of forest too. |
 |
| Another very compact deployment for the Herd. |
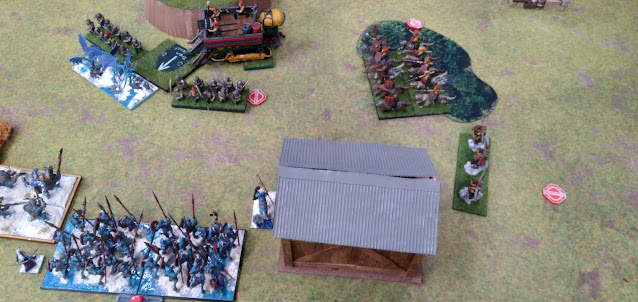
Despite having two tokens on the right side, the Halflings surprised me, deploying compactly on the left and center. The Wild Runners (they really need a more intuitive name) ended up on the far left, ready to push up and around the building. The line continued with some Juggers askew, and then the Heroic Stalwarts. Wary of bow-fire, both troops of smashy Stalwarts hid behind the hill, along with the Volley Gun and Hot Pot Sauceror. The war machine opted to deploy here and try to take the hill. The prideful Iron Beast continued the line, with more Juggers on the flank, and the mounted Sauceror and Muster Captain behind. The final unit for the Halflings were the Grenadiers, who were on token duty, alone and unopposed on the right side of the table.
 |
| The Grenadiers, all alone. |
I pay for Pathfinder, and that doesn't play nicely with obstacles. Seeing both obstacles on the right-hand side, I opted to heavily favor my left. Ideally I should have left a Centaur Chief out on the right to keep the Grenadiers honest, but they were early drops for me, and knowing the army slightly better these days, I felt like I needed the Chiefs near my lines for their disruption value.
Left-to-right for the Herd we had the Centaur Chieftain and Harpies with the Centaur Striders in reserve. Then the Forest Warden and Greater Earth Elemental, then both Centaur Hunter units, then the Guardian Brutes and Tribal Spears, with the Druid supporting them, and the second Centaur Chieftain near the building.
 |
| Deployment for the Herd. |
I didn't note who decided the turn order. I think it was me. Either way, I went first here.
Top of Round 1: Herd
The Herd moves up! It looks like we are are in for a bit of a blood-bath here, so I am just trying to take some ground now, so I can back up and create some space where ever I need to.
On the far left, the Centaur Chief zips up. He is mighty, and should be preventing the shooting Wild Runners from moving up too far. The Centaur Striders move in behind, looking to claim that token next turn, and maybe fight the Wild Runners if conditions allow it.
 |
| Advances, but tentative ones. |
The Harpies reposition as the rest of the line moves up. I did just a 10" reposition, but don't like this in retrospect, as the Harpies are Height 2 and the Centaurs in front of them are Height 3. I am not going to be able to charge out and do anything, so I think it might have been better to move 20" towards the right and be able to block more things next turn.
If my opponent gets lucky on the Sauceror's Wild Charge, the Juggers could have a charge into the Centaur Hunters. However, the Centaur Hunters shoot into them, land 6, and secure a lucky Waver, since the Halflings haven't gone and the Saucerors have not had a chance to Rally things.
A few turns later, we did have a rule question here. Shooting is not a strong suite of our group, and I am just trying it out more these days myself. The questions was if the Hunters should have been shooting with a penalty for being in terrain. At the tournament, I was told Pathfinding units did not suffer this penalty, but honestly didn't know for sure. More on this later.
Bottom of Round 1: Halflings
It's another positionally-minded turn. The Halflings opt top play it cool, and instead of flinging a few units forward with Wild Charge, they opt for Rallying on both Saucerors, with both getting Rally 2, and the entire army playing it cool.
 |
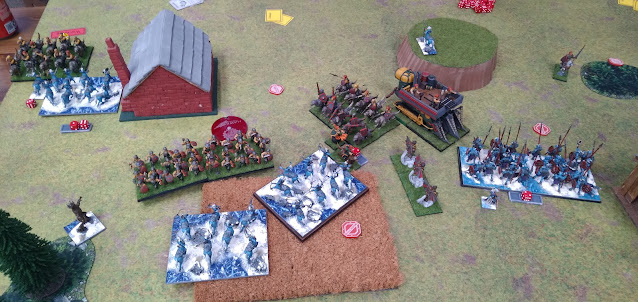
| A nice crescent of death. |
The Juggers on the right enter the woods. The Volley Gun and the troops of smashy Stalwarts take the hill, with the Heroic Stalwart horde and Iron Beast alongside as well. The Beast shoots into the Tribal Spears, landing 2 damage.
The Grenadiers fly up, and secure a token for my opponent. Unopposed, my opponent was also making good use of positioning, not getting on top of the token to claim it, so that the next would be easier to claim in the following turn. He also took the further one first, so his Grenadiers could be facing my lines and still contribute later in the game. Very solid play here and worth pointing out.The Wild Runners move up, ignore the Centaur Chief, and shoot into the Centaur Striders, landing 7 damage and securing a surprise waver. Black Powder weapons are nice, but this is still over twice the expected damage output! It is a very lucky outcome for the hungry halflings here.
Top of Round 2: Herd
Left-to-tight the Centaur Chief charges the Wild Runners, and deals 1 damage, which is immediately Iron Resolved off. Still, unit is disordered. The wavered Centaur Striders hold.
The Greater Earth Elemental pivots and moves up, with the Forest Warden tucking in behind. I again forward-surge him, getting 2". I want to get closer, and figure this isn't a terrible call. However, with 2" it turns out that the Juggers can now draw line of sight to him, showing again how Surging straight ahead isn't a good idea. However, the Juggers take another three damage from the combined-shooting of my Centaur Hunters, taking them to 9 damage, but thanks to Rally, they are just Wavered again.
 |
| I don't know what to block with the Harpies, so they fly up to see what my opponent kills them with. |
The Tribal Spears back up, to prevent multi-charges, while the Harpies fly up to sacrifice themselves to instigate a piece trade.
Bottom of Round 2: Halflings
The Saucerors both go for Brutal, with the mounted one getting Brutal 1 and the Hot Pot one getting Brutal 2 thanks to the rerolls. The Grenadiers use their adorable jet packs to fly towards the center, slowing down just enough so that they will be able to secure a second token this turn.
 |
| The Grenadiers land, and with some clever positioning are just able to score this token. |
 |
| Clever reforms to protect the Iron Beast. |
Post-combat, the troop overruns and the Beast holts, preventing what can actually reach the mechanical monster.
The Volley Gun fires but the halflings are still unpacking the ammunition, and deal just 2 to the Guardian Brutes.
 |
| Oof, this isn't great, but could have been worse. |
The Muster Captain moves, letting the Heroic Stalwarts make a striding charge into the Greater Earth Elemental. I am ok with this, until I remember that they have the Hammer of Measured Force. They deal 8 damage, and get a hot 10 on the Nerve, but at Fearless 19, the GEE sticks around.
 |
| A devastating charge from the heroic Stalwarts. |
The Wild Runners counter charge the Centaur Chief, dealing 3 and securing the waver.
Top of Round 3: Herd
Things are looking a little dicey already, but that's normal for me against these Halflings! Rob has a solid list and has been playing it very well indeed. The Greater Elemental counter charges the Heroic Stalwarts, with a regiment of Centaurs joining in the flank. Bane Chant was attempted, but failed here. Being new units for me, I don't know the expected math here. It's a horde, and I don't expect a rout, but I am hoping to grind the unit out over the next few turns. The GEE does a very nice 6 damage, and the Hunters contribute 7 from the flank, and the horde of halflings holds, thanks to the Inspired reroll from itself.
 |
| The Herd tries to deal with things. |
I could have sent the Forest Warden in, but 3 attacks didn't seem worth it. I could have also sent the other Centaur Hunters in against the horde, but with such an injured unit of Juggers I felt I needed to get rid of them. They hold, and take shots with a cover penalty into the Juggers, and thankfully do land a few more damage and get the rout.
The Centaur Striders are able to fit in and able to partially bail out the Centaur Chief, landing 7 damage and securing a Waver against the Wild Runners.
 |
| It's not a sweep, but the Herd have a chance here. |
The Guardian Brutes and Tribal Spears each take a troop of Stalwarts, devastating each and then routing each, as is proper. The Spears reform to get the Juggers into their front arc.
We had a bit of a feels bad moment here with the Volley Gun and the Centaur Chief. The Chief is within 16" as the crow flies. He can go straight ahead, getting past the Stalwarts, and then make a single pivot to get into the Volley Gun, traveling 17-18" total. , but Kings of War doesn't monitor the actual distance traveled, just the initial distance. (Big Red Book, Page 19). It's one of the rules quirks of this game, and is a legit charge, for better or for worse.
The Volley Gun is silenced.
Bottom of Round 3: Halflings
The Saucerers get Lifeleech 1 and Brutal 2. With the loss of the Volley Gun, the Halflings are eager to exact some retribution. The Muster Captain dashes back to let the Juggers make a striding charge into the Guardian Brutes, who are also assailed by the Iron Beast and the Grenadiers. The Brutes are devastated and routed, as is proper.
 |
| Yowza, a triple charge from the Halflings! |
The Juggers overrun, bumping into the Saucerer with the Hot Pot. The Iron Beast turns to face the front of the Tribal Spears, and the Grenadiers turn to face their flank.
 |
| Reforms for the Halflings. |
 |
| Charges from the Herd! |
 |
| The Herd does... ok. |
In retrospect, I think this is a mistake. The Iron Beast is Defense 6 and Inspiring, so should need some extra work to remove it. The Chieftain isn't going to make a difference. I can't get into the flank of the Grenadiers, but I should have gone into the rear of the Juggers, as I would have good odds to strip their TC and blunt the damage output of the unit. Additionally, the Spears could have still taken this charge... or, and I am just seeing this now, they could charge out out and hopefully picking up the Muster Captain and burn the token there. That would have been a move! Alas.
The Hot Pot Sauceror gets Brutal 1, and the mounted Sauceror gets Rally 1. The Muster Captain zips up behind the Iron Beast, enabling a striding charge from the untouched Juggers into the Centaur Hunters, who take 8 damage, but are found to be quite insane. They have a bit of a bracket to work with here, but the Herd doesn't have great Nerve, so this is very welcome news!
 |
| The Centaur Hunters sold with the help of insanity. |
Elsewhere, the Iron Beast charges the Tribal Spears, with the Grenadiers hitting the horde in the flank. The Beast rolls it's maximum attacks, and the Spears take 11 damage, but just manage to unflinchingly hold against some good Nerve checks.
Top of Round 5: Herd
The Herd try, but I'm in some very bad spots positionally. The Forest Warden will move up and raze a token though, making this 2-2.
The Centaur Striders have no charges, so move and pivot to see things. The Centaur Chief can't see anything, so runs out and around the building, looking to try and help in final round.
 |
| The Herd fight on, and aren't in a terrible spot. |
The Tribal Spears countercharge the Iron Beast. They get a Bane Chant, but fail hard, landing just 4 damage. Still, the damage has accumulated a bit, and the Nerve check isn't too bad, and I am able to pick the contraption up.
The injured but insane Centaur Hunters countercharge, but deal no damage. Everything here is Height 3, and the other unit cannot charge in to help. Instead it nimbly moves over to shoot into Grenadiers, dealing just 2.
The Saucerors go for Brutal 1 and Rally 1.
The Juggers are not disordered, and are countercharging, so deal a fresh 11 to the Centaur Hunters, who are devastated but are found to be Insane again.
 |
| Double insanity! The Centaur Hunters are most improper. |
The Grenadiers opt to not fight the Tribal Spears, instead flying over them to contest the center token.
The Muster Captain goes into the more calm Centaur Hunters, and deals a strong 4 damage.
The mounted Sauceror charges in, and should be hindered by Phalanx. No damage is done.
Top of Round 6: Herd
The Tribal Spears are contesting the central token, and just change facing, to square off against the Grenadiers. The Centaur Chief attacks the Sauceror, lands two damage, and gets a surprise rout, with some hot dice, as the Sauceror is not inspiring.
 |
| The Herd can't quite best the Juggers. |
The Striders charge the Juggers, with the devastated but Insane Hunters joining. They do 8 damage combined, but the Juggers stick around.
The other unit of Hunters countercharge the Muster Captain, deal 4 damage, and secure a surprise waver with a hot 9 on the dice when it's time to test.
The Forest Warden moves as quickly as he can, looking to run out and grab my third token if there is a Round 7.
Bottom of Round 6: Halflings
The Juggers countercharge the double-insane Hunters, best them, and change facing. I am not close enough to contest the token, so they claim it, making it 2-3 in favor of the Halflings.
 |
| End of the game, with the Halflings clinching things. |
The Grenadiers suit up, and charge the Tribal Spears. Phalanx kicks in, and they don't have any damage modifiers, but they roll out of their minds, dealing 4 damage to my spears, and getting Brutal 2 from themselves. It's now even money to rout the Spears, and the Halflings manage to pick the unit up after the daring charge.
We roll up a resounding 1 for a Round 7, meaning it stops here, and with some luck, the Halflings take the game, 4-2!
Game Conclusions
With all the Striding charges, his list always feels just better than mine. Our games have usually been pretty competitive, though that often seems to be due to the dice dragging me forward and keeping me in the game, such as the double insanity results here. Win or lose, playing against the halflings is always a treat though! The army looks fantastic and Rob is always a strong tactician.
Testing Conclusions
- Tribal Spears with the Brew of Strength. As one would expect, the Brew did help them out a lot, and with so many attacks they they were able to put out some good damage. Both the Brew of Strength and the Brew of Sharpness felt good, which is great because I will likely be running a few hordes of Tribal Spears in my bigger lists! I still need to try out the Hammer and the Chalice, but so far the Brews are making strong cases for my go-to picks.
- Harpies. This wasn't the best use for them. Using them like the , but their sacrifice broke up my opponent's line, and opened things up for me, so this wasn't a terrible use for them.
- Guardian Brutes. Not a great game for them, but they did take a lot of effort to remove.
- Centaur Bray Striders. They got clean charges here, but they were always into the front facing, and the damage was never quite enough to move the unit. They are fine, and my gut-take seems to be decent with them.
- Centaur Bray Hunters. They actually had the potential for decent targets, but I deployed them centrally to focus fire, and ended up just getting the Def5 Juggers as the best bet.
- Greater Earth Elemental. Fighting a horde with the hammer was pretty unfortunate. At least he lasted two rounds and the horde was dragged down too?
- Druid with Bane Chant. As-ever, decent but not amazing. As a one-of, I should probably splurge and get her the Conjuror's Staff for more consistent Bane Chants, but old habits are hard
- Forest Warden. I was hoping to test out some items, but he still impressed me. I think I will still pair him with Elementals for now, but in token-related scenarios like this he doesn't need a Surge target to be useful. I am definitely seeing the appeal of him now!
- Centaur Chief(s). They had good utility here, and I was surprised by that. Aside from the fight with the war machine, I still struggled to get damage out of them, but had I charged the Juggers in Round 4 instead of the Iron Beast, I think I improve my chances of winning.
As mentioned, we had some shooting rules questions pop up this game. We've had similar questions pop up in other games as well, without good or definitive answers. So I went to the Forum to outline a number of situations our group has encountered, with my best guesses. Apparently Height 0 stuff causes some consternation, and is worth exploring more in the future, but the gist for now is that Steady Aim doesn't negate a penalty for moving in difficult terrain and shooting; nor does Pathfinder, and that the ending position of the leader point is what determines if you would be taking that penalty or not if you are moving around. In short, we should generally be taking more shooting penalties, especially when it comes to difficult terrain. Learning games is a process, and I am glad this part of the ranged phases is a little better understood!
Rob has been carting table-toppers back-and-forth for us all while the shop continues to build up their own wargaming accoutrements and such, so a big thank you to him for doing so, now that we are into these larger games for the league. The Halflings are always a treat to see on the table, and Rob always brings a very strong game. His recent 1st-Place finish in the doubles tournament is proof of that! It was a great day and a wonderful meetup. Thanks for the game!
No comments:
Post a Comment