

Intro and Lists
After the fun I had last week, I was looking ahead at my work schedule to try and take some more time off for games. I discovered that I was going to have Juneteenth off already, and friend, forum-goer, fellow blogger, and now apparently app developer Trevor was able to oblige me with an unusual mid-morning morning game. Will a day without the troubles of the office and toils of commuting improve our decision-making or dice rolling? We shall see! Trevor was in the Madison area, and carted over some Northern Alliance for our game:


I brought the Abyssals again. I have been fortunate to get in a variety of games in with them recently, and I wanted to keep the momentum going and see what else can be learned. Points ended up being exceptionally tight, so we’re mostly exploring interactions between units more than fine-tuning items and loadouts. The Abyssals got a revamp late in 2024, and I'm still just getting around to exploring things, so everything is up for evaluation:
- Gargoyles. These are great support and chaff piece and we’re bringing two, like usual.
- Abyssal Berserker Horde. I’ve run them stock a few times now, and they’ve done ok. Being Large Infantry with Crushing Strength, they sidestep interactions with a lot of Phalanx units, which is neat, design-wise. I wanted to give them an item, but points were too tight for something like the Brew of Strength, so they got the Boots, which I am hoping will enable a strong charge or a surprising long, nimble, Pathfinding move.
- Molochs. Most folks regarded these as the original hammers for the army. Even with Fury and Regeneration, the lower Def4 made them hard to grind with though, as they tended to accrue so much damage the surviving multiple combats just wasn’t likely. It’s been a long while since I’ve run them though, so I need to check in again, and specifically, see how they play with the new Nagarri unit. We are running a lot of threatening things, and many speedy things, so the hope is that the Berserkers and Hellhounds and such can be shock units, and these can be more of a second line, cleaning stuff up.
- Abyssal Horsemen. Points were tight, so we’re running them stock again. They aren’t as quick as the Berserkers, but quicker than the Molochs, so the plan is to just keep the pressure on and multi-charge with whatever I can.
- Hellhounds regiment. Honestly, this is the source of my tight points. These don’t unlock, and I think a troop will probably be just as-effective, and if so, a more efficient use of points. But I finished the second troop up (post coming soon) and wanted to run the full regiment to see what it can do. They are speedy, and we want them to get the charge, so we’ll try to use them aggressively. Ideally, we find a flank or rear, but more commonly I think I’ll be charging them out to delay something scary while the rest of my list moves up under a little less pressure. We’ll see how they do, and if I can make Ferocious Charge happen.
- Seductress. I felt like was running low on Inspiring sources, and also lacked a quick source to keep pace with the Berserkers and Hellhounds, so we’re taking her. Online, she’s been known to sport an expensive kit with the Gnome-Glass Shield and Host Shadowbeast, but she gets nothing here as points are tight and fitting her in was already challenging.
- Abyssal Warlock with Bane Chant. The Warlocks bring a lot of versatility and a customizable spellcasting platform. I haven’t made good use of Firebolts recently, so I’ll be looking for opportunities to fling those. Bane Chant seems nice to have in this list, as I should be able to push a lot of my units into wounding stuff on 2's, which is always great.
- Despoiler Champion. He is definitely a pet unit of mine, so we’re trying him out here now, alongside the Molochs. Unlike the Molochs, his Nerve is quite low and he’s gotten bumped up to Def5, with the revamp giving him Inspiring now too. I think there could be a niche for him, but he’s struggled to keep pace with the Berserkers and help out in their combats.
- Formation Berserkers. I was impressed with regiments, as Fury and high Nerve let them survive and do stuff even when they got caught, so we’re trying the new formation out! The formation gives them TC1, making them hit harder on the charge, which is nice on a speedy unit, since it is likely to be making that initial charge. Like fliers, I think you want to split these fast units up, and so we’ll try to run a Berserker unit on each wing and one on the center to project as much threat as possible and maximize our chances at getting in some multi-charges.
- Formation Nagarri. These are a new build-around unit from the revamp, boosting nearby units with Regeneration (like the Berserkers and Molochs) up to Regeneration 4+, and we’re taking the Sacred Horn to boost the aura’s coverage too. They are a Chariot Regiment and 150mm wide, which is good for the aura but bad for movement. They have felt unwieldy before, but the formation gives them Nimble, which should be helpful making sure they aren't stuck up behind things. Overall, this list feels like a real best-case situation for them, but they've been disappointing before, so we’ll see how they actually do.
- Sacrificial Imp. The Sacrificial Imps upgrade got revamped from letting you reroll a Regeneration reroll, to instead giving you Def6 against shooting for one turn. It’s a niche upgrade that will have wildly varying results and be difficult to evaluate, so we’ll do our best to keep this in mind during the game.
- Regeneration. Most Abyssal units have Regeneration, leaning on it while eschewing high defense, for the sake of game balance. Since Regeneration should be rolled one unit at a time just as they are given their move orders (instead of everything all at the beginning or end of a phase), this makes them very fiddly to play while on the clock, as the activation of units could be quite impactful to your tactics, not to mention the outcomes of the Regeneration rolls themselves. A pet theory of mine is that Regeneration makes the army unattractive to competitive players, as you are running a glass-cannon army that is relying more and more on Regeneration rolls to keep you around, introducing a big time sink in the movement phase for both decisions and rolls, and that the overall variance makes the army less reliable, all which is undesirable in competition. Just something to keep in mind as I play.
Table and Terrain
I had the pleasure of hosting us in my sunny little condo, and tried to lower the blinds and such to mitigate glare this time. One of the overhead lights burnt out though, and so most of the pictures, especially early ones, are a little high-contrast. I'm working on it; we'll get there someday.
 |
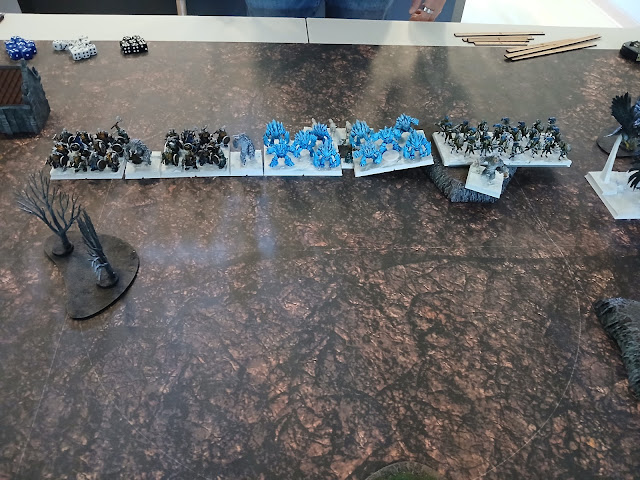
| The table, with the Abyssals barely on the board. |
Trevor had just launched a new Kings of War App, designed to quickly outline a game with a map and scenario at the click of a button, so I clicked the button and set things up prior to his arrival. I was hosting so we had my table and terrain. We were using our typical terrain rules, running the circular towers as Height 9 blocking terrain, all the forests as Height 6 Difficult Terrain, fences as Height 2 Obstacles, and Hills as Height 3, and the ponds as Height 0.
 |
| View from the left. |
We got "Hold the Line" for the scenario, which the app describes as: "Hold the Line! (Area-control) — Mark a 6 wide corridor along the centre line split into three equal zones. Units count where most of their base lies; ties don't score. Control a zone by having the highest Unit Strength there. Score 3 VP for the centre zone and 2 VP for each outer zone you hold."
 |
| View from the center-left. |
The Northern Alliance had a building splitting up the deployment a bit, so they mostly ignored the left third of the board. You only need two zones to win, so this is definitely not a bad plan! Left to right we have a Dwarf Clansmen unit as the only unit technically on the left-third of the table, then a Snow Troll Prime, Dwarf Clansmen, another Snow Troll Prime. We then had a scary center with the legendary Ice Queen Serakina flanked by two hordes of Ice Elementals with Snow Foxes in reserve. Then there was the third Snow Troll Prime screening for the Ice Naiad Horde, and then one horde of Frostclaws, the Frostclaw Champion, and then Snow Foxes screening for the second Frostclaw Horde out on the right. Overall, it's a very long line, and favoring the right, from my perspective.
 |
| View from the center-right. |
I had won the roll for sides, and was lazy. Everything was deployed 6 inches back, so that the Frostclaws wouldn't be able to have any shots. Left to right I had the Berserker horde, Gargoyles screening for the Warlock, Hellhounds, and the Seductress. In the center third I had Abyssal Horsemen, Molochs, and the Despoiler Champion ready to play in the muck. A formation regiment of Berserkers were nearby, ready to run past the mucky pool, with formation Nagarri in reserve and Molochs and a Warlock continuing on. Out on the right were Gargoyles and the second regiment of Berserkers on the far flank, ready to zip past the building.
 |
| View from the right. |
Deployment is hard when you bounce from list to list, but I obviously do this to myself. Overall, I am happy with my deployment. Starting everything back gives me a full turn to react, and remove a round of shooting against me, which I was keen to do, since so many things in my list are Def4. I knew the Frostclaws were coming down in a corner, but not sure which, so I dropped a Gargoyle in each of my own to assist. The Warlocks are spread out, as are the Berserkers, but the Nagarri are nice and central, and part of a second line. I could have spread out a little on the right though, since that choke point is so narrow due to the building. My biggest conundrum ended up being my final drop, which was the Berserker Horde. I felt like I could either stick them on the right in between the Warlock and the Gargoyles to dance with the Frostclaws and probably get shot at, or go out on the far left and try to pressure and hunt for flanks. Ultimately, I went for the left, but was feeling really anxious for my right, since that is a lot of flying cavalry to try and deal with. a
My opponent then won the roll for first turn, and was eager to kick things off for us.
Top of Round 1: Northern Alliance
On the right, there were no shots in range for the Frostclaws to take, and wary of my own speed, he doesn't want to move at the double and get caught out by anything. The Frostclaw units menacingly approach, but stay safe, keeping their rough formation. The screening Snow Foxes zip ahead, heedless of the potential danger.
 |
| Movement on the right. black dice should be Gargoyles, and the gray tray the range of the Berserkers. |
The vast majority of the Northern Alliance line kept pace and moved a uniform 6" forward. The two free spirits were the Naiad horde which moved faster to end in-line with the rest of the battle line, and the Snow Troll Prime who had been screening them, who moved a bit ahead of the rest, already getting in-position to interdict in the coming turns.
 |
| A long, orderly line from the Northern Alliance. |
With not shots to take, it was a quick turn, with the Northern Alliance just gaining some ground early.
Bottom of Round 1: Abyssals
On the left, the Berserkers are able to avoid the pond while moving ahead (part of why I ended up putting them here), so greedily move up and then pivot. I've got the inches into the Dwarfs, and a flank into the unit, so this is a great place to threaten from. Nearby, the Hellhounds nimbly move ahead and out to the left, seeing around the forest to spy the Dwarf unit as well.
 |
| Pressure from the left, as intended. |
The Seductress flies up behind the woods. I had brought her around to Inspire, but my units are in no danger of being shot at or charged over here next turn, so am bringing her up so she can hop the line next turn and start hunting the legendary Ice Queen.
The Horsemen move and pivot, making sure to stay more than 18" away from the Ice Elementals, to limit their shooting. The Molochs do similarly, moving up a bit, but staying far enough away to still be safe. Technically, the Elementals could be surged into range for shooting, but it would just be one unit, and the Surge would very likely bring them into charge range of something, so I would be ok with the risk here. |
| Gargoyles run away and the Abyssals threaten the center with some long charges. |
The Gargoyles from the left pivot and fly 20" towards the right, to help contain the Frostclaws in the coming turns. The Despoiler Champion moves up and plays in the muck. He does not have Pathfinder, so this isn't great, but with 5 attacks, I'm more looking to have him around to disorder and Inspire. As long as he deals 1, I am ok with him being Hindered, especially since this lets the nearby Molochs and Berserkers avoid the terrain themselves.
 |
| Layering to fight the Frostclaws. |
The Nagarri move and pivot to face the oncoming Frostclaws. The Molochs step up, and I believe are just over 18" away, so if the Frostclaws want to shoot, they'll have to move. Wary of a flyby, the Warlock pivots to zone out a potential landing zone. He is also able to see the Snow Foxes, and flicks a Firebolt into the stealthy chaff unit, landing 1 damage against them.
On the far right, I don't have a lot of space to work with. I want to preserve the Berserkers, so the Gargoyles flap up and ahead to screen from charges. In hindsight, I probably could have been a little more aggressive and if I can be safe from charges, pop the Imp to mitigate any potential shooting.
Top of Round 2: Northern Alliance
On the right, I was expecting another round of positioning, and an initial volley from the Frostclaws before they closed, so I thought I was presenting some difficult options and angles. I was not. The Snow Foxes go into the Gargoyles, landing 1 damage and getting a waver. I was expecting them to break, so the Berserkers are in a rough spot, stuck behind them with no room to maneuver.
 |
| Charges from the Northern Alliance. |
The trio of Frostclaw units cannot shoot at the Molochs without moving, but they can charge, and so the birds descend upon my monstrous infantry. Defense 4 is not great against the flying cavalry, and the Molochs are brought up to 23 damage, so devastated and routed, as is proper.Reforms prove to be tough though. The Champion Overruns to try and create space, but only pulls ahead 1 inch. The horde on the right pivots 90 to face flanks towards the center, and the other horde pivots slightly to get things into front arc. It's a big, scary contingent, but a little exposed now.
 |
| Reforms for the Northern Alliance. |
The nearby Prime runs up ahead of the Naiads to gum things up. His is out of arc of the Molochs, and will complicate alignment to the Frostclaws on the hill, preventing multi-charges into them. However, as my opponent double-checks his thinking, the Prime does have his flank exposed to the Abyssal Horsemen, so the Snow Foxes run up and pivot, and as a result the Horsemen can reach him but can't align, so will not be able to charge.
 |
| The Northern Alliance offers up some units to try and slow the Abyssals down. |
The Naiads move up, as to the Ice Elementals, who are not surged around since the rest of my opponent's movements have been so precise. One says out of range of the Horsemen, and the other has a Snow Troll Prime step up to complicate things.
Serakina Wind Blasts the Berserker regiment in the center, pushing them back an inch or two into the Nagarri and landing a point of damage against them too.
Dwarfs are around to provide Unit Strength, and another Snow Troll Prime enters the woods as bait, but is just out of range of the Berserkers on the left. The final Dwarf regiment just pivots, to get the Berserker Horde and the Hellhound regiment into front-arc.
Bottom of Round 2: Abyssals
On the left, I do some measuring with bases, and determine that while I can double-charge the Dwarfs, the Hellhounds would be hindered. I really want to mess around with Ferocious Charge, so the Hellhounds go in alone. Eager to prove themselves, they overperform and land 12 damage (8 expected), and I am able to swiftly rout the unit and reform.
 |
| The Abyssals try to stretch the Northern Alliance line out. |
The Berserkers don't have the inches to hit the Snow Troll Prime in the flank, so they just wade through the muck, drawing line of sight between the Hellhounds and the woods to still threaten things.
I originally wanted the Seductress around to Inspire the quicker units, but continue with my plan from last turn to fly on ahead to pressure. Shamblers are great for dealing with fliers, and I'm definitely putting her in danger, but should be forcing some hard decisions for my opponent next turn for what to do with his movement and spells, and he'll need to be very careful with his position for Serakina.
The Horsemen have a charge into the Snow Troll Prime, but it will be hindered and unsupported from the front, so I inch back instead with both them and the Molochs, again getting out of range of easy Ice Elemental shots. I want to try and deal with the Foxes with some Firebolts, but didn't place an "undo" marker for the Warlock, can't figure it out once it's in my hand, so he just hides.
I don't want to be solo-charging the chaff and opening myself up for reprisals, so the Despoiler Champ makes a hindered charge into the flank of the Snow Troll Prime, and the formation Berserkers make a clean front charge, and we are able to pop the unit and reform, with the Berserkers backing up. I should note that I am pretty sure I moved them back the d6, instead of translating it into a d3 result. So no, an earlier game does not help me with rolling and mistakes and such!
 |
| Combats on the right. |
The Frostclaws are on top of me, but I have options. The Gargoyles from the left fly in, and land a crazy 4 damage into the first horde, forcefully grounding them.
Grounding hordes is more important, so Frostclaw Champion is ignored, and the Nagarri go in against the second horde. I waffle, and feel like Bane Chant for 12 attacks isn't as good as the Warlock hitting the flank of the horde, so this is a multi-charge. The Nagari land a ridiculous 10 damage but the Warlock contributes 0 damage himself. Still, it's a lot of damage, but the unit is able to hold on strong.
 |
| The Berserkers try to create some space for themselves. |
On the right, I have hurt myself. The Gargoyles don't regenerate anything, and kind of need to hold, given the tight quarters. There's maybe 140mm out here on the edge, but the Berserkers have Nimble, and are able to back up and pivot to make some space. While the building is in the way, and I can spy a bit of the rear of the closest unit, so it it doesn't break free or reform, the Berserkers should be able to get in on my next turn, provided the Frostclaws don't move or reform in victory.
Top of Round 3: Northern Alliance
On the right, the Northern Alliance is forced to counter-charge. The Foxes go into the Gargoyles again, landing 2 more damage to bring them to 3, and they will get another Waver.
 |
| Counter-charges from the Northern Alliance. |
The Frostclaw Champion decides to try and get the Frostclaw horde unstuck, and so hits the flank of the Nagarri for 5 damage, with the horde contributing 6 damage to bring the Nagarri to 11. My opponent rolls up a miserable 3 for the Nerve check, so the Nagarri hang around, technically wavered.
The other horde struggles against the interdicting Gargoyles, and can only land an astonishing 1 damage against them, but the Nerve check here is higher, and they do waver as well.
Spacing is tight, but the Naiads are able to get in against the Despoiler Champion. Relative to the fluff-related Molochs, the Champion has weird stats, with low Nerve and Def5, which catches my opponent by surprise. The Naiads have a lot of attacks, but are spearmen, and only three thrusts make it past the Champion's additional armor.
 |
| Delaying charges from the Northern Alliance. |
The Naiads will be giving a flank to the both the Molochs and the Horsemen, so Snow Foxes go in to tie up the former, and a Prime makes a hindered charge from the woods against the Horsemen. The Foxes go hard, landing 4 damage, while the hindered Prime lands nothing against the Horsemen, for the third ice-cold combat this round for my opponent.
Serakina hides, and one Ice Elemental horde spins to toss into the Seductress, who is an Individual and Stealthy, and so the Elementals go from hitting on 4's to hitting on 6's, and only two damage lands. Ultimately, he decides not to Surge into her.
The rest of the units on the left move to deal with the very scary Hellhounds and Berserker horde. The Dwarfs pivot to get things into front-arc, and the Snow Troll Prime tucks himself in to Inspire from a safe place.
 |
| View on the left. |
The other Ice Elementals pivot and move to shoot into the Hellhounds. The roll well and land 10 damage against the Hounds. Wary of the Hellhounds, Serakina attempts to Surge the Elementals in, needing 4 inches, but getting another poor result with just 2 successes. Since the Hellhounds are not in combat, they take a test, and are uninspired, and the resulting 6 is enough to break them, removing a lot of pressure on the left.
Bottom of Round 3: Abyssals
On the left, the Berserkers can charge the Dwarfs or the Ice Elementals, but there is no way I can get them a Bane Chant. If I pop the Boots, I'm on 4's and 4's at best, and that isn't going to be enough damage to break either unit here. Uninspired, I don't want to grind against multiple units, so I try to make use of my greater speed and reposition, heading back towards my deployment zone and then nimbly looking around the other side of the woods.
 |
| Movement for the Abyssals. Pushing back! |
The Horsemen got charged, but are not disordered. They countercharge the Snow Troll Prime, and catch a Bane Chant from the Warlock, and make quick work of the heroic monster. They hold.
The Molochs countercharge the Snow Foxes, obliterate them, and overrun 5", still threatening the Naiads and now projecting threat into the center.
Serakina is safe behind the taller Elementals, so the Seductress makes a long charge out into the Frostclaw horde on the hill. I don't disengage the Gargoyles from this fight. The Seductress lands 2 damage, and grounds the Frostclaws again and taking them up to 6 damage.
The Gargoyles wavering gums things up for me, and so I send the Berserkers in to help the Despoiler Champion, as that is their only possible charge. Phalanx strips my TC on the regiment, and both units are Ensnared. Still, they land 3 and the Champ lands a hot 4 thanks to some Vicious rerolls.
 |
| Scrums over on the right. |
Out on the right, the Nagarri regenerate 7 damage, going from 11 down to just 4 with some good rolling. They'll catch a Bane Chant and land a another improbably strong 8 against the Champion.
Since the Frostclaws did not win and reform, the Berserkers from the far-right are able to still see them, and get a rear charge. The formation unit has TC1 and CS1, and the horde is shredded. The regiment then side steps towards my opponent's deployment zone.
The wavering Gargoyles finally regenerate a few damage, but do nothing else.
Top of Round 4: Northern Alliance
The Snow Foxes land a few more damage, and see-saw the Gargoyles back up to 5, but the Nerve Check is snake eyes, and the pitiful fliers are ready to lock in.
 |
| The Frostclaws win and spin, trying to survive. |
Grounded, the Frostclaw Champion struggles, landing just 1 into the Nagari. I believe they waver agian, but they have Fury, so they are in fighting form and are sticking around regardless.
The Frostclaw Horde is still engaged with the Gargoyles, so they fight them, beat them handily, and then reform to face the Berserker regiment.
 |
| The Ice Elementals finally get to focus-fire on a unit. |
Centrally, the Naiads choose to focus on the Berserkers, sliding over a bit to center-up. They'll land 8 damage, bringing them up to 11, and the Naiads do get the waver, though the Berserkers do have Fury.
The Naiads are still exposed though. Serakina runs up to prevent a clean alignment against the Ice Elementals, and force an overrun if the Molochs want to go for the Naiads.
Both Ice Elemental units move and pivot, firing into the remaining Moloch horde. One flicks cleanly to land 6 damage, and the other flicks with a cover penalty, landing 5 damage, and at 11, the Molochs waver, and do so at range, so Fury can't help them.
 |
| A big waver against the Molochs. The Berserkers and fighting and don't care. |
Trying to break up charges, the last Snow Troll Prime enters no mans land to prevent the Horsemen from being able to reach the Naiads, and Dwarf Clansmen enter the woods.
Bottom of Round 4: Abyssals
The left is a mess, and the Molochs wavering is unfortunate. Multi-charges are slim, so my goal is to disorder the Ice Elementals, and buy a little more time.
The Molochs hold, regenerating a few damage. The Berserkers click their heels, and using the Boots, make an unhindered charge into the Dwarfs. The Warlock here attempts a Bane Chant to aid them... and fails. The Berserkers land 7 damage, which is expected, but a bummer, as I really wanted Bane Chant in this fight in the hopes of making this quick.
 |
| Charges from the Abyssals, |
The Horsemen take the flank charge into the Snow Troll Prime, and although the Prime is not devastated, it is close, and he will be picked up.
The Despoiler Champion was ignored, so he Nimbly charges out and around The Naiad horde to hit one of the Ice Elemental Hordes, looking to disorder them, and succeeds.
 |
| Charges out on the right. |
The wavering Berserkers counter-charge the Naiads, utilizing the Nagarri's aura and regenerating from 9 down to 4 damage. Ensnare is rough, and between their own Regeneration and Radiance of Life from Serakina, the Naiads are shaking off a lot of damage.
The Seductress was ignored by the Frostclaws. Serakina is hiding, so she has a charge into the Naiads or the Ice Elementals fighting the Despoiler Champion. The Seductress isn't going to swing either of those fights, so she charges in against the Frostclaw horde, so she can get on the hill, and from this vantage point, Serakina should be easy pickings.
The flying horde takes a frontal charge from the Berserkers, who have a clean charge and get to make use of their TC too. Already damaged, the Frostclaws routed. The Seductress holds, and the Berserkers overrun, hoping to get into the Naiads
 |
| Reforms for the Abyssals on the right. |
The Nagarri catch a Bane Chant, and clobber the Frostclaw Champion on the counter-charge, and then reform, to eye up the Naiads.
The Snow Foxes got hit for 1 with an early Firebolt, and the insane Gargoyles take them up to 5 and then rout the uninspired unit, and then overrun. It's been a weird game for them, but they came through.
Top of Round 5: Northern Alliance
The Northern Alliance are low on units, and things are starting to look grim, but my opponent still as some tricks left. The Naiads countercharge the Berserkers, land another 8 or so, and will rout the unit, and then turn to face the Berserker regiment on the hill.
 |
| Movement for the Northern Alliance. |
The Ice Elementals will fight the Despoiler Champion land 5 damage to bring him to 6, and he is wavering, but has Fury and doesn't care.
We agree that the other Ice Elementals can essentially pivot and shoot the gap, respecting 1" buffers, to stop within 2" of the Horsemen. They can just see the majority of the Molochs, and fling into them without penalty. I forget the damage, but I think it is 5-6? I remember it wasn't guaranteed but likely... and the Molochs do rout! The Ice Elementals are then surged into the Horsemen, where they will land just 3 damage.
The Dwarf Clansmen are maimed, but still around. They back up to force a hindered charge next turn from the Berserkers, which does seem like their best chance to delay.
Bottom of Round 5: Abyssals
The Berserkers make the hindered charge, I think land the expected 5 damage, and then do get the rout on the uninspired unit. They will reform to face the flank of the Ice Elementals fighting the Horsemen.
 |
| Charges from the Abyssals. |
From the hill, the Seductress can finally see Serakina, and the dualist flies out to fight the legendary Ice Queen. The spellcaster had turned to Surge the Ice Elementals around last turn, so the Seductress is hitting in the rear, unaffected by Ensnare. The Abyssal Assassin lands 10 damage, and routs the last source of Inspiring for the Northern Alliance.
The Horsemen regenerate 1 damage, and counter-charge, catching a Bane Chant and will land 7 damage onto the frigid elementals, who hold firm.
The Nagari had charged the Naiads. With such a unit advantage, I wanted to pin them down if I could. They aren't impacted by Phalanx, but the swings are softened by Ensnare. A few damage lands, but the Naiads are still shrugging off damage.
At the end of Round 5, the left zone is held by my Warlock, and the right zone held by the Warlock and the Gargoyles, who had flown up and to the edge of the zone. We're still fighting for the center, but holding any two zones is enough to win, so things are looking dire for the Northern Alliance.
Top of Round 6: Northern Alliance
Unfortunately, there is naught for the Northern Alliance to really do but countercharge.
 |
| The Northern Alliance counter-charge, with limited success. |
The Naiads fight the Nagarri, and take them up to 13 damage, and then get the rout. There is a lot opposing them, but they are able to spin around and get it all into front-arc.
The Ice Elementals fight the Horsemen, but my opponent's dice have been pretty cold this game, and just 2 damage makes it through. The Nerve check is hot, but just low enough that Fearless keeps the Horsemen around.
Bottom of Round 6: Abyssals
I'm currently winning, but still have a turn here to seal the deal before a potential Round 7. The Horsemen are not majority in the band to be scoring for the center, so I need to be charging.
 |
| A multi-charge on the left. |
The Berserker Horde hits the flank of the Ice Elementals, hindered. The counter-charging Horsemen are Bane-Chanted, and the unit is indeed routed. The Horsemen overrun enough to be scoring.
The Seductress hops back on to the hill for a rear charge in a potential Round 7.
 |
| A multi-charge on the right. |
The Despoiler Champion and Berserkers charge the Naiads in the front, and bring them from 8 to 13 damage, but don't move them. I think the Naiads for the Gargoyles into front arc, and that's why I didn't charge in with them now, and from here we should be able to mess them up in a Round 7.
However, there is not much that can be done here. The Naiads could still pick off a unit, but that won't be enough to shift control of the center, and one needs two zones to prevail for the scenario. Down to one unit, the Northern Alliance is out of options, and the Abyssals will win this one.
Game Conclusion
The early game was a bit rough. I boxed myself out on the right with some poor, far-too-tight layering, and totally forgot that the Frostclaws were better in melee than at range, and that a triple charge against the Molochs was a possibility I needed to plan around, not just shooting. However, after losing them, I definitely had luck on my side, with a lot of chilly dice against me, and had about a half dozen units wavering instead of routing throughout the game, allowing the Abyssals to regenerate some and push back hard.
Much of the win comes down to lucky results, but I did set myself up for the success with some good early choices, such as deploying back to mitigate early shooting, bringing the Gargoyles from the left over to help ground the Frostclaws, and realizing when to pressure and when to retreat on the left, to make the best use of my greater speed there.
Testing Conclusion
- Gargoyles. They deployed where I needed them, and I think these were both used well, though admittedly both had some luck to stick around far longer than I was expecting them to!
- Abyssal Berserker Horde. They performed as-expected, and I think I made good use of their great speed throughout the game. I did not like the J Boots on them though. One is usually using the Boots to get in against something in terrain, but then even if you win, you're often still in terrain, and then just hindered down the road. We want to be hitting and running with them, so we'll try a different item next time.
- Molochs. They had a weird game. One unit had an early positioning error that doomed them, and then the remaining unit didn't actually get to fight much. Despite what seems like a bummer of a showing, I still thought they did ok? A lot of folks wanted to run Lower Abyssal hordes with the Nagarri... but with the change to Melee 5+, those hordes are just not threatening, and you ahve hundreds of points committed to a tar pit reliant on dice rolls to recover wounds. In contrast, the Molochs are potent enough that my opponent did not want to deal with them, and needed to make tough choices in order to pick them off. Not a great showing for damage done, but they took hits and drew fire for the rest of the list.
- Abyssal Horsemen. I think I used these well, holding them back to maintain the line instead of charging out recklessly to their doom. They are cavalry, but as one of the few Def5 units in the list, using them a bit more conservatively has been working out well for me so far.
- Hellhound regiment. Overperformers and eager to please! They definitely should not have bested that Dwarf unit, but they did, and that really put the fear into my opponent, even if he knew the result was an outlier. I think it is rare that the regiment will do this well, and I think a troop or two spread among a slower line is probably the best way to run the unit.
- Seductress. She bounced around and had a great game. Even without items she was a great pressure piece here, and I can see why folks like her with the Glass Shield and Host Shadowbeast to really make her frightening. If I am not going to run multiples, she definitely seems worthy of an item or something.
- Abyssal Warlock with Bane Chant. I made good use of their unit strength to help win the side zones at the end, in order to let my fighting units continue to brawl for the middle. Without additional shooting in the list, Firebolts continued to be under-utilized, though I did get one volley off this game. For support, they kept things Inspired and landed all but one Bane Chant. A great support unit, and I liked having Bane Chant on them this game.
- Formation Berserkers. I already quite liked the normal regiments from the recent league games, as they are speedy, and the high Nerve made them relatively survivable despite the low Def4. The Formation gives them TC1, letting them hit even harder, which is obviously great.
- Formation Nagarri. They are still just such a middling unit, with stats just don't "read" well for the model, and is still a bit of an awkward and expensive support piece overall. Sticking them behind another unit is essentially mandatory for their survival, which feels like a tax on top of the tax you are paying for them as a supporting/buffing unit. All that said, they actually had a good game here! Nimble from the formation helps a ton with such a wide unit, and they had some good fights too this game.
- Formation, Generally. Formations are a fantastic design space to play around with, and while power level varies, more often than not, they doing something intriguing and fun. The Abyssals got a new formation with the 2024 revamp, and I liked it a lot. The formation buffs are good, and you can hide the Nagarri behind one of the Berserker regiments and not need to take another unit to block for them in the early game. If you are interested in running Nagarri, I think this is the way to do it.
- Sacrificial Imps. I had them, but ultimately did not pop any of them. Early Frostclaw shooting was mitigated by positioning, and the later Ice Elemental shots weren't threatening any units with the upgrade. So, still a niche upgrade, still potentially very strong, but again unimpactful here.
- Regeneration. As before, rolling as-written, this is just so cumbersome. I think a simple rules tweak to be rolling this at the beginning or ending of the movement phase would be the way to go, so a player can do this all at once instead of unit-by-unit as you are moving them.
No comments:
Post a Comment