

Intro and Lists
I took some time off of work to get some weekday games in. Wanting to make sure he got his June League games in, Joe happily obliged me, carting out his cult-themed, Draugr-heavy Varangur:

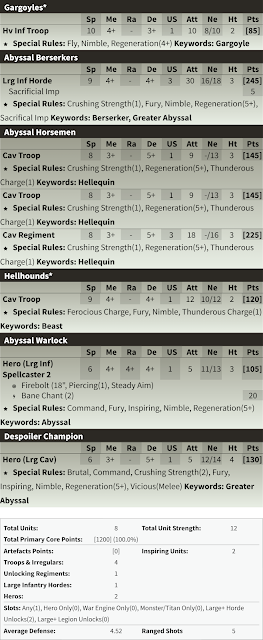
I brought the Abyssals, looking to get some practice in with a number of new units, and running more Horsemen this time than the previous game. Since just about everything in the list is new or updated, up to evaluate is everything:
- Abyssal Berserker Horde. I missed the mark and these have garnered a bit of a online reputation already. Great Nerve plus Regeneration and Fury all means they might be in fights longer. Since my units are finally done now, we’ll get them on the table and see what they can do for me.
- Abyssal Horsemen Regiment. They are rather capable cavalry with regeneration and a mix of CS/TC, and got a small points decrease in a previous Clash update. With the revamp, they gained Fearless. Mine were often wavered by ranged fire, so I viewed this as a massive boon. Given that the rest of the list is so speedy, we’ll use these a bit conservatively, more as an anvil, and see how they do for us.
- Abyssal Horsemen Troop. They've got good defense of 5, but at -/13 their survivability is giving me a little worry. Fearless is a powerful buff though, so I wanted to try out some troops of the Horsemen as well.
- Hellhounds. They are speedy and nimble but likely a bit fragile as just a troop. We’ll save these for a late drop and hunt for flanks.
- Abyssal Warlock. The a la carte spell selection benefits the Warlock greatly, as it is able to play scenarios, Inspire, and fling Firebolts, all without any other investment. Buying a spell or two is a very nice bonus though. Here I went with Bane Chant, and the idea is to babysit the Berserker horde whenever possible.
- Despoiler Champion. In the revamp the Champion got Inspiring, making them far more attractive as an option. Speed 6 is a little slow relative to the rest of the list, but we’ll see what he can do as I still like my model and wanted to bring them out.
- Gargoyles. We only have the one chaff unit, which makes me uneasy, but is probably fine for this points level. I want to lean into regeneration a bit, so we’ll try to use this to play objectives or for fighting, instead of flying and dying.
- Sacrificial Imp. The Sacrificial Imps upgrade got revamped from letting you reroll a Regeneration reroll, to instead giving you Def6 against shooting for one turn. It’s a niche upgrade that will have wildly varying results and be difficult to evaluate, so we’ll do our best to keep this in mind during the game.
- Regeneration. Most Abyssal units have Regeneration, leaning on it while eschewing high defense, for the sake of game balance. Since Regeneration should be rolled one unit at a time just as they are given their move orders (instead of everything all at the beginning or end of a phase), this makes them very fiddly to play while on the clock, as the activation of units could be quite impactful to your tactics, not to mention the outcomes of the Regeneration rolls themselves. A pet theory of mine is that Regeneration makes the army unattractive to competitive players, as you are running a glass-cannon army that is relying more and more on Regeneration rolls to keep you around, introducing a big time sink in the movement phase for both decisions and rolls, and that the overall variance makes the army less reliable, all which is undesirable in competition. Just something to keep in mind as I play.
Table and Terrain
We were out at Planet Chaos in Fort Atkinson, WI, a charming shop with a variety of nerdy offerings, from collectables, to comics, along with the usual suspects like Magic and 40k. The shop isn't big on wargaming, and we've struggled to get a full 6 foot long table previously. They did have a 5 foot long table set up for (I think) 40k, with a 44"x60" mat, which we opted to use.
For the rematch we grabbed a new table configuration from an app, and then scrunched it slightly to fit the table. We were using our typical terrain rules, running the circular towers as Height 9 blocking terrain, all the forests as Height 6 Difficult Terrain, fences as Height 2 Obstacles, and Hills as Height 3, and the ponds as Height 0.
For the scenario we got the newish Compass Points, an objective-based scenario. On the wings are objective tokens worth 1 point, and then in the center is essentially a "home" and an "away" objective for each player. Your home objective is worth 1 to you, but 2 to your opponent.
My understanding is that it had a bit of a "standoffish" reputation to start, since you are somewhat incentivized to hold your center and token and play for one a wing... and then it became difficult to push in. I haven't played this scenario much, but nowadays I think you are either trying to contain, pushing the wings and holding your center, or trying a refused flank, holing a wing and pushing towards the away objective while holding your own. Again, I haven't played this scenario too much, so we'll see how it unfolds.
I won the roll for sides, and was lazy again.
The Varangur committed pretty hard to the left, ignoring the right. We have the Tundra Wolves on the far left, with the Draugr Legion and the Hammer of Measured Force nearby. The Hearthguard were in reserve, with a cluster of the Magus, Cavern Dweller, and Skald screening for them. The second Draugr Legion were out on the right, in line with the two center tokens.
 |
| Table and deployment. |
For the Abyssals, we have a Horsemen troop, Warlock, second Horsemen Troop, Hellhounds behind the hill, Horsemen Regiment, Despoiler Champion, and then my last two drops were the Gargoyles and Abyssal Berserkers out on the right, to leverage my speed. The pool on the left was about 110mm from the table edge, and I decided I did not want to deal with hindered charges and went wide. With a slight advantage in drops, going wide is a good call for me regardless, as I can hopefully hold the right token without issue. Conversely, my opponent choosing to play compactly and ignore that token is probably a strong call as well, as he can concentrate his forces better by deploying more conservatively.
Seeing the full deployment, I wanted to pressure and contain. I am most scared of the speedy Wolves getting somewhere I don't want them, so if I can contain them, the game should be easier for me, as I can then dictate fights with my greater speed. My opponent wins the roll, and opts to go first.
Top of Round 1: Varangur
The opening moves for the Varangur are conservative. On the left, the Tundra Wolves inched up to just get a leader point onto the hill and see things. The Draugr inch up as well, I think just moving their speed. The Horsemen's 16" range is represented by the grey wound tracker, and the longer range of the Wolves is represented by the black dice-topper. We have a few inches to play with from either side.
 |
| Opening moves. |
The Cavern Dweller turns, ready to support the Draugr as-needed, and both supporting heroes stack up behind. Barkskin lands 2 out on the Draugr on the right, who move up a bit as well. They aren't in danger, so don't need the spell, my opponent is just trying to form good habits. The Hearthguard are very aware of where my Berserkers deployed, so they reposition in reserve, hoping to catch them, or at least keep them honest in the coming turns.
Bottom of Round 1: Abyssals
On the right, with the Hearthguard pivoting out this way, I want to exert constant pressure and keep their attention. The horde of Berserkers zip up around 11" and pivot, already threatening the Draugr next turn and in the meantime securing the right objective. The Gargoyles hang around, ready to interdict if needed.
 |
| Pressure on the right already from the Abyssals. |
More centrally the Despoiler Champion hops ahead, also threatening a charge into the Draugr on the right, but also projecting threat out towards the left. If the Cavern Dweller isn't careful, I could get a flank next turn.
 |
| The Horsemen ready themselves. |
The Abyssal Horsemen regiment takes the hill, in case we need the extra TC against the Cavern Dweller, though we are back far enough to deny him a charge next turn.
The Hellhounds utilize Nimble to reposition, strolling up into charge range of the Tundra Wolves again, and forcing a charge decision from my opponent.
The Warlock nestles in, but he and the two lurking Abyssal Horsemen troops are out of range of the Wolves this round, clearly threatening reprisals, should the Wolves take the bait. And they are the only unit with a possible charge next turn.
Top of Round 2: Varangur
I apparently forget to take another Round 2 picture. That's becoming an common occurrence now, and I'll have to leave myself a note for next game. We were busy discussing, and things mostly just pivot.
Essentially, we were discussing piece trading. It's a friendly game, and we're discussing throughout. I had basically shown my hand, saying that I am scared of the Wolves. I offered up my Hounds last game and won the trade, and tried the same move again here, which my opponent opts not to take. The Wolves reposition slightly.
The nearby Draugr step up their speed again, and the Cavern Dweller who also repositions, purposefully swiveling and putting a corner into the woods. The Skald steps up to complicate alignments to the Dweller, and the nearby Magus even goes for Barskin on the monster, getting 3 successes.
The other Draugr reposition, sitting atop the token. The Hearthguard pivot again to cover them. It's not a great position, but with the Berserkers being taller, chances are good the Draugr can shuffle down to let them get in if needed.
Bottom of Round 2: Abyssals
I am not going to one shot the Draugr no matter what tricks I pull, so I don't want to charge in. Instead the Berserkers move ahead a bit, still controlling the objective for now and still threatening, while being out of the maximum charge range on the Wild-Charging Draugr. The Gargoyles flutter about over here, also safe.
 |
| Movement for the Varangur. Only the Hellhounds go in. |
I should have a few charges into the Cavern Dweller from the nearby Horsemen units, but I cannot multi-charge due to spacing, and the single charge would for-sure be hindered. Plus the monster has Barkskin. So it's an easy pass to avoid the monster this round.
I check some angles, and zip the Despoiler Champion in past the arc of the Draugr and out of line of sight of the Cavern Dweller. The Dweller had ever-so-slightly put a corner into the woods, as my opponent thought that granted line of sight. Line of sight to, but the Dweller would be using his leader point, which is still behind the terrain.
The Horseman all inch forward, again keeping out of the maximum charge range of the other Wild-Charging Draugr. The regiment is on the hill, and a troop joins them, threatening the Cavern Dweller, and the Monster doesn't have the range to hit them next turn.
The Draugr advanced too far, so the Hellhounds eagerly charge the Wolves, and land 4 damage against them. Somehow I thought Ferocious Charge was a +1CS on the Countercharge, but I am a fool and didn't read the rule. I'm hitting on 4's here instead of 3's per the rule. The Wolves hold, unbothered, but the piece-trading has begun!
Top of Round 3: Varangur
The Wolves counter-charge the Hounds, and underperform, landing just 4 damage (6 expected). Still, the Abyssal's troop is found wavering. However, the Hounds have Fury, so I am ok with this.
The Draugr hold, with the Skald disappearing behind them for safety, and to get line of sight to heal the Wolves down to just 1, landing all three Heal hits apparently. My opponent played Dwarfs for a solid year, and is used to counter-punching. So, the Cavern Dweller backs up, ready to support with a counter-punch here as well.
 |
| A waver, but not much moving from the Varangur. |
The Magus lands a Drain Life 2 into the pressuring Despoiler Champion, but has nothing to transfer the health to. Still, the Nerve check is a hot 11, and the Champion is wavered, at range.
The other Draugr hold, still atop my opponent's home token. And the Hearthguard sidestep, allowing for easier access for a counter-punch here as well, should I choose to fight the Draugr.
Bottom of Round 3: Abyssals
On the right, I haven't charged anything, but feel fine about it. The Berserkers nimbly reposition, and keep out of max charge range while still threatening the Draugr in a bit of a standoff. They won't be clipping the obstacle if they do eventually charge, and can sidestep back a few inches to reclaim the token if needed. The Gargoyles fly to safely hold my home token.
 |
| A triple charge from the Horsemen. |
I have a pretty safe triple charge into the Draugr with all of my Horsemen units, so I take it. "Just" 20 damage looks like the expected result, which would mean the Draugr would probably be likely to survive this, and means I should have been poking a bit with the Warlock's Firebolts. However, I land 25 damage, with every unit over-performing slightly.
 |
| Reforms for the Abyssals. |
In victory, I try to set up a bit of a kill box, but am sloppy. I am not used to this. It still works, but I should be more corner-to-corner here, to get a better overlap. The third Horsemen unit holds, ready to support the Hellhounds. Even if the Wolves win and sidestep, they'll still be in arc.
I wasn't sure I would break the Draugr, so the Despoiler Champ regenerates and turns to face the Cavern Dweller. He has a good arc to protect the regiment, but not much else. Not needing BC against the Draugr, the Warlock runs up to contest the left token.
The furious Hellhounds counter-charge the Tundra Wolves, and as I am narrating the dice, my opponent suggests we check Ferocious Charge, and indeed I am getting this rule wrong. Nothing on the counter-charge, and just a +1 to hit on a clean charge. Neat. Still on 4's, the Hellhounds like 3 more damage, but again fail to make a dent in the fighting spirit of the Wolves.
Top of Round 4: Varangur
The Tundra wolves land 6 into the Hellhounds, bringing them to 10 damage and routing them. The Wolves are indeed stuck, and so overrun, trying to keep the Abyssals contained.
 |
| The best option for the Cavern Dweller. |
The Cavern Dweller goes for the weak spot, charging the regiment. After some mulling, the Magus chooses to try a Drain Life into the regiment as well, landing 2 damage, but again unfortunately has nothing to heal up. The Cavern Dweller rolls up a lot of extra attacks, but only lands 5 damage to bring the Horsemen up to 7 damage. I am Inspired, and Fearless, and barely hold on thanks to the reroll, with my opponent falling 1 shy of what was needed.
On the right, the Hearthguard pivot and move, sick of the standoff and looking to try and help the Cavern Dweller break on through. The Draugr on the right hold.
Bottom of Round 4: Abyssals
On the right, with the Hearthguard leaving, I seriously consider charging the Draugr with the Berserkers, just to see what would happen. I am obviously not going to break them, but I'm curious to see if I could break the Legion before the game ends. I choose to play it safe and hold my token, continuing the standoff. It looks like 12.5 is expected, so with IR we'll say 10 damage sticking per turn? Not bad, but still a little dicey with Heal and Drain Life around, so I made the right call.
 |
| Ohhh, so tempting. |
The Gargoyles flip around, ready to fly out and grab that token in case I do want to do something dumb and risky next turn.
I take some measurements, and decide not the charge the Magus in the woods. It will be hindered, and that will for-sure give the Hearthguard something to do next turn. I've kept them out of the game so far, so that's the goal here.
 |
| The Horsemen continue to push. |
I need to go for the Cavern Dweller though. The troop counter-charges and the regiment flanks, and Bane Chant is attempted, but fails. Still, the Horsemen land a combined 19 damage, devastating and routing the monster, as is proper. From the earlier measurements, the Hearthguard have wild charge, but can barely reach the Cavern Dweller where it is. So in victory, the troop safely sidesteps. The regiment cannot get away, but pivots, hoping to force a hindered charge from the potent fighters.
 |
| Reforms for the Varangur. |
The last Horsemen troop on the left goes in against the Tundra Wolves, bringing them to 10 damage a getting a waver against them. I thought this would go quicker, but at least they've been occupied all game.
I'm currently holding 3 objectives for 3 points, vs the Varangur's 1 objective for 1 point.
Top of Round 5: Varangur
My opponent starts his moves, and is resigned to a hindered charge from the Hearthguard until we realize that he can be tricky with the Magus, having them blocking the Hearthguard from clipping the woods. The Magus will contribute 2 with Drain Life, and the Hearthguard will thump on 6 more, a bit shy of the 8 damage I was expecting. The Horsemen are Fearless, and hold, with my opponent needing some strong luck to potentially break the Inspired unit.
 |
| The Hearthguard arrive at top of Round 5. |
On the left, the wavering Wolves hold. And on the right, the Draugr hold, continuing to cover my opponent's home token.
Bottom of Round 5: Abyssals
I again consider charging the Berserkers into the Draugr, but that's an even less good idea now, and their Unit Strength is greater than mine too. So the standoff continues.
 |
| ...And the Hearthguard fall in the bottom of Round 5. |
With the Hearthguard stalled, the Horsemen regiment regenerates and then counter-charges, with the troop hitting one flank and the Despoiler Champing making a hindered charge into the other. The triple charge brings them up to a staggering 26 damage (the Champ smacked them for 7 on his own), another overperformance by the Abyssals, though even with normal damage output the Hearthguard should be bested here.
On the left, the Horsemen troop charge the wavering Tundra Wolves, and will pick them up. The Skald's heal kept them in the game for a long time, but we were eventually able to grind the unit out once we pinned it down.
At this point, the Varangur concede. They've been stuck holding just their home objective all game, and the Abyssals are clearly going to win this.
Game Conclusions
This game showcased speed and strategy. Engaging the Tundra Wolves early let the Horsemen safely gain ground and then engage on my terms, following my containment plan, and applying speedy pressure along the Varangur line worked. The eventual charges made by both the Cavern Dweller and Hearthguard were they best options they could do in those rounds. Not breaking anything either time was unlucky for my opponent. It was a bummer that they underperformed, but the Varangur generally and those units in particular were going to be in a rough spot regardless. Good strategy for the scenario couple with good luck for me led to a strong victory.
Testing Conclusions
- Abyssal Berserker Horde. It feels weird to say, since they are a big scary fighting unit and I didn’t charge with them at all, but I still think these had a good game. Occupying the attention of Hearthguard for 3 turns without letting them charge feels like a win all by itself, but that was just gravy. My plan was containment, and they were able to make use of Nimble and their long charge range to make that happen. Not a flashy or exciting game for them, but used well to secure the win.
- Abyssal Horsemen Troops. More testing is needed on the troops, and likely some comparisons to the Tortured Souls that I already know and like. I was using them to take up space and project threat, and they did ok here. Nine attacks, even with good stats probably isn’t all that scary though, and this kind of threat projection is probably better some something like the slightly cheaper Hellhounds.
- Abyssal Horsemen Regiment. Fearless is still a nice buff, but the 16 Nerve is still a bit worrisome against other hammer units. These did fine, but I acknowledge they got lucky.
- Hellhounds. Well, I donked up Ferocious Charge, but these still had an ok time. Trading for the enemy cavalry was definitely worth it both games. Lacking Regeneration, I don’t know how much I want to invest into these units, but I do want to play around with these a few more times, now that I have a better understanding of them (and their special rules!). More to come for these.
- Abyssal Warlock. I was prioritizing their safety and Bane Chant, and did not toss any Firebolts at all. I did not use them to their full potential. Still, the Warlock did fine in these supporting roles both games.
- Despoiler Champion. With the lower Nerve he does seem prone to surprise wavering, like seen here. I still like him, as the model, but don’t think a speedy list is right for him. Fortunately I have plenty of other ideas swirling around for the Abyssals, so
- Gargoyles. I did not throw them away, and they survived to hold an objective token. They played the scenario and were used well overall.
- Sacrificial Imps. The upgrade did not come up this game. It’s a neat rule, but niche. For an all-comers list, it seems like a great buy for the Berserkers though.
- Regeneration. I generally like the preciseness of Kings of War, but playing this as-written, going unit-by-unit, rolling this when the unit is issued the order but before moving it… was cumbersome. So much else is figured out ahead of time, perhaps a general “before this unit is given a movement order” would be a better approach to let folks get this all done at the beginning of the phase and be able to plan accordingly? Or if Mantic wants to retain the randomness and uncertainty here, rolling at the end of the movement phase would still be preferable to me. Going unit-by-unit is awkward.
I'm really digging the army and the theme. The Legions were formidable, and running the math in the reports, even with a triple charge, I lucked out popping them in this game. Hopefully we'll see them on the table again soon! Thanks for the games!
No comments:
Post a Comment