
Intro and Lists
I had been meaning to take some time off from work, and get some weekday games in. I realized around this last Wednesday that it was June already, basically mid-June, and I had yet to do this since we've been so busy. So I snuck in a slightly spiteful last-minute request, and then managed to connect with Joe for some League Games. Joe dutifully continued on with the Varangur that he had started (and that we saw in Battle 125), running a cult-themed army exploring some heavy-Draugr play, and bringing the following:

I sputtered in disbelief as I glanced at his lists. LEGIONS? That's some definite cool points and a ton of Nerve, especially in a smaller game. The Cavern Dweller is a strong pick and with Lifeleech 3, I usually feel like I get one chance per game to deal with it, otherwise I need to avoid it. Helping out is a regiment of strong Hearthguard, speedy Tundra Wolves, and a Magus and Skald around to try and keep the legions of Zombies Inspired, and around even longer with Heal and Drain Life.

I am not as diligent a league player as Joe. While I had been running the Varangur also, I had mostly done so to explore Axes vs Bows in those smaller games. There is more to explore there, but with a better handle on that, I had wanted to switch over into another army for June and July. So I brought the Abyssals, with the lists I was not able to run at the last meetup. The goal with these was to shake off the rust with the army prior to the game for Masters prep. That didn't happen, but I still wanted to explore the lists, as I wasn't happy with the prep game, and felt this was a good avenue to explore things. Since just about everything in the list is new or updated, up to evaluate is everything:
- Abyssal Berserker Horde. I missed the mark and these have garnered a bit of a online reputation already. Great Nerve plus Regeneration and Fury all means they might be in fights longer. Two hordes felt oppressive at this points level, so we have just the one, and stock, so I can try and get a baseline performance level for them..
- Abyssal Berserkers Regiments. Newcomers! The Formation regiments (with TC) are very desirable, but I didn’t want to pay for the Nagarri as well, so we’re trying out the regiments stock for now. The high Nerve makes them surprisingly resilient, so we’ll see what damage they can take and dish out this game.
- Abyssal Horsemen. They are rather capable cavalry with regeneration and a mix of CS/TC, and got a small points decrease in a previous Clash update. With the recent revamp, they gained Fearless. My solitary unit was often wavered by ranged fire, so I viewed this as a massive boon. Given that the rest of the list is so speedy, we’ll use these a bit conservatively, more as an anvil, and see how they do.
- Hellhounds. Newcomers! They are speedy and nimble but likely a bit fragile as just a troop. We’ll save these for a late drop and hunt for flanks.
- Abyssal Warlock. The a la carte spell selection benefits the Warlock greatly, as it is able to play scenarios, Inspire, and fling Firebolts, all without any other investment. Buying a spell or two is a very nice bonus though. Here I went with Bane Chant, and the idea is to babysit the Berserker horde whenever possible.
- Despoiler Champion. In the revamp the Champion got Inspiring, making them far more attractive as an option. Speed 6 is a little slow relative to the rest of the list, but we’ll see what he can do as I still like my model and wanted to bring them out.
- Gargoyles. We only have the one chaff unit, which makes me uneasy, but is probably fine for this points level. I want to lean into regeneration a bit, so we’ll try to use this to play objectives or for fighting, instead of flying and dying.
- Sacrificial Imp. The Sacrificial Imps upgrade got revamped from letting you reroll a Regeneration reroll, to instead giving you Def6 against shooting for one turn. It’s a niche upgrade that will have wildly varying results and be difficult to evaluate, so we’ll do our best to keep this in mind during the game.
- Regeneration. Most Abyssal units have Regeneration, leaning on it while generally eschewing high defense, for the sake of game balance. Since Regeneration should be rolled one unit at a time just as they are given their move orders (instead of everything all at the beginning or end of a phase), this makes them very fiddly to play while on the clock, as the activation of units could be quite impactful to your tactics, not to mention the outcomes of the Regeneration rolls themselves. A pet theory of mine is that Regeneration makes the army unattractive to competitive players, as you are running a glass-cannon army that is relying more and more on Regeneration rolls to keep you around, introducing a big time sink in the movement phase, and that the overall variance makes the army less reliable, all which is undesirable in competition. Just something to keep in mind as I play.
The League was set to jump from 3’x3’ tables to the full 6’x4’ battlefield this month, so while it might be a little unsporting to bring all this speed, it was a conscious choice, since I really wanted to try and make use of all the new space and see what the speedier options for the Abyssals could do.
Table and Terrain
We were out at Planet Chaos in Fort Atkinson, WI, a charming shop with a variety of nerdy offerings, from collectables, to comics, along with the usual suspects like Magic and 40k. The shop isn't big on wargaming, and we've struggled to get a full 6 foot long table previously. They did have a 5 foot long table set up for (I think) 40k, with a 44"x60" mat, which we opted to use.
We grabbed a table set-up from an app, scrunched it slightly, and then were using our typical terrain rules, running the circular towers as Height 9 blocking terrain, all the forests as Height 6 Difficult Terrain, fences as Height 2 Obstacles, and Hills as Height 3, and the ponds as Height 0.
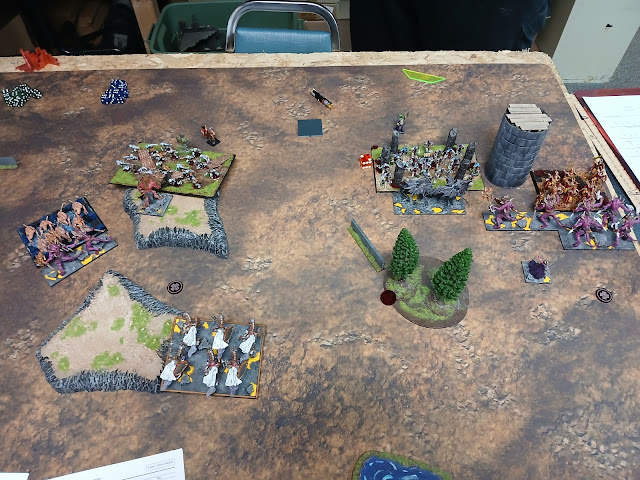
We got Loot for the scenario, and would be fighting for control of three tokens. I won the roll off, and placed way on the right, trying to spread things out. After measuring, Joe realizes he can sneak his token in between where I placed, trying to play to his strengths and make us fight for just half the table. I donked up!
For deployment, the Varangur had the speedy nightmarish Tundra Wolves out on the far left, and the Legion with the Hammer of Measured force looking at the token in the center of the board, which we'll be calling the left token from now on. The Cavern Dweller was unfortunately left at home by accident, and so is the blank base. He and the Skald held a gap, with the Magus and other Draugr Legion looking at the middle token. The tower complicated deployment a bit, but the Hearthguard had enough space to slip by to fight for the right token.
 |
| The table and deployment. |
My list two drops were out on the left, trying to deal with the fast Wolves. Here we have the new Hellhounds and a regiment of Berserkers. Looking at the photo, I must have been measuring goofily, as they are a few inches up further then the rest of my line. Thankfully, it is not consequential. Continuing on were my early drops of the Champion and Horsemen. I wanted to avoid the pond, so the second regiment of Berserkers, the Warlock, and the Horde completed the line, with the Gargoyles out here to help instigate against the Hearthguard.
I win the roll off, and with this much speed, want to try and capitalize on it, and see what units I might be able to isolate. I take first turn.
Top of Round 1: Abyssals
Out on the left, the nimble Hellhounds zip up, crossing the center line by a few inches, and are just out of max range of the Draugr, but in against the Wolves as a sacrifice. The regiment of Berserkers take the hill, ready to avenge the hounds if needed.
 |
| Movement for the Abyssals. |
Centrally, the Despoiler Champ and the Horsemen move up around 7-8 inches, projecting threat. The quick Cavern Dweller is deployed a few inches back, so they are quite and just applying pressure.
Similarly, on the the Berserkers move up all weirdly angled near the center line, threatening charges next turn. The Warlock babysits, but I think moves just over 6" so casts no spells. The Gargoyles flap in reserve.
Bottom of Round 1: Varangur
It's a quick turn, and I look to have not snapped a picture.
On the right, the boastful Hearthguard move up, ready to fight on the right. The Draugr use the building to protect their flank, and are ready to add weight to any fight the Hearthguard pick, and the Magus lands Barkskin 2 onto the legion.
The Cavern Dweller holds in reserve, to see where he may be needed.
The other Draugr legion, out on the left, utilizes Ordered March to take the hill and get a pivot in, keeping everything in front arc. Lastly, the Tundra Wolves happily charge the Hellhounds, and easily see the uninspired unit off the field.
Top of Round 2: Abyssals
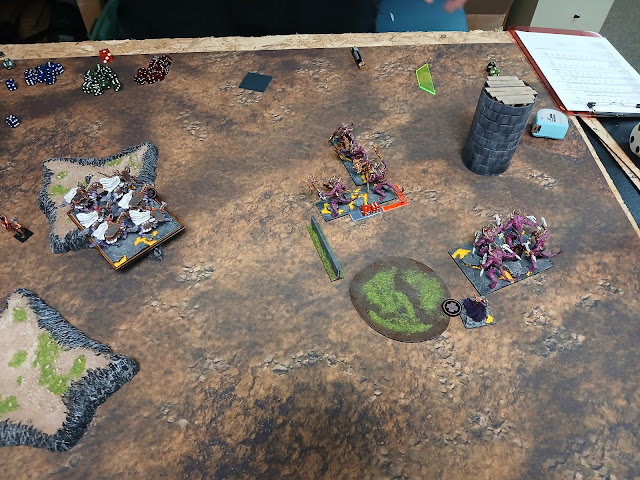
On the left, the Tundra Wolves were indeed victorious, but are in the sights of the Berserkers, who charge off the hill and unto the Wolves. I land 7 damage, and will avenge the Hellhounds beating this uninspired unit, and will then turn to face the Draugr and the Cavern Dweller, who can be seen over the hills nearby.
 |
| Charges from the Abyssals. |
The Horsemen have a charge, but just sidestep, projecting threat. If they charge, they will be in arc of the Cavern Dweller, and I don't want that monster in the fight yet. So the Despoiler Champion charges in alone, fighting against the tide of frigid undead.
 |
| Reforms for the victorious units. |
I can't really finagle the block I want with the Gargoyles, so they end up flying into the Draugr legion to block them up, and the fliers will claw 2 damage in, which just removes the Barkskin counters.
The big play turn turn is a double-charge into the Hearthguard. They had advanced past the building, letting me align and smash into them with both the regiment and the horde. The horde of Berserkers catches a Bane Chant, and we are able to devastate and then rout the mighty regiment. My victorious regiment pivots, and the horde tries an overrun, looking to get into the back field to threaten things next turn, but only roll up 1 inch.
Bottom of Round 2: Varangur
The Cavern Dweller sees what the Berserker horde want to do, and so pivots and moves to protect the backfield.
The Draugr countercharge the Gargoyles, landing 5 damage, and good checks will rout them. In victory, the Draugr will hold, keeping the regiment of Berserkers in front arc. The Magus fortifies them with Barkskin 4 as well.
 |
| Aftermath of the Varangur turn. |
On the left, my opponent realizes that he forgot to designate which legion had the Hammer during deployment, and I forgot to ask and clarify since I wasn't reading his list closely. He rolls some dice to determine, and it turns out the Hammer was in one of the opened coffins the whole time! Silly Draugr always losing stuff. They catch a heal to get down to no damage and countercharge the Despoiler Champion. It's a legion, but they are hitting on 5's and the dice are low, with only 3 damage landing in against the good armor of the Champion. Still, the Nerve check is hot, and the Champion is wavered.
Top of Round 3: Abyssals
I remember that the Champion has Fury, and so he doesn't care about his temporary embarassment last turn. He countercharges, with the Berserkers and Horsemen getting in on this combat too. The Champ flubs, nut the Horsemen contribute the expected 10 and the Berserkers do 8, making up for the floundering of the Champion. Even with Brutal, we fall one shy of breaking the Legion when it is time to check. With Fearless, they hold, and Iron Resolve down to 17. It's a good attempt, but a legion is still a legion I guess.
 |
| Legions are formidable. |
I can't reach the backfield and don't want to let the Cavern Dweller in. So the regiment of Berserkers sidesteps out of his arc, just occupying the attention of the Draugr. The horde backs up, and with their nimble pivot, turns to face the Draugr as well. They end their movement on the token, but I do not pick it up. The Warlock doesn't need to help with anything, so starts moving towards the central token.
Bottom of Round 3: Varangur
The Varngur are on the back foot, but with two legions and a Cavern Dweller still, they can't be counted out just yet.
The Dweller pivots around, facing the horsemen regiment I belive. The nearby Draugr horde on the right moves and pivots, shuffling up to keep both Berserker units in front arc. I believe we measured, and a charge would but the Berserker horde in the flank, which is the reason for the hesitation here. That was the vague goal in keeping them out here, but not something I had planned or determined ahead of time, so I'll count myself lucky.
 |
| The Draugr claw a Champion down. |
The other Draugr Legion rolls hot, landing 9 into the Champion, and brining him to 12 damage. The Champion is routed. In victory, the legion sidesteps.
Top of Round 4: Abyssals
I don't know what the thinking was, and I think it was just 1 inch, was a clear mistake, as the Draugr's victorious move puts the Berserkers in their flank. I take it, with the Horsemen charging in as well. The flanking Berserkers take the legion to 28 damage, we opt fast-forward, skipping the rolls for the horsemen, and the first legion is popped.
 |
| Movement for the Abyssals. |
In victory, the Berserkers will sidestep, pretty safely eyeing what remains of the Varangur line. The Horsemen are just out of the Dwellers charge range where they are, so they too turn with impunity to threaten things.
 |
| Reforms for the Abyssals. |
The other regiment of Berserkers sidestep, to get out of arc of the Cavern Dweller, and continue to block up the Draugr. The Warlock and horde of Berserkers each grab a token this turn.
Bottom of Round 4: Varangur
The Abyssal Horsemen just have the range into the Cavern Dweller. It cannot get away from the Berserkers, but backs up 3" to at least avoid a double-charge.
 |
| The Draugr charge. |
The Magus steps up, and lands Drain Life 2 into the delaying Berserkers. The Draugr charge, with the Magus preventing a significant shuffle just because, and the zombies claw 3 damage in, but it's a long-shot, and the Nerve check is low, and the Berserkers hold.
Out on the left, the Skald throws axes, but they can't bite through.
Top of Round 5: Abyssals
Out on the left, the Horsemen sidestep and pick up a Loot token, slowing themselves down. With everything else happening this turn, just grabbing a token and playing the scenario seems like the best play for them.
 |
| A commanding position for the Abyssals. |
On the right, the Warlock repositions to keep things Inspired, as I don't need Bane Chant. Then all the remaining Berserker units smash into the Draugr legion, which is brought up to a staggering 38 damage, which is probably a record for damage endured, and appears to be right on-track with the expected output of all these units. I don't snake-eyes the check, and the devastated second legion is routed.
 |
| A big triple charge! A stunning 90 attacks into the Draugr Legion! |
For reforms, I spin the rear-charging regiment around to face the Cavern Dweller and try to delay. The horde backs up. And the other regiment overruns, running far ahead and into the blocking unit, which is a mistake. I had a great place where I was, and didn't even need to reform at all.
Bottom of Round 5: Varangur
The overrun was unnecessary, and was then a high roll too, getting the injured Berserkers up near the blocking unit, and overhanging, and allowing the Cavern Dweller a chance to escape the noose.
 |
| A defiant move from the stealthy Cavern Dweller. |
The Cavern Dweller charges in, rolling up 5 extra attacks and landing 9 damage, overperforming actually. Unfortunately the Berserkers hold with a low Nerve check.
The Magus charges the Berserker horde in an attempt to hold them up and let the Cavern Dweller to their thing, but misses with their 1 attack, so the horde has a pretty free hand next turn.
The Skald throws axes again, into the Horsemen, but nothing connects this time either.
Top of Round 6: Abyssals
The Horsemen are holding a token, and thus slowed down. I don't think they have the range to get into the Cavern Dweller this turn. I don't think I can scootch far enough away to escape if we do have a Round 7 and the Cavern Dweller breaks free. I'm using a stand so don't count myself as on the hill, but they inch forward, getting into range, and ready to fight if needed.
 |
| End of the game. |
Game Conclusions
We chatted a lot throughout the day, and I think the new units just caught my opponent really off-guard here. On my right, he was too aggressive with the Hearthguard, allowing for an early multi-charge from the Berserkers for free. Elsewhere he was too cautious, holding the Cavern Dweller back in the hopes of counter-punching, but the Abyssals weren't taking the bait to let the Dweller join in, so he was losing a lot of momentum. Overall, I was able to use my speed to get in multi-charges and keep him off balance all game, eventually getting the win.
Testing Conclusions
- Abyssal Berserker Horde. I still think you probably want to fit an item on them, but these did fine, and at Def 3, the Draugr were an ideal punching bag. Without an item, I wanted to wait for a multi-charge, and was able to make that happen!
- Abyssal Berserker Regiments. Still a bit vulnerable to enemy hammers as they are just Def4, but the regiments were surprisingly effective? The higher Nerve really helps them out as you can’t just boop and disorder them to hold them up or chaff them up, as with CS they are going to be hitting just as hard. The Nagari “tax” is still hefty, so we’ll need to wait a bit before trying out the new Formation, but The Formation regiments are looking even better now!
- Abyssal Horsemen. A Nerve of 16 isn’t great for an anvil, but thankfully I was able to use their speed to pressure and then wait for a multi-charge. They had a good game, and even survived! I think they will often want an item too, though a small one (even just 5-10 pts) should suffice well enough. I like the Fearless buff, and will be messing around with these some more in the future.
- Hellhounds. They died, but drawing the speedy Tundra Wolves out and trading for them was definitely worth it. More testing is needed to see if they may have a niche somewhere.
- Abyssal Warlock. I didn’t use any Firebolts, so did not use them to their full potential, but they grabbed a token and still did good support overall. Even when not used particularly well, these heroic units can be quite handy.
- Despoiler Champion. He was ignobly clawed down by Draugr! That’s rough buddy. He did ok pressuring and getting around, but as with the bigger game recently, I don’t think he is the best fit for a speedy list.
- Gargoyles. I sacrificed them for a blocking / delaying charge, which feels bad when I can’t follow up, but still ended up bring ok.
- Sacrificial Imps. The upgrade did not come up this game. It’s a neat rule, but niche. For an all-comers list, it seems like a great buy for the Berserkers though.
- Regeneration. I generally like the preciseness of Kings of War, but playing this as-written, going unit-by-unit, rolling this when the unit is issued the order but before moving it… was cumbersome. So much else is figured out ahead of time, perhaps a general “before this unit is given a movement order” would be a better approach to let folks get this all done at the beginning of the phase and be able to plan accordingly? Or if Mantic wants to keep the randomness inherent here, rolling at the end of the phase would still be preferable to me. Going unit-by-unit is officially awkward though.
No comments:
Post a Comment