

Intro and Lists
I got a pair of league games in with the Kings of War Wisconsin FB group. This was the second game I played, up against a splendidly themed and painted Nightstalkers army. It's got a vibe and I can't wait to see what units hit the table next! I unfortunately don't have a good copy of their list for our game. The list below is my best guess, and is missing any items or upgrades that were taken. For league play, the Shadowhounds were the Veterans from the last month, and had also rolled up 3 extra attacks, making them quite scary on the charge.

I continued on with the Varangur. Being me, I brought two Varangur lists (as well as a Herd list, should I manage to get in a third game) out to play. This list for this game was much the same, looking to explore shooting and Horse Raiders, but had dropped the second Horse Raider regiment for a Jabberwock, to see how bow shots might synergize with the little monster, since he hasn't seen the table in quite some time.

I've technically played the Nightstalkers before, but that game was almost two years ago! I do know they have Stealthy across the board, so my commitment to bow shooting is probably ill-fated. I don't have any good grinding units in this list, so hopefully I can figure out a way to get combats going in my favor as the game progresses.
Table and Terrain
We were still out at the shop, making use of assorted terrain. We had a height 0 pond, a height 3 hill, a height 4 cabin, a height 5 tower, and a height 6 forest. The different heights was a little unnecessarily complex since we didn't have any towering monsters that will interact with these, but it was still a neat idea to play around with.
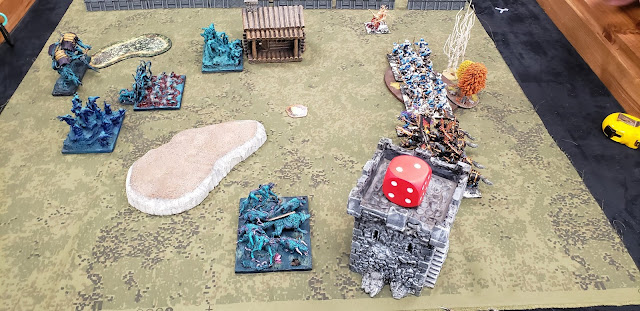
The new table was a little awkwardly sized for us. We were sharing a big table with another league game (Imperial Dwarfs vs Abyssal Dwarfs!), and had 3 feet in width, but only 3 feet in depth. We shortened our deployment zones to 6 inches, to preserve the 24" distance between the starting lines. The battle mat was impromptu, and the dark "edges" of the table are fair game for movement and such.
I won the roll off and picked the lazy gamer side, aiming to camp in the woods with my Night Raiders. Loot was the game du jour, with one token behind the tower, one in the center, and one nearer the cabin than it probably should be.
My opponent deployed the very scary Shadowhounds last, in the corner. The rest of the list was castled slightly off-center, with Reapers screening the Horror, and Worms and flying Tormenters screening the pumpkin-headed Butchers.
 |
| Deployment! The Coke can will moved when we get into it. |
My early drops were Night Raiders to take the woods, and Mounted Sons in the clear central area, trying to learn a bit from the previous game. I stuck my Horse Raiders on the far flank, and the Jabberwock over on the other flank.
I forget who won the roll, but I end up going first.
Top of Round 1: Varangur
The Varangur move out at the double! The Night Raiders utilize Pathfinder and move their maximum to get into the woods. Everything else moves up around 12 inches.

The Horse Raiders move up the most, but are a few inches out of the charge range of the very potent Shadowhounds, who were deployed back a bit and at an angle.
Bottom of Round 1: Nightstalkers
The castling complicates my opponent's movement phase, and the powerful Butchers are stymied by the pond. Starting all the way back in the deployment zone, they can just barely enter it this turn.
 |
| Moves for the Nightstalkers. |
 |
| The daring doggos. |
In a surprisingly daring move, the Shadowhounds pivot and run up and claim the token, using most of their movement.
Top of Round 2: Varangur
We bust out the charge arcs template, and the Horse Raiders are in the flank of the very dangerous hounds, and there isn't anything that could have really been done to mitigate this, given the movement and the seizing of the token. The Raiders take the flank, with the Mounted Sons attacking from the front, and the hounds are trounced. The hill is going to block line of sight, so I am ok with where the Sons are at. The Horse Raiders attempt to overrun to claim the token, but only roll up a solitary inch. The Shadowhounds picked it up last turn, so I should have been able to pick it up from the victorious combat, we just spaced on that.
 |
| A picture lifted from the FB group. The Tormenters are intently peering into the cabin. |
I consider sending the Lord out to disrupt the flying Tormentors, but opt to sit still with him, since I don't have a way to support a charge like this in my coming turn.
The Jabberwock uses the building to help block and protect him, and he moves up and pivots, to see where the Tormentors might go next turn.
 |
| A quick victory over the hoounds. |
The Nightstalkers are Stealthy, but the Night Raiders need something to do. They shoot into the stealthy Blood Worms, landing 3 and 1 damage apiece. The lines haven't closed enough for Mindthirst to be relevant yet, and a hot 11 for the nerve check sees the worms wriggle away!
Bottom of Round 2: Nightstalkers
As it turns out, my opponent wanted to make a flying charge with the Tormentors over the cabin. The Leaper special rule lets them operate with Height 3 to draw line of sight, but line of sight will be an issue, as they are less than an inch away from the height 4 building. We rewind things a bit. Had the Tormentors held back a few inches, they could still see a ways around the building and into one of the Night Raider units, and would still have the inches to charge in this round. So we let that happen.
 |
| Look at that little guy. Tossing Lighting Bolts around and being a menace. |
The Tormenters are fliers with Strider, and they land 9 damage against the Night Raiders, and the Raiders are shredded. The Tormentors will change facing to get the Jabberwock and other Night Raider unit in the front arc.
Elsewhere, the world's most adorable Horror scampers forth, throwing a Lightning Bold into the Horse Lord, dealing 1. The Butchers finally extricate themselves from the pond, and the Reapers bide their time, lurking behind the safety of hill.Top of Round 3: Varangur
The Horse Raiders move up another inch to take the token, but with the hill, cannot see anything. The Mounted Sons are more than 12" away, so just pivot to face the oncoming Butchers.
 |
| The Varangur collapse into the Tormenters. |
The Tormenters are dog-piled by the Jabberwock and Night Raiders in the front, with the Horse Lord attacking the rear. At the start of the Phase, the Tormenters have no damage on them, so the Jabberwock gets no additional attacks. It also misses every hit, so there's that. Raiders do 5, the Lord does 4, and the Tormenters are then founds to be quite insane!
Bottom of Round 3: Nightstalkers
The Reapers get their leader point up onto the hill, to spy on things, while the Butchers lumber forward with menace, though are too slow to charge anything this turn.
 |
| Nightstalkers stalk around the field. |
The Tormentors will countercharge the Night Raiders, sliding down to fight them. Seven damage is done, but with the Inspired reroll, the Raiders hang around, unbothered, but disordered..
The Jabberwock and Horse Lord are pushed out of combat, and the Horror lands 2 more against the Horse Lord with another Lighting Bolt.
Top of Round 4: Varangur
Unengaged, the Horse Lord joins the Mounted Sons against the Butchers. It's all for show though, and the Lord contributes no damage. The Sons deliver 11, and the Butchers are rolled, despite Mindthirst helping them here. The Lord will overrun 2" allowing the Mounted Sons to pivot to face the Reapers.
I don't remember what the Horse Raiders do. I think they sidestep, but are still in the Charge arc for the Reapers, so that doesn't accomplish anything. I must have been trying to set up a "if you don't break this unit on the charge you will be flanked" situation here for the Ravagers.
 |
| Post-combats for the Varngur. |
The Night Raiders are disordered, so lose TC, but charge in against the Tormentors. The Jabberwock gets 9 extra attacks, but the Varangur are only able to bring the Tormentors up to 16 damage. And then the Tormentors are found to be insane again!
Bottom of Round 4: Nightstalkers
The Reapers opt to go into the Mounted Sons, and will land 7 damage, a low Nerve check lets them stick around.
 |
| The Tormenters continue to dish out damage. |
In a clever gambit, the Tormentors countercharge the Jabberwock, landing just 3 damage since they are devastated and their attacks are halved. This lets the Horror attempt a Mind Fog on the maimed Night Raiders, though their Nerve check is also low enough to let them stick around too...
Top of Round 5: Varangur
The Varangur horsemen collapse into the Reapers as the Mounted Sons counter charge them, bringing them up to 20 damage before routing the nightmares.
 |
| Final charges for the Varangur. |
Bottom of Round 5: Nightstalkers
The adorable Horror scampers back into the fetid shadows of the field, to scheme and fight again another day!
The Horse Raiders and Mounted Sons each hold a token, making this a 2-0 victory for the Varangur raiders.
Game Conclusion
My opponent has a fantastic looking army, and I can't wait to see more if it in the coming months! As I myself have demonstrated on the blog many, many times, uninspired regiments are hard to make work! I think this army will really come into its own once it gets a few more units on the table and once the league progresses out of the Ambush rules.
Experience definitely won the day for me here. Without turn-by-turn progressive scoring, the hounds bounding up to grab the token early and unsupported was ill-advised. Getting one charge into them to start a piece trade would have been great, but getting two easy charges into them without the threat of retaliation sealed their fate and put me ahead quite early, and you don't need too much going your way with either Ambush or at this points level to start snowballing momentum.
Testing Conclusion
Even with the confined table space, this was more how I wanted the list to work.. The bow shooting wasn't impressive with its output, but I did manage to get lucky against the Blood Worms, and then was able to multi-charge other units bit by bit to secure the victory. I don't think I'd commit this hard to cavalry or to bow shooting again for games like this, but it was neat to see things working better together in this second game for me.
- Night Raiders. They were fun to use this game, but really can't stand up to any pressure themselves. The plan was to shoot stuff and then charge, and they did both in this game! One needs to be close for Mindthirst to work, so shooting into uninspired regiments, even with Stealthy, worked out for me this game, as one hot Nerve check was all it needs to pay off.
- Mounted Sons. These were definitely able to bully things this game, taking advantage of their longer charge range and good stats.
- Horse Raiders. The parameters of the day didn't provide an ideal situations for them, but against the odds, they worked out here. I can't complain about getting two flank charges with them!
- Lord on Horse. I used his mobility better this game, bouncing between combats, but his output, like oh so many of my characters, was generally lacking.
- Jabberwock. This game was an outlier game for him, but it was fun to see him roll so many dice on those extra attacks! I don't think the bows do enough to make this a potent combo, but the monster doesn't care about the source of damage, and should play well with some cavalry too, or just being around to charge things as the game progresses. It's a neat little monster!
No comments:
Post a Comment