
Intro and Lists
I was recently treated to an unexpected weeknight game against friend, fellow blogger and forum-goer Cartwright. He was kind enough to cart his Northern Alliance over to the Madison area after a workday, running the following for our game:

It was another fearsome Northern Alliance list, with a lot of the usual suspects making appearances across the table. Regiments of Dwarf Clan Warriors and Pack Hunters were around, as were hordes of Snow Trolls with some well-outfitted Ice Naiads. He had singular units of Frostclaw Riders and Snow Foxes as supporting elements, along with the Ice Queen and Bolt Thrower to soften things up from afar. Hrimm the legendary Frost Giant is back, with a Rallying Thegn and mighty Lord on Chimera as newcomers. I was surprised to see the Lord on Chimera, but pleasantly so, as titanic fliers are fun units, even if they have proven hard to use. Most got slight points decreases and a buff to their Unit Strength with the recent Clash update, so I am interested to see if this is enough to make them more viable.

I brought the Undead. I still have a ton to explore with them, and figured a quick one-off game would be a great opportunity for me to explore one of the more unusual ideas bouncing around in my noggin, though this looked like a tough match-up! Up to test and comment on is everything, since the Undead are still a very new army to me:
- Zombie Regiments. The regiments are chaffy, akin to KoM Militia or Varangur Draugr, but thankfully happen to unlock like the latter. Zombies are a classic unit, so we'll see how these smaller regiments feel, and probably just have them holding down objectives.
- Wraiths. I am running these as troops, as kind of anti-chaff units. They are Defense 6, but their Nerve is low enough that any damage on them will put them in danger, so we’ll see how effective they actually are for me on the table.
- Mummies. The Teutonic Knights take the field again! They look like a nice grinding unit, but I haven’t been able to give them good fights or proper support yet, so they remain a bit of an unknown still. We’ll see if that changes this game and what they end up fighting against!
- Soul Reaver Infantry. They seem like a great hammer unit, but at only a regiment, can be a bit fragile if not protected. My goal is to get them into two combats to see what they can do.
- Zombie Trolls. I realized I could proxy my old 2nd Edition non-flying Wights as Zombie Trolls, so here we are! Unlike the Wights, these unlock, and look like they could be decent main-line units with a little support, as unlike a lot of undead units, they should be able to land some damage back . We’ll how they hold up.
- Revenant Cavalry. The skeleton cavalry have been used very well against me, so I am hopeful I can internalize those beatings and make good use of them here! They are Shambling Cavalry, so can be surged, though I am a little shy on sources of Surge in this list.
- Liche King with Alchemist’s Curse. We posited on the forum that this is probably one of the better uses for a Liche King. With innate Speed 7, the Boots can give him a pretty-wide threat range. I am hoping he can survive the game, and we’ll see what damage he can do along the way.
- ASBs with items. The ASBs got some nice buffs with a boost to being Very Inspiring and an Aura Wild Charge for Skeletons. This was more of a test of cheap Inspiring options for the Undead, then an exploration of the aura, though the Aura will cover the Revenant Cavalry and even the various Revenant Wyrms. We’ll see how these cheap supporting heroes do!
- Revenants on Burrowing Wyrms. I love how my Wyrm models turned out and wanted to get them on the table quickly to test them out. Unfortunately, they do not Inspire, so are going to compete very heavily with the very similar (and cheaper) Goreblights in the monster slot.
- Rev King on Flying Wyrm. After several years of languishing, I managed to finally complete my conversion for this centerpiece unit as 2023 wrapped up, and I am quite happy with the results! I decided to go for the triple wyrms in the list to directly compare the two versions of Undead Wyrm. We’ll see how much use I get out of Fly and Inspiring on this guy, and which version I like better.
Table and Terrain
We were out at Misty Mountain Games, and utilized their terrain. We used the typical terrain rules, running the buildings as Height 9 blocking terrain, the forests as Height 6 Difficult Terrain, fences as Height 2 Obstacles, and Hills as Height 3. I won the roll of for deploying, and we got down to it!
 |
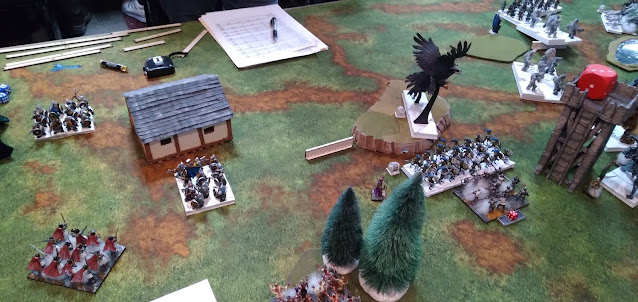
| The Norther Alliance, deployed pretty centrally. |
 |
| The sparse Undead Left. |
Out on my left, I had the Mummies and AC Lich, cowering Zombies, Soul Reavers, the BC ASB, then the Zombie Trolls, Surging ASB, Revenant Wyrm and Revenant Cavalry on the hill screening more cowering Zombies, and then a stacked line with the other Revenant Wyrm, Wraiths screening the Revenant King, and Revenant Cavalry screening more Wraiths.
 |
| The stacked Undead Right. |
We had rolled up Control for the scenario, and both of us sought to spread around the table a bit. The titanic fliers were each of our final drops. I thought the Chimera would come down on the table edge, but my opponent surprised me by dropping it in the center against the isolated Soul Reavers. I decided to put mine out on the flank still, looking to pressure his shooting elements.
My opponent won the roll off, and decided to go first.
Top of Round 1: Northern Alliance
Out on the far left, the Dwarf Clansmen stay put, daring the shambling Mummies to make the long trek over. The second regiment moved up near the building, keeping pace with the rest of the line.
 |
| The Northern Alliance moves out! |
The Lord on Chimera moved up, and has a possible charge into the Soul Reavers next turn. The Naiads moved up, with Hrimm and the Snow secured the forest. The Frostclaws landed a solitary point of damage against the Soul Reavers, and got a lucky boxcars to waver them.
The Pack Hunters need to move up, but they the Bolt Thrower, and the Ice Queen will fire into the Revenant Cavalry on the hill, dealing 4 and giving them the Frozen condition.
Bottom of Round 1: Undead
Out on the left, the Mummies shambled up, starting on their long journey to fight some dwarfs. Thank goodness I deployed them on the line! The Liche King made use of the Boots, flitting up near the building, and then dealing 5 damage to the Lord on Chimera from Alchemist Curse. The Wavered Soul Reavers back up.
| Some Undead move up while the vampires move back. |
Over on the right, the Revenant King on Flying Wyrm is not a Shambling unit, so moves way, way up to threaten things, and should have all the shooting elements here in his charge arc for next turn.
 |
| The Undead are surprisingly quick here. |
The rest of the Undead line haggardly moves up as well, but with the exception of the Flying King, are save from charges next turn.
Top of Round 2: Northern Alliance
The Snow Foxes slip around and charge the Revenant King and the flying mausoleum, but do no damage. Still, they are engaging the King, and I will take a penalty if I want to fight anything else.
 |
| The Chimera gets into the deployment zone of the Undead! |
The Chimera doesn't have great odds to crush the Soul Reavers, so instead takes advantage of their dazed state and hops my line, eyeing the rear of the Zombie Trolls, and the flanks of several other things, creating some dilemmas for me.
The Frostclaws again land 1 damage on the Soul Reavers, but the vampires shake it off this time. The rest of the Northern Alliance shooting focuses on the Revenant Cavalry again, brings them to 11 damage, and this able to see them off the field.
Bottom of Round 2: Undead
The Mummies continue their journey. My charge range is slightly more, so I should have pivoted them here, to prepare to fight both units. The Mummies are Shambling, so it's not like I gained anything by not pivoting them. The Liche is about an inch shy from being able to move up and get in range against the Lord on Chimera again, so he opts to toss into the Frostclaws, landing 4 and wavering them.
 |
| With dice marking the charge range of the dwarfs, the Mummies shamble up safely. |
The Naiads had moved up to pressure the Soul Reavers. Unfortunately, with the building where it is, I am unable to move and Surge the Zombie Trolls in like I wanted to. The Zombie Trolls back up to only give the Lord on Chimera a flank charge. The Soul Reavers decide to try their changes against the ensnaring Naiads, and translate 12 hits into 12 wounds. The Naiads are still standing, but the vampires have fortunately lifeleeched their way back down to nothing, so this combat is off to a good start for me.
I probably spent 10 minutes trying to decide what to do with my right. As mentioned, the Zombie Trolls are in a bad place. They would need to change facing to be Surged into the Chimera, but even if all the Surge dice land, it would not be enough. They back up to only give a flank charge to the Lord on Chimera. Hrimm also has a possible charge into them, but moving backwards does prevent some Snow Trolls from joining in too. I consider them lost, and the Revenant on Wyrm undulates on the hill waiting to counter charge, with the ASB moving to take up space and prevent a Chimera landing in to charge. The Zombies will also change facing, to only give a front charge to the Lord on Chimera. A troop of Wraiths pivot and move in my back line, hoping to zone out the Chimera from flying too much further. There are still a lot of messy options for the rest of my right flank.
 |
| Some multi-charges from the Undead. |
With the Revenant King on Undead Flying Wyrm needing to withdraw and disengage, he'll be taking a penalty and hitting on 5's, so I want to send him in with some support. The two Wyrms could hit the Snow Trolls to the right, but the King would end on the obstacle, making it a hindered charge, and hitting on 6's doesn't sound like a good plan. The left Pack Hunter would be very nice, but with facings, the King needs to end in their flank, but cannot. So, I opt to send both into the right Pack Hunter unit, they deal 7 damage combined, and fail to break the Hunters. Running the math now, that's about what should be expected with the situation, but it was a bummer at the time.
I had opted to do those multi-charges, so I could take advantage of charging instead of walking with the other Shambling units over here. The other troop of Wraiths make a hindered charge into the Snow Foxes (I missed that they had Strider, and only realized while writing up the report), and are joined by the Revenant Cavalry with a clean charge. The Wraiths hit 4 times into 3 damage, and the Cavalry hit only 3 times, translating into 2 damage. Sheesh! On a mere 5 damage, the Snow Foxes are merely Wavered when we go to test them.
Top of Round 3: Northern Alliance
With the Snow Foxes holding things up for another turn, the Northern Alliance is free collapse onto the terrestrial Revenant on Wyrm without fear of pushback. The rallying Thegn lands a Bane Chant on the flanking Pack Hunters, and 21 damage is done, and the Wyrm felled. Meanwhile the Ice Queen rolls hot for Heal, removing 4 damage from the Pack Hunters.
 |
| Violent reprisals from the Northern Alliance. Fortunately, only one unit is taken down. |
Hrimm and the Lord on Chimera multi-charge the Zombie Trolls. The Lord on Chimera lands 17 hits, but with 8 1's, only deals 9 damage in the end. Still Hrimm rolls well for his extra attacks, and the unit is devastated and then routed. In victory, the Lord on Chimera will back up, and Hrimm change facing to glare menacingly at the Revenant on Burrowing Wyrm.
 |
| A big multi-charge from the Northern Alliance! |
The Naiads will regenerate some damage, then counter charge the Soul Reavers and land 5 damage themselves, with the spears struggling to pierce the high armor of the vampires. The Dwarfs will move to encircle the Mummies out on the left, but one unit smartly dawdles, to deny me a charge next turn.
Bottom of Round 3: Undead
Over on the left, I don't have any Surge here, so the Mummies now turn to face both Dwarf units, and will be forced to endure charges. From Dwarfs. Again, I should have made the pivot last turn to prevent this. The cowardly Zombies enter the woods nearby to support the Mummies in the coming turns. The saving grace here is that only one unit is actually in range to charge the Mummies next turn, so this should be a slow, grinding combat, and a good test for them.
 |
| The Mummies pivot, and the Soul Reavers charge in. |
Centrally, the Liche will Alchemist Curse the Frostclaws again, landing 4 more damage, and shooing them off the field. The Soul Reavers will charge the ensnaring Naiads again. They had regenerated down to 8, but I land an astonishing 11 new damage, and uninspired, I am able to pick these up.
 |
| The Chimera takes a multi-charge. |
Having the Lord on Chimera back up proved to be a mistake, as this lets the Revenant on Wyrm charge off the hill without fear of Hrimm doing anything next turn. The Wyrm is joined by the Zombies, who will catch a Bane Chant. The Lord on Chimera had taken some damage from Alchemist Curse previously. The charges here will bring him to 11 damage total, and two 11's for the Nerve check will fortuitously see the Lord off the field of battle!
The Zombies will overrun 1 inch and be blocked by an ASB that I forgot about, while the Wyrm will pivot to face Hrimm, while being out of the giant's line of sight..
 |
| Delaying tactics on the right from the Undead. View from the short edge of the table. |
The aggressive right has a disaster, and I try to salvage what I can. Since he didn't get charged, the Flying Wyrm was dislodged from the combat. I want to preserve him, so instead of charging right back in, he goes after the Ballista. It is surprisingly close, but he does manage to rout off the war machine, and will then wheel about to face the center of the field, and will be safe from enemy charges next turn.
The Revenant Cavalry withdraw from the Snow Foxes, and change facing. The Wraiths will charge the Snow Foxes again, rout them, and then change facing as well, to try to protect the Cavalry as best they can.
Top of Round 4: Northern Alliance
The Snow Trolls make a hindered charge into the Wraiths protecting the Revenant Cavalry, and the Pack Hunters will charge the Revenant Cavalry. The hindered Snow Trolls will deal just 2 to the Wraiths, while the Pack Hunters will deal 5 to the Revenant Cavalry. These are uninspired currently, so thankfully and the Nerve checks are low, letting both units stick around for the Undead, and Fearless will let them fight on next turn.
 |
| Individual charges against the Undead units, who thankfully hold. |
Hrimm moves out of the charge arc of the Revenant on Burrowing Wyrm, and is close enough to use his Frost Breath on the Wraiths in the corner. Just 2 damage lands, and though the Wraiths hold, they are Frozen, which will slow them down and limit their options next turn.
 |
| Hrimm, getting in position to breathe extra meanly at the Wraiths |
Some Snow Trolls don't have a charge this turn, but move up to threaten the Wyrm, and hopefully prevent Hrimm from just being chased around.
 |
| The dwarfs moved so swiftly I was barely able to document the charge... |
Over on the left, the Mummies are ignobly charged by Dwarfs. My opponent moves the first unit up to make sure they will have line of sight in the following round, before making the charge this round with the other unit, making this a little messy.
Bottom of Round 4: Undead
On the left, the Teutonic Mummies charge some Dwarfs, with the Zombies making a hindered charge out of the woods to assist. I believe 3 damage is done? I do not roll well here, but the Mummies will Regenerate and Lifeleech down to 2 damage. The Liche runs back over here, casting Alchemist Curse against the non-engaged Dwarf unit, landing 4 damage against it.
 |
| A grinding combat for the Mummies! |
The Snow Trolls are barely in range of the Soul Reavers, but barely in range is still in range, so the latter make a flank charge into the Trolls, with the Wyrm crashing into their front, and the Snow Trolls are torn to ribbons.
 |
| The Undead finally get a multi-charge with a satisfying conclusion! |
The Frozen Wraiths back up. They can't back up to get away from Hrimm this way, but also can't get away moving forward, and are Shambling, so they can't just fly by and get away either. They certainly aren't going to rout him so by backing up I am aiming to pull the Giant into the corner and hopefully out of the rest of the game.
 |
| Followed by another disappointing multi-charge! The dice giveth, and the dice taketh. |
With the Wraiths unexpectedly holding last turn, the Flying Revenant King hits the flank of the Snow Trolls, with the Wraiths assailing them in the front. The flying undead land a combined 15 damage onto the Trolls, but the Thegn is rallying, and the Ice Queen Inspiring, and my reroll is a 3 for the Nerve check. Normally, that would still be just be enough to Rout them, but with Rallying, they are just wavered. The Snow Trolls have the Dwarven Ale, so they are still in the game if they can pass their Headstrong check next turn.
The Revenant Cavalry are disordered, but counter-charge the Pack Hunters. This unit had been the target of the double-Wyrm charge, but had also gotten a solid heal previously. The Revenant Cavalry do just decently for damage, but the Nerve check results in another Rout-into-Waver situation, courtesy of the Rallying Thegn. This was a huge turn for the Thegn!
Top of Round 5: Northern Alliance
The Snow Trolls regenerate 6 of their 15 damage, pass Headstrong, and then counter charge the Flying Wyrm. They then roll super well and deal 11 damage while the Pack Hunters are Bane-Chanted and hit the flank for a measly 4 damage, but the end result is that the mighty Flying Wyrm is cut down. The Ice Queen will also attempt a Heal into the Snow Trolls, if memory serves.
 |
| The Pack Hunters continue a long streak of reliably delivering for my opponent. |
Hrimm charges the Wraiths in the corner, trounces them with ease, and then wheels around. With Rallying keeping the Northern Alliance units around, there is still a game on!
 |
| Post-combat over on the right. Not much left of the Undead's stacked right flank... |
It's messy, but we determine that the second unit of Dwarfs are in the flank of the Mummies, and so both units of Clansmen charge in, assailing the Mummies from two sides, landing 5 new damage against them, bringing them to 7 damage total. But the Mummies hold when it is time to test them.
 |
| The Dwarfs are numerous, but the Mummies hold! |
Bottom of Round 5: Undead
The Teutonic Mummies battle against the Dwarfs, joined by the Zombies. The other unit of Dwarfs is popped out of combat, allowing the Liche King to Alchemist Curse the formerly flanking unit. Both units accumulate around 4 more damage while the Mummies regenerate and Lifeleech some to get back down to 4 damage total. Both Dwarf units are nearing double-digits of damage, but will both hold here in the bottom of Round 5.
 |
| The grind continues. |
Hrimm is just under 15 inches away from the Revenant on Burrowing Wyrm. I decide I want to pin in the legendary Frost Giant, since the two titans should cancel each other out when it comes time to look at Unit Strength and the scenario. I utilize the ASB's Wild Charge Aura for Skeletons to get me the inch I need to make the charge, and a solid 6 damage is done. Hrimm should definitely win this fight in the long run, but I am hoping the clock runs out before then.
 |
| The Undead try and fight back, and will pick up one of the Pack Hunter units. |
The Soul Reavers move up to threaten the Snow Trolls. The Snow Trolls had healed up a lot, and I wasn't sure the Wraiths could break them now, so I charged the Pack Hunters instead, but they land no hits.
The wavered Pack Hunters had disengaged last turn, so the Revenant Cavalry charged back in, and thankfully manage to rout them this time.
Top of Round 6: Northern Alliance
The surviving Pack Hunters counter charge and beat the Wraiths, and the Snow Trolls make a hindered charge into the Revenant Cavalry. The damage isn't stellar, but the Nerve check is hot, and the uninspired Cavalry are broken!
 |
| The Northern Alliance mop up what remains of the right flank. |
Hrimm lands 7 damage on my Wyrm, but it holds firm, and the titans are now locked in combat, with no support coming for either of them.
 |
| And the grind with the Mummies continues some more. |
The Dwarfs continue to fight the Mummies, but struggle to land damage. The Mummies are brought back up to just 6 damage, and will hold.
Bottom of Round 6: Undead
The Mummies and Zombies will again charge their unit of Dwarf Clansmen, allowing the other unit to eat another Alchemist Curse. A steady 3-4 damage is done to both units again, and they are both routed off this turn. We are fighting near or on the dividing line between zones. Both will reform to face my opponent's deployment zone, but should just barely be on my side of the table right now.
 |
| Having claimed two units, the Soul Reavers tactfully withdraw to play the scenario. |
The Soul Reavers don't have a charge. Measuring the table quickly, they opt to juke, and enter the central space on my opponent's side of the table to secure it.
The Zombies will inch back to try and make any last-second shooting difficult for my opponent, and will secure my central space.
The Revenant Wyrm struggles to hit anything this round, only landing 3 damage against Hrimm.
We decide to call it here.
We are playing Control, with the board split into six 2 foot by 2 foot squares. The Mummies and Zombies are currently scoring my left zone for 1 point. The Soul Reavers are scoring my opponent's central zone for 2 points, and some Zombies are scoring my central zone for 1 point. The Titans are a wash in my right zone, so no one claims it, and the Pack Hunters and Snow Trolls are both securing my opponent's right zone for 1 point. Neither of those two Northern Alliance units has enough movement to make it to another zone if there is a turn 7, while the Mummies or Zombies should be able to spread out to increase my lead. Even if Hrimm prevails, that's still going to be a loss for the Northern Alliance. It's as good as it's going to get, so we call it here, making this a 4:1 victory for the Undead!
Game Conclusions
What a wild game! The tempo just kept swinging in ways neither of us could guess. I thought I was totally doomed in Round 2 with both of my big multi-charges failing so spectacularly, but I somehow managed to minimize my losses there and claw my way back into it. I was then able to put my opponent on the back foot, until he got some critical reprieves from Rallying in Round 4, but the Undead were still able to slink away with the scenario in the end. It was a splendid game!
Testing Conclusions
- Zombie Regiments. Well, these were great! I had deployed them each behind terrain to shield them and play for my home flanks for the scenario. Both survived to the end of the game, and both even got to fight some things along the way. Very pleased with these.
- Wraiths. They are just a bizarre little unit. In 2nd Edition they had Speed 10, making the fly and disruption options more dangerous. At Speed 7 they aren't terribly quick, and while Defense 6 is nice, their low Nerve seems to categorize them as very expensive chaff, which then borders on not being chaff at all. I don't quite know what to make of them, and so more testing is needed.
- Mummies. Their damage output wasn't that impressive, but they finally got a grinding combat, and did spectacularly holding things down! They still need support to help break things, but I was really happy with them here.
- Soul Reaver Infantry. I had stuck these behind the hill to try and mitigate any shooting into them, and that mostly paid off, and they could not be focus-fired. These astounded me, though their hit dice against the Naiads were admittedly quite hot in both combats. Clearing the Ensnare penalty, CS2 really took over when it came time to roll damage. We both expected the Naiads to hold out longer, but the vampires have some good stats! They did make it into a very successful second combat as well, and just really pulled their weight and more this game.
- Zombie Trolls. Was not a great game for them! I wanted to Surge them around to help and evade the Lord on Chimera, but was confounded by the building. Any mundane infantry horde probably would have been better in this particular instance for the higher Nerve block, but I still think the unit has some grinding potential though, and will try to get some more tests in with it.
- Revenant Cavalry. They held ok, but didn't have a phenomenal game when it came to actually dealing the damage. So it goes! I could have used these a bit better, and just need to play around with them more I think.
- Liche King with Alchemist’s Curse. Yep, this is a great way to run a Liche King, if you are so inclined. My opponent didn't have any individuals to hunt him down, so the Liche King was able to dodge around enemy units, and contribute 3-5 damage to something every turn, which is a very significant contribution.
- ASBs with Lute / Tome. Bane Chant came into play a few times. This being my only Surge source really limited what I could do with the spell this game though, but is a nice option to have in the future. The Aura interactions were really interesting though. While I wasn't able to launch any of the Revenant Cavalry around, I was able to get a long charge in on Round 5 with one of the Burrowing Wyrms, which was an interesting interaction.
- Revenants on Burrowing Wyrms. They felt a bit like Giants? Despite the set number of attacks they were a little unpredictable on the damage output, but I really liked them here. They aren't Shambling so can pressure things quicker then usual, and Strider lets them be a little more consistent with their charges. Comparing them to the Goreblight is also interesting. The Goreblight has the Zombie keyword, and could be buffed by a Necromancer with their Vicious Aura. The Burrowing Wyrms have the Skeleton keyword, and can be buffed by the ASBs with their Wild Charge Aura. Some neat list building synergies kicking around.
- Revenant King on Flying Wyrm. The Flying Wurm should be about the equivalent of a KoM General on Winged Beast, which is to say not too terribly deadly! Theoretically the greater Nerve and pure CS should let him grind slightly better though if things do go wrong? But he isn't going to be breaking anything on his own. Still, not being a Shambling unit was really fun to play around with in an Undead list, and 10" flying also opened up some neat opportunities. A more skeleton-focused list utilizing the ASBs for long charges could be a lot of fun.
No comments:
Post a Comment