

Intro and Lists
My calendar filled up fast. Fortunately I had one free weekend this month, and I was able to squeeze in some league games, which are up to 2000 points for August. My first opponent was a fellow Brian, fellow blogger (The Nerd’s Tale), our local Mantic Pathfinder, as well as the organizer of the escalation league. He was running his Abyssals for it, and brought the following to our game:
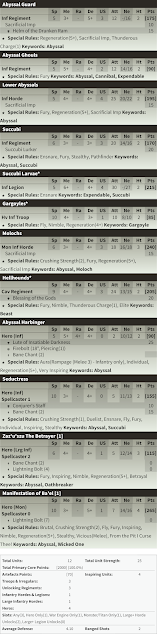
He’s got a great looking army, which has appeared on the blog before, so many things should look familiar! He has not been chasing the meta nor really adding much to this particular army, simply running what he already has painted up.
This list has a good variety of units, and a bit of everything. Notable picks include the Manifestation and Zaz for some extra potent Lightning Bolts, a Legion of Succubi Larvae, Hellhounds (with Blessing of the Gods rather than the Brew of Sharpness, which has appeared in the previous games). He also has a regiment of Ghouls, which has piqued my interest before, and seem like a great way to sneak in a little more US or an unlock if needed, and the ASB with Lute, which is something I am generally quite inclined to take, so I feel compelled to point it out! His games have apparently been very bloody, so he had opted for no weapon swaps, prioritizing the shields and the defense, while also including multiple Sacrificial Imps. He then has 3 sources of Bane Chant, to help the line punch back once the lines close.

I brought the above. After pooh-poohing the Longhorn-centric emergency backup list from my Game 1 of the Interstate Doubles Tournament a bit (which my opponent this game had graciously provided), I wanted to use my time in August to try and actually explore the unit and see if I could find a use for them that was better suited for my tastes.
- Spear Hordes with Brew of Sharpness and Chalice of Wrath. The Spear Hordes are my go-to battleline units for the Herd these days. They carry items well, and I am still messing around with my preferred loadouts, so we’ll see how these items do this game.
- Longhorn Troops. As discussed a lot on the blog, the revised Longhorns are weird. They still have CS and can buy TC for some good offensive punch… but lost a good number of attacks when the unit was updated. They were bumped up to Def5, but you can’t take them as a horde, so their staying power is actually more limited than you’d think. Supporting regiments in a longer line could be a thing, but I wanted to kick things off with troops today, trying to see what difference multiple rally bubbles could make.
- Harpies. I aimed to be aggressive with the rest of the list, so only brought one chaff unit to try and delay the absolute scariest thing facing me. We’ll see how it does.
- Guardian Brutes. Though hitting on 4’s and relying on TC like so much of the rest of the army… they are still one of the smashier units the Herd can run. We’ll see how they do, and if Rally helps them out at all.
- Druid with BC and Conjurer's Staff. Readers will know that my sources of Inspiring for the Herd have been a concern of mine. These have been nice as a go-to source of both Inspiring and a meager Bane Chant. As a solitary take this time, I opted to try out the Conjurer’s Staff.
- Double Tree Herder! I was singing praises of the Greater Earth Elementals online recently, when someone on the forum pointed out the Tree Herders do the same while inspiring. Very true! I had been trying to avoid the centerpiece units and had forgotten about them. Like the GEE, they should help the Herd deal with High armor, Phalanx, obstacles, and even help out with grinding combats, thanks to Radiance of Life. We’ll see how this all does!
Table and Terrain
We were out at Oddwillows, which is becoming the main meeting spot for the league. They did get some table toppers for their store, and are building up wargaming accoutrements slowly but surely! We threw together a table, with the normal terrain rules, playing the buildings as Height 9 blocking terrain, the forests as Height 6 Difficult Terrain, the fences as Height 2 Obstacles, the Hills as normal Height 3 hills, and the flat tock mat as a Height 0 difficult terrain.
 |
| Tokens for the game. |
I got out deployed, with the Hellhounds and Manifestation coming down last for my opponent, and not where I wanted them.
 |
| Most of deployment. |
Left-to-right for my opponent we have the Hellhounds, the Manifestation, Ghouls in front of Zaz, the building, then the Molochs, the Lower Abyssal Horde ahead of the ASB, then the Abyssal Guard, Succubi Behind the woods, and then the Seductress, Gargoyles, and Succubi Larvae way off on the far right flank.
 |
| Deployment out on the right. |
I was hoping to bully the Ghouls for their token, so left-to-right I have the Tree Herder, Longhorn Troop, Tribal Spears with the Brew of Sharpness, Longhorns in reserve, Guardian Brutes, Druid, more Guardian Brutes, Tribal Spears with the Chalice, the second Tree Herder, more Longhorns, and then Harpies in reserve, but already guarding a token.
 |
| Scout moves for the Herd. |
I scouted up with the Tree Herders. On the left I moved up 5" to give a charge to the Manifestation, should he want it. On the right, the Herder moved up the full 12", but having started behind the line, didn't move up too far either.
My opponent won the roll off and determined that I should go first, so he might be able to dictate the end of the game. So we got down to it!
Top of Round 1: Herd
On the left, the Tree Herder holds. The Manifestation can already reach him, and I am not eager to give the Hellhounds a charge as well. The Longhorns nearby hold back, and are safe, but ready to collapse in, should my opponent take the bait.
The Tribal Spears with the red spears have the Brew of Sharpness. They hang back slightly, out of range of the Manifestation.
 |
| Movement for the Herd. |
Everything else moves up a bit. With only the Harpies to chaff things up, and them out on my right, I am hesitant to be too aggressive.
 |
| Movement on the right. the Harpies hold. |
Speaking of... the Harpies are out guarding a token already. The Longhhorns nearby move to zone out the Gargoyles a bit, and the Tree herder Here takes advantage of the woods, and pivots and moves up to hopefully start instigating fights next turn.
Bottom of Round 1: Abyssals
On the left, I apparently made a bit of a blunder. The Hellhounds and the Manifestation were his last drops, arriving after I had deployed. I was careful with the charge distances here, but the Hellhounds do have the space to race up and safely pivot to escape the arc of the Tree Herder. We bust out the laser sight and determine that being just height 2, despite the aggressive move, the hill is blocking line of sight for the hounds to all the Herd infantry. There is pressure here, but I do have some time here.
 |
| Opening moves for the Abyssals. |
The Manifestation and Zaz elect to just inch up a bit, staying out of the Herder's charge range. Zaz Betrays the expendable Ghouls for more Lighting, and they zap 3 onto the Tree Herder, which looks to be about as expected.
The rest of the line moves up. The Abyssal Guard cannot back up to escape the Tree Herder here, so they turn to face. To hopefully help them out, the Succubi enter the woods, and the Seductress flies over to help with a Bane Chant, should I take the bait. Arc-wise, the Succubi are safe from the Herder. |
| The Abyssal Guard and Succubi prepare themselves for the Tree Herder. |
The Succubi Larvae hold, and the Gargoyles fly up slightly to get better positioning, while easily avoiding the charge range from the Longhorns.
Top of Round 2: Herd
On the left, I am wary of the Hellhounds, but if I can get the Tree Herder out of the way, they have no charges and I can prepare. I have no charges with him, but the Herder can get to the edge of the hill and out of the charge arc for the Hellhounds, so I do so while Radiance of Life brings him down to 2. The Longhorns reposition to try and zone out the places the Hellhounds can easily go next turn, and the Tribal Spears move up and turn, hoping to support something in the coming turns, either against the Hellhounds or the Molochs.
 |
| Repositioning, to deal with the aggressive but short Hellhounds. |
In the center, I have no charges with my units, so just work to gum things up. With double Guardian Brutes and double Spear Hordes, I should have better punching power here. A troop of Longhorns moves out at the double to interdict and block out any serious multi-charges.
 |
| The Longhorns move up, and the Tree Herder charges in. |
The Molochs should have a straight shot out to connect with the Tribal Spears. There is no real way to avoid that. With the angles, the Longhorn troop does prevent charges into the left-most Guardian Brutes, while the other unit hangs back. This could be a charge, but the Lower Abyssal Horde cannot fit. The other Tribal Spears move out, threatening to charge the Guard of the Succubi next turn.
 |
| Movement from the right. |
On the right, my Harpies hold, and the Longhorns hop the fence to threaten the Gargoyles here and are out of charge arc of the Succubi.
I go to pass the turn and forget about the Tree Herder combat, so resolve that, as I did opt to spring the trap and charge the Abyssal Guard. The tree is indignant, and turns 8 hits into 8 damage against the Guard, though I am unable to break the Inspired and Fearless unit.
Bottom of Round 2: Abyssals
The Succubi spring their trap, but Bane Chant fails to connect, even with the Conjurer's staff. The Succubi flank the Tree Herder and land 5 damage, while the Guard pop their sacrificial imp, regenerate 7 of their 8 damage, and then countercharge the Herder, contributing 2. The Herder is on 7 damage, but holds.
Defense 6 is (obviously) tough. Math-wise, the units performed about as expected, and failing the Bane Chant here turned out to be critical, missing out on another 4-5 damage from the Succubi. Not only that I hold, but do so relatively healthy, is huge for me. |
| Charges and movement for the bulk of the Abyssal army. |
In the center, the Lower Abyssals inch back in order to prevent a double-charge from the Guardian Brute units next turn.
The Molochs hesitate as well. They have a charge into the front of the Tribal Spears, but it is unsupported, and my opponent doesn't like his odds of breaking the Spears.
The Manifestation decides to charge the Tree Herder, with Zaz doing some light betrayal in order to Bane Chant her. With just 7 attacks, this is a dicey proposition. The Minifestation doesn't roll well, and while the Herder takes some damage, it ends the turn on just 5 damage.
Being short, the Hellhounds are actually safe themselves, and turn to face the flank of the Tree Herder.
 |
| The Gargoyles fly about. |
Top of Round 3: Herd
Out on the left, the Longhorns reposition again, looking to fight the Hellhounds if they do commit. The Tree Herder countercharges the Manifestation, with the Tribal Spears and their Brew of Sharpness hitting her in the flank. The Druid runs out and lands a Bane Chant on the Spears. Just the Spears do 17, enough to devastate her, so we fast-forward to the Nerve check and she doesn't make it.
 |
| A bit blurry, sorry. Just charges right now, and you can hopefully make out most things. |
With the Molochs hesitating, I send the Longhorns in with a blocking charge to tie them up for a turn. The Longhorns still do well though, and land 6 damage against them.
Since my opponent backed up, just the one Guardian Brute can make it in against the Lower Abyssals, and it lands 11 damage. The second unit has a flank into the Succubi, but I just move them up instead.
 |
| The Herd arrives to bail out the Tree Herder. |
The Tree Herder is apparently out for Abyssal Blood, and lands 9 of a possible 9 damage into the Guard, though they again hold, since they regenerated so much last turn.
The Tribal Spears with the Chalice of Wrath take the flank into the Succubi. I deal 22, and will devastate and rout the ladies.
Again out on the right, the Longhorns move up and pivot, trying to chase the Gargoyles away, or at least keep them honest. He doesn't want to charge me since I am Defense 5, but I don't think I am ever going to catch the Gargoyles.
Bottom of Round 3: Abyssals
My opponent does my signature move, and forgets that his ASB had the Lute until now. Bane Chant connects for the Lower Abyssals, who also pop their imp, and regenerate from 11 down to 3 damage. They land 9 damage into the Guardian Brutes, who are rallied and Inspired. The first check is boxcars, and the second is a 10, and the Brutes are unexpectedly bested! The Abyssals swivel onto the hill with their victorious reform.
The Molochs similarly trounce the Longhorns blocking them up. |
| The Abyssals punch back! |
The Seductress gets her BC off into the Guard fighting the Tree Herder, and they land a damage in against him.
The Ghouls back up, using the building to block a charge to them from the Tribal Spears. Zaz hides as well, tucked in behind the building, and betraying the Ghouls to get the Bane Chant off on the Hellhounds, as they charge in against the Tree Herder.
 |
| View from the left. |
The angles and positioning was tough for the Hellhounds. There is about 130mm between the Herder and the Longhorns, so the unit could fit, but just one pivot they would bump into the Herder and not be able to hit the angle required; two pivots can get them there, but they would need to move just their speed, and they would end up directly in front of the Longhorns with a flank exposed. So, they opt to charge the Herder.
With the Bane Chant from Zaz, they land 6, and bring the Herder to 10 damage. Thankfully, the Nerve check is normal here, and the Herder holds again.
 |
| The Gargoyles make a move. |
Out on the right, the Gargoyles nimbly fly around the building to face the rear of my Harpies in an attempt to put this token into play. After some discussion, I convince my opponent to move the Succubi Larvae up. They've been camping the token, but it's been along their front. They are a legion and can be holding it from their rear facing while projecting a bit more threat.
Top of Round 4: Herd
The Harpies simply turn to face the Gargoyles. I suppose I could have run away or something. Gut-wise, I think whoever charges first will win, but I am ok gambling here since it looks like I have good chances to pick up objectives elsewhere.
 |
| Movement for the Herd on the right. |
Speaking of, the Longhorns pivot and move towards the nearby token in the woods. Since the Succubi Larvae moved forward, I now need to be a little more careful about my approach, and give them a wide berth.
The second unit of Brutes charge in against the Lower Abyssals, and seesaw them back up to double-digits of damage.
 |
| Charges from the Herd. |
Victorious, the Herder will pivot 90 degrees, to support coming fights, and the Spears change facing, to make sure they can get in the Lower Abyssals.
On the left, having held again, the Tree Herder will countercharge the Hellhounds. Since part of the unit is on the hill, the Longhorns can see them, and will join in.
 |
| Charges on the left. |
 |
| Victorious reforms for the Herd. The Abyssals are getting boxed in. |
Bottom of Round 4: Abyssals
Zaz shuffles away to let the Abyssal Ghouls get a hindered flank charge on the Tribal Spears, with the Moloch hitting them in the front. Phalanx does nothing here, and I take 16 damage, with the Ghouls landing 8 hits and contributing an impressive 5 damage on their own. They are a horde, and Inspired, and Rallied, but my opponent secures a hot waver here.
 |
| Mid-combat. The Brutes will take a few more damage. |
In the center, the ASB attempts a Bane Chant on the Lower Abyssals, but fails. They regenerate and counter-charge the Guardian Brutes, with the Seductress hitting them in the flank. The dice are chilly and with Bane Chant failing, they deal a total of 8 damage, but do still secure a waver against the Guardian Brutes.
 |
| The Guardian Brutes falter. |
Elsewhere.. the Gargoyles charge the Harpies. They land 3 damage, and with an 8 on the dice for the Nerve check, the Harpies are bested!
 |
| The Gargoyles win! |
Top of Round 5: Herd
Zaz moved far enough away to escape the Tree Herder this turn, so the Herder charges off the hill into the flank of the Abyssal Ghouls. The unit has been betrayed multiple times by Zaz, and start the turn at 9 damage, and the Herder is able to devastate and rout the Ghouls, as is proper, and Radiance of life should bring the Herder down to 9 and the Spears down to 15. Victorious, the Herder backs up, looking to get the Molochs and Zaz in his front arc.
 |
| More charges from the Herd. |
The wavering spears unfortunately can't do anything. Angles-wise, I can see them with the Longhorns on the hill, but can't complete a charge into them. So the spears cower and the Longhorns change facing; ready to help out once the Spears fall.
 |
| Big combats in the center. |
Centrally, the Guardian Brutes are wavered, but thankfully have Fury. The Tree Herder can see the Lower Abyssals as well, and will join in here. Bane Chant lands on the Brutes, and the Lower Abyssals will be broken this turn. The Brutes spin to see the rear of the Molochs, and the Tree Herder will overrun, looking to possibly pincer Zaz with the other Herder as the game concludes, and hopefully wrest control of that token.
 |
| More victorious combats for the Herd. |
The Tribal Spears with the Chalice will charge the Seductress, hitting her in the flank and avoiding Ensnare. The Spears land 10 damage, and do rout her, but an overrun will hit the friendly Tree Herder, so they change facing.
The Longhorn Troop moves into the woods, avoiding the range of the Succubi Larvae to secure this token for the Herd.
Bottom of Round 5: Abyssals
Zaz has pushed all his friends away, but just normal lighting hits 4 times and lands 3 damage into the left-most Tree Herder, and with some hot Nerve checks, my opponent is able to uproot one of the trees up this round!
 |
| Zaz zaps a Tree Herder, but will it be enough? |
The Molochs trounce the spears on their second combat attempt, but have Longhorns and Brutes facing them from opposite sides. They need to give something up, and are able to position to just give a flank charge to the Longhorns.
 |
| View from the right. |
As the Round concludes, they have lost a lot of units, but the Abyssals have 4 Objectives (held by Zaz, Molochs, Succubi Larvae, and Gargoyles) to the Herd's 2 (Guardian Brutes in the center and Longhorns in the woods).
Top of Round 6: Herd
The remaining Tree Herder cannot charge Zaz, but can move at the double to contest that token. With 1:1 US here, neither of us can score it.
 |
| Final movements for the Herd. |
The Spears secure the token on the hill, and the Longhorns continue to move around the woods while still securing that token.
The Druid runs over to keep the Brutes and such Inspired, and the Brutes and Longhorns multi-charge the Molochs from multiple angles, and are able to beat the large devils down. Victorious, the Longhorns change facing while securing a token, and the Guardian Brutes turn about, ready to go and grab another token if there is a Round 7.
The Herd have clawed their way to a 3:2 advantage for the scenario. One objective is contested, and the final one unclaimed.
Bottom of Round 6: Abyssals
Lighting Bolt doesn't remove the second Tree Herder, so the scenario remains 3:2 for the Herd, meaning a victory for the Herd!
Game Conclusions
Including myself we have three local Forces of the Abyss players, and all of us are approaching the army a bit differently. Brian's list here has some neat things going on. Specifically, the Hellhounds are probably the most unique pick, but have been hard to use since they are just Height 2. They deftly exploited a blind spot in my lines, but then couldn’t capitalize on it, given the intervening hill. The Hounds are a neat unit, but hard to use. Generally, he has shifted to a more defensive list aiming to endure some charges and then fight back using the power of Regeneration and Fury.
I play my own Abyssals more aggressively with regard to weapon swaps. His Abyssals definitely took hits like champs and recovered incredibly well between Regeneration and the Sacrificial Imps, but he missed the majority of his Bane Chant attempts, which was unfortunately rather determinative. Without that additional hitting power to help remove my units, the Herd was able to make some good multi-charges throughout the game, tip the tides, and wrest control of just enough objectives to win at the end. My opponent played a good game, and it was a close one up to the end.
- Spear Hordes with Brew of Sharpness and Chalice of Wrath. Each made a flank charge this game and contributed a lot to the win. Unfortunately a waver took out the Brew of Sharpness horde, but we were able to position things in order to avenge them. Tribal Spears continue to deliver, and both items were useful.
- Longhorn Troops. Rally was neat but didn’t save anything. Still, they surprised me and actually did ok. Having a few extra units to zone things out was a big help for me this game, like keeping the Hellhounds from completely swinging around my line. I’m intrigued, and we’ll see how they do in the second game of the day.
- Harpies. They didn’t get lucky, and were bested by the Gargoyles, but that happens. Keeping the Gargoyles from chaffing up my hordes was probably worth it in the end.
- Guardian Brutes. Remembering Fury pretty important with them, and while the Lower Abyssals did manage to take one horde off, the second
- Druid with BC and Conjurer's Staff. A bit boring, but still a staple of my Herd. I got luckier than my opponent, and landed the Bane Chants I attempted. When I have the points though the Conjurer’s Staff does look like a nice way to bake some reliability into the list.
- Double Tree Herder. I was really impressed, but they also rolled out of their minds all game. They definitely did a lot here, but only sort-of helped with my Inspiring needs. Being the strong combatants that they are, the primary goal was to get them into combats, so my Inspiring coverage was not perfect, especially with the extra Longhorn Troops running about.
It's neat to see your army played in a different style. A big thanks to Brian for the game, and for all he does for the local community!
No comments:
Post a Comment