

Intro and Lists
Tacked onto the June League meetup for Kings of War Wisconsin was a request to play some larger games, to let Rob get in some reps with his Halflings, since they are headed out to US Masters later this summer. Unfortunately, the League part of the meetup was a bust, and only three folks were ready to play against Rob.

Rob's been running these for over a year now, perfecting his take on the hungry lil guys. Frequent visitors to the blog will recognize just about everything the list, and I think just about everything is locked-in and where he wants it. For the uninitiated, the Halflings here make heavy use of characters with Auras: the Muster Captain grants Strider to Ravenous units, which is just about everything in the list, and the Sauceror can pick each turn from Rally, Lifeleech, Brutal or Wild Charge, with the Sacred Horn boosting everything but Rally (which is technically not an aura) out to 9 inches. The rest of the list is combined arms.

I brought the Abyssals, looking to make up a little for some lost time, and explore them more fully after their revamp in late 2024. I was really hoping to get in a League game to debut some units and refamiliarize myself with the army and its performance a bit, but due to the low player count, that was not to be! Some of the changes and additions are strong, but my pet theory is that they are not a popular tournament army since they largely rely on Regeneration, which rules-as-written greatly complicates the movement phase, eats up clock time, and just isn’t reliable. But we’ll see how my fiendish force does today! Up to test is:
- Flamebearers. I haven’t run these in a while, and figured I was do for a reintroduction given the army revamp. They are pretty unique ranged units, but struggle with early shots, which can then lead to them feeling underwhelming. To counteract this, I’ve enjoyed running an Enthrall Seductress with a cluster of these, but that requires a lot of setup and is a huge investment for a trick that might not pay off. We’ll try them with some moderation this time, running just a duo to first area deny, then plink and then play the scenario.
- Gargoyles. I was so excited to run my new toys I almost forgot to add these in, which would have been bad. Flying, Regenerating chaff can be very useful!
- Abyssal Berserkers. Newcomers! Speedy and Nimble, their popularity got me looking at the Herd’s Lycans. Two hordes might be too big an investment, but
- Abyssal Horsemen. Gaining Fearless, I am eager to try them out more as well.
- Seductress. She is popular online with the Gnome Glass Shield and Host Shadowbeast, neither of which I am taking, because I am taking a duo. With Duelist now tripling attacks, and the Halflings relying on their individual heroes, I figured running a duo of “basic” ladies would be more impactful than one diva. We’ll see if I can decapitate the Halfling leadership this game.
- Warlock with BC. Scoring heroes are highly valued, and Firebolts give the stock Warlock even more utility. Spells aren’t needed for him to be useful, but I took Bane Chant anyways, to hopefully provide some extra punching power.
- Despoiler Champion. I like my model, and he did get revamped to be Inspiring, so we’ll see how he does in a larger game. The’s a little too slow to keep pace with the speedy fighting units, but should be able to at least keep them Inspired.
- Zaz the Betrayer. He’s a legendary warlock with Lightning Bolt and Bane Chant, and a nice supporting unit. His Betrayal rule lets him boost his spells at the expense of a nearby unit, often something that can regenerate, like Gargoyles, and early Lightning Bolts can be great at clearing chaff. He’s alright on his own, but excels when paired with the Manifestation to double-dip on big early Lightning Bolt play, so that's the plan here.
- Manifestation of Ba’el. He’s on a monster-sized base, so a bit like a baby dragon or General on Winged Beast or Vampire on Pegasus. He’s relatively much more expensive than those options, but gains some good survivability (Fury and Regen) and a lot of versatility, including Lightning Bolt 7. And again, the idea is to pair him up with Zaz and bully a flank with a lot of early Lightning Bolts.
Rob had wanted to practice against mean lists and fast lists for his preparations. Already settled on Abyssals for the league games, this is what I had threw together for Masters practice. I took inspiration from Alex Chaves on his Master Sight appearance, and the idea was run the Berserkers on the wings, hoping to funnel units into the center, where a combination of Lightning Bolts from Zaz and the Manifestation, coupled with Firebolts from the Flamebearers and Warlock would soften things up, and then the Horsemen could punch through and scrap.
Table and Terrain
We were out at Gamers Realm in New Berlin, Wisconsin, which was graciously hosting our League games this year. It’s a bit of a labyrinth, with separate rooms for board games, card games, war games, role playing games, in addition to being a normal shop selling all that, hobbying supplies, and all sorts of things. They also have a neat second-hand room, and now a bidding room, with new items monthly, as well as a separate nerdy collectable shop that has opened up under the same roof. If you are in the area, you should check them out! We were using their table and mat, and terrain that I had brought from my "verdant" table.
We grabbed a table from an app, and were using our typical terrain rules, running the circular towers as Height 9 blocking terrain, all the forests as Height 6 Difficult Terrain, fences as Height 2 Obstacles, and Hills as Height 3, and the ponds as Height 0.
 |
| The Table. |
We ended up with Protect and Raze. There is a central objective token, and then we each place 3 more objective tokens on the opponent’s side of the board, 6” from the center line. If we control one of the tokens that we placed, we can burn them for a point, and then that token goes away, so we should be whittling down the points of interest on the battlefield down to a final clash in the center. The new twist here is that we can control but not burn the tokens our opponent placed, and we can score them if we happen to hold them at the end of the game, providing for a little more interplay than the original version.
 |
| Deployment. |
Spacing-wise, you are always going to have a 2:1 split. So as not to screw myself up, I try to go from the center point outward, and eventually settled on favoring my right, and my opponent mirrored the same side as well, with his left token coming down sneakily in the woods.
 |
| View from the left. |
The Halflings won the roll for sides, and for deployment, they nearly filled their side of the battlefield, with Grenadiers, two regiments of Juggers and screening Stalwarts on the left. The Muster Captain hid behind the tower, with more Juggers on the other side. The Heroes and Iron Beast held the center, with the Sauceror behind. The Poachers took the hill with the Engineer, and the right had both Harvesters, the other Stalwart troop, and other Regiment of Grenadiers.
 |
| View from the center. |
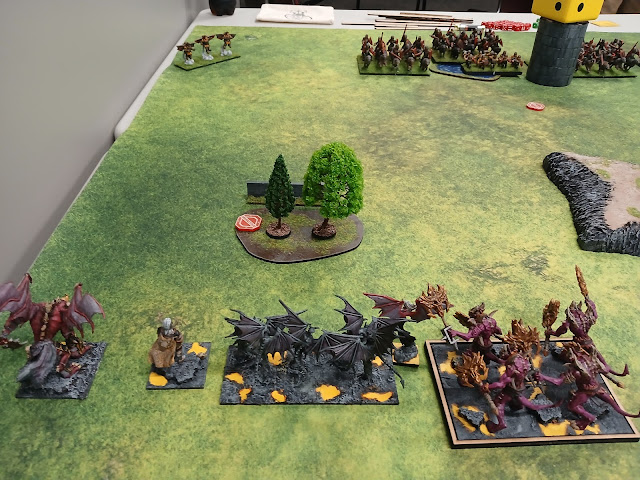
I couldn't make good use of the hill in front of my lines, so chose to spread out. I made a late choice to push the left, so the Manifestation and Zaz were out there. We have Gargoyles behind the woods, then the Seductress and one of the Berserker hordes. The hill made a dead-spot in my lines, and some Horsemen held the center, looking past the hill. The Flamebearers set up to target the center along with the Warlock. The Gargoyles deployed safely back behind the tower, and my right had the second Seductress, second Berserker horde, and Despoiler Champion.
 |
| View from the right. |
The Halflings had Scout moves, and the Poachers advanced to the edge of the hill for a strong firing position. This is concerning, as my Flamebearers are going to be excellent targets, and counter-fire will be difficult since the Poachers are Stealthy. There is hope though, as I have more shots than him, and could make use of the Sacrificial Imps, if I get first turn.
 |
| Overview of the table, after Scout moves. |
Unfortunately for me, the Halflings win the roll for deciding turn order too, and will wisely choose to go first to gain ground and leverage their shooting and scout moves.
Top of Round 1: Halflings
On the right, the Grenadiers move up, offering a charge to the Seductress, with the Stalwarts, and both Harvesters lurking.
The Engineer steps up, safe from the Seductress, and joins the Poachers in picking on the Flamebearers. A stunning 12 damage lands, and even Inspired, the Flamebearers are swiftly routed.
 |
| One unit of Flamebearers falls already. |
Centrally, the Iron Beast inches into the woods, and the heroic horde moves up too. The Central Juggers move up, but stay out of range of the opposing Horsemen.
 |
| The Juggers move up while the Grenadier reposition. |
On the left, the Jugger duo advanced, buy stays even and just out of range for the Berserkers. The Grenadiers realize they are in danger, and reposition.
Bottom of Round 1: Abyssals
On the left, the Seductress flies far away. If I can get her into the backfield, she can properly hunt characters. For now though, she is just trying to pressure and zone out the Grenadiers.
Speaking of, the Grenadiers are one of the few units without Spellward, so one of the few things I can bully with my Lighting Bolts. The Manifestation swings up to pressure, safe from the Juggers, and will fling at the Grenadiers, but land only 2 damage. Zaz the Betrayer is within charge range of the quick and Nimble Juggers, so he needs to hid behind the woods a bit, and is flinging with a cover penalty since he’s tossing over the obstacle. He lands 3 hits, damaging the Berserkers for 3 since the Gargoyles are just out of range, and then 1 gets through on the Grenadiers. At just 3, the Grenadiers hold. With the unfortunate cover penalty, this is actually close to the expected damage of 4, but still disappointing.
 |
| Abyssal pressure on the left. |
I realize that I am under the gun, so the Gargoyles fly out and pivot, to use their slightly larger base to cover the advance of the Berserkers.
 |
| A little desperation in the center. |
In the center, my Horsemen hold. The Flamebearers move into range and pivot, popping their Sacrificial Imp, and landing a hot 6 into the central Juggers. The Warlock moves up to assist, contributing just 1 to the cause. Unfortunately, the Juggers have Iron Resolve, and end the turn on just 6 damage, but we are still way above average here.
 |
| And a little more pressure on the right. |
On the right, I stay out of maximum charge range of the Halflings, but it's a little easier out here since the cavalry and crazies on my side outpace the main Halfling units. The Horsemen move up to threaten things though. The Seductress nestles between the unit and the building, preventing the Grenadiers from getting to her. The Berserkers jaunt up to threaten things, supported by the Despoiler Champion.
The Gargoyles pivot, to zone out landing zones for the Grenadiers. I don’t want them behind my lines.
Top of Round 2: Halflings:
Round 2 is a murderous blur, and I apparently fail to take pictures as I am scooping more units off the field already. The hungry Halflings are already going for the throat, and get Wild Charge 3 from the Sauceror.
Low on options, the Grenediers on the right will just charge the Berserkers to slow them up. They will land 1 damage, and the Harvesters and Stalwarts get into range.
The Iron Beast, Engineer, and Poachers all shoot into the Horsemen, and landing 7 damage against the cavalry, and falling just shy of the rout. Thanks Fearless!
The Wild Charge 3 lets the central Juggers hit my Horsemen with impunity, and the dice gods are with the Halflings. A stunning 11 damage lands, and we find that the horsemen are just out of Inspiring range of the Warlock and bested.
The Gargoyles take a multi-charge from the jugger duo, and take 18 to be devastated and routed, as is proper. Both units overrun to get in the face of my Berserkers out here.
The Warlock is guarding the objective, and I thought that was enough. However, the pesky Grenadiers are actually unit strength 2, which catches me off-guard since it has been a while, and they can fly up to just barely control the token and then burn it, butting the Halflings in the lead since the other units are slightly more than 3" away.
Bottom of Round 2: Abyssals
On the left, the Manifestation didn’t quite pivot enough to threaten the brazen Juggers, who were able to fight their way out of arc. He does have a flank charge into the Grenadiers, and this seems like the least worst play for him this turn.
Despite being up in the face of the Berserkers, this will be a fresh charge for me, and 2v1, something is going to be in my flank. However, Zaz is able to cleverly move through the woods, and stop the shuffle down as the Berserkers countercharge the left Juggers, joined by the Seductress. Zaz betrays the Berserkers to add 1 to his Bane Chant, and the Berserkers take 2 damage, brining them to 5 since they regenerated nothing. With the Chant they underperform and land 8, and the Seductress contributes 3, and we are able to pop this unit and reposition to keep the other in the front.
 |
| A few charges from the Abyssals, but the Halflings have already won on this flank. |
Centrally, there is not much I can do against the Juggers. The Flamebearers move and fling, as does the Warlock, who flings with cover. A total of 5 more damage lands, brining the Juggers to 11, and uninspired, I am able to best this unit as well while keeping the Heroes in front arc.
 |
| A chaotic center. |
The Abyssal Horsemen have plenty of charges, but no great options, and plenty are getting in range to charge them now. Charging out is also dumb, but sitting still is also dumb. Backing up isn't an option as I recall since it would put the flank of the Horsemen into arc of the Heroic Stalwarts, and the building prevents much of a sidestep. I feel like the game is well over already, so ultimately charged the Horsemen out into Poachers, hoping to regenerate some, punch through and then get the inch the overrun to get out of the Iron Beast’s arc, with any additional inches being gravy. Maybe I can endure a flank from the Harvester and open things up here. I issue the order, and the Horsemen Regenerate 1 to get down to 6 damage. I underperform and land 8 damage, and fail to move the archers, though they are wavered. The Seductress goes into the other Poacher unit, and I think just lands the 1 needed to disorder them.
 |
| From the right. |
The Berserkers charge the Grenadiers, and also underperform, landing 8 damage. The Despoiler Champion rolls well though, hitting the fliers in the flank, and the Grenadiers are routed.
Top of Round 3: Halflings:
The Halflings go for Lifeleech, and descend upon the Horsemen with headstrong Poachers in the front (Iron Beast Aura), Iron Beast in the flank, and harvester in the other flank.
The other Harvester charges the Berserkers, and is joined by the Stalwarts. The Halflings roll hot, land double-digits of damage, and the unit is popped with boxcars on the second check if memory serves.
 |
| Many multi-charges. |
The Heroic Stalwarts charge the Flamebearers, but the Hammer of Measured Force works against their interest, and they land a pitiful 4 damage.
The Muster Captain saunters out and lands a Mind Fog onto the Gargoyles, and will waver them, as the Spell had Shattering, and that's got pretty good odds of sticking against a chaff unit.
 |
| View on the left, such as it is. |
The Juggers on the left charge the Berserkers, it’s a clean, thunderous charge. The Berserkers start on 5, and end the turn devastated and routed.
Bottom of Round 3: Abyssals
I concede. I’ve regenerated 1 damage this game, and have no real units left.
 |
| Believe it or not, the start of the Bottom of Round 3. |
Game Conclusions
Sorry Rob, I definitely did not give you a good game. If I had known there were going to be no league games (and thus no warm-up game for me), I would have brought something else, with a little more thought and personal experience behind it.
This is the kind of stuff I would like to be doing: leveraging a wider background of lists and styles and army to help a friend prep for something important to them. I was hoping the Abyssals could pressure the Halfling heroes, but this just showcased the skill gap when running a new list with some rust and running the same thing over and over. q
Testing Conclusions
- Flamebearers. They were able to eventually take down some Juggers, but they did not have a good game. We don’t have a ton of shooting in the meta, but against the Halfling Poachers they are just outclassed given their shorter shooting range. Sacrificial Imp is neat, but only works for a turn, so they don’t do counterfire well.
- Gargoyles. I actually think this was close to a bright spot in my play this game. I used one to protect the advance of the Berserkers, and while I didn’t position the Manifestation quite right, this did work, and the other had a decent time zoning out the Grenadiers on the right. These were used well, but I still have plenty of room to clean up my play with other units so that I can get the most out of these.
- Abyssal Berserkers. They underperformed in all their combats, but were still able to dish out some decent damage, so they are potent. This is all tempered by Def4 though, so overpowered, they are not. If they get caught up on something, they are doomed. I think they are important enough that one wants to give them items, so stock is not the way to run them, but it was nice to get a baseline for the unit and it wasn't a terribly debut overall.
- Abyssal Horsemen. Fearless was great, they just got a little unlucky overall. Running multiples felt better than my old singleton, but they aren’t strong enough to delete a unit on their own typically. Pairing them with Flamebearers is a neat idea, but did not pan out here.
- Seductress. I wanted to avoid the Gnome Glass Shield and Host Shadowbeast kit, though there is probably a reason it is so popular. I had high hopes for character hunting, but things started falling apart for me immediately, and they did not get the chance to try out the new Duelist for me. Still, they found ways to contribute.
- Warlock with BC. Go figure, but a little scoring hero with ranged attack and suite of spells is versatile indeed! He seems worth playing around more in the future for sure, even potentially without spells.
- Despoiler Champion. He was a holdover from the softer League lists I had brought, and while he is fun and nice and buffed with Inspiring now, he is not a great choice here, and didn't have any synergy. The Abyssal Guard play I had been pursuing last year would be a much better spot for him, though I think the Warlock in any form might be an even better pick there. A fun heroic unit, but facing some stiff competition. For Berserkers, I am looking at the heroic unit, and that looks attractive the more Berserker units you are running, thanks to the aura.
- Zaz the Betrayer. Definitely lived up to his name, dealing 5 damage to his own team while dishing out just 1 to the Halflings. That is obviously a little unfair since a Bane chant did help clean up a unit of Juggers, but hey, numbers are numbers here! That is a little fun and fluffy. I should have been a little more careful with his positioning.
- Manifestation of Ba’el. He technically survived! He’s fine on his own, and like Zaz, provides some good utility, but I think if you run one, you want to run both. Planning, positioning, and list building all boost their effectiveness though, and I failed on all three counts here.
- Sacrificial Imp. It did not actually to anything at all here, but it’s a really neat upgrade, and a fun design space to play around in. Like the Kingdom of Men’s Indomitable Will, it is situationally very strong.
- Regeneration. My opponent was doing a good job at focusing fire and trying to make sure the units he targeted routed, lest I be able to make use of the rule. With clever targeting and my own poor dice, I regenerated just 1 total damage this game, so both the Halfling Iron Resolve and the 1 turn of Lifeleech each outperformed my own healing, which isn’t ideal.
- Abyssals and Alpha Strike. While I had pointed to Regeneration being a strike against them for competitive play, my friend Joe was theorizing that most people were just running the army incorrectly, as a more alpha-strike list. I’ll offer this game up as credence to his theory. I was out-dropped and had less unit strength than the Halflings. I didn’t actually have the speed or tricks to get in against them, and they were able to trade easily for all my hammers and stop my before I could get going. The new Berserkers are a boon to this style of play, and I am no expert on them, but without flying monsters, a true alpha strike list seems hard to run and would take much more trail and error than I am willing to commit to the approach. I’d rather do other things with this army going forward.
- Reporting. My reporting clearly suffered. My notes were good enough, but no pictures in Round 2 for the Halflings is a pretty big gap with everything going on. Honestly, my fighting spirit just wasn’t in it. I was immediately under pressure, and this felt over by my Round 2, so my play suffered as well as my reporting.
The day was a bit of a bust for me with just the one game played. Furthermore, I did not even play well, and this match was all over in about an hour. Summers are busy, and hypernormalization is definitely a trip these days, but hopefully we’ll have some more escapist meet-ups, with both league games and larger games coming soon!
No comments:
Post a Comment