

Intro and Lists
It was very short notice, but friend, forum-goer and fellow blogger Cartwright was around and had a few hours free over the weekend, and we were able to sneak in a game betwixt some a number of other commitments. He had carted over his Northern Alliance to the Madison area:


Since he wasn't bringing the Brothermark, I decided to subject him to another speedy throwback Herd List, as I still have a handful of iterations to test out. The list concept harkens back to Keith Conroy’s 2020-2021 approaches to the army. I have a lot of thoughts on the older lists, but suffice it to say here, Mr. Conroy’s Herd 2021 list utilized two Lycan hordes, an extra speedy Spirit Walker Horde, and multiple Beasts of Nature to zip out and crush stuff. He attended US Masters in 2020, and won US Masters in 2021, and while the meta has changed with Clash updates and army refreshes, this playstyle still seems worth exploring. We’ll save detailed discussions of the approach for later posts, but will still discuss a little. Up to test and comment on are:
- Lycan Hordes. Mr. Conroy made use of two hordes with the same items in both the 2020 and 2021 versions of his lists. Since then, the Lycans have actually decreased in cost, so there are all sorts of reasons to explore them now! I added a third horde with the Staying Stone, hoping to add a little more bulk to the list.
- Mounted Druids with Bane Chant. Boss_Salvage on the Forum describes Lycans as a bit “pillowy” on the damage they actually deal, and was advocating for one horde with something like the Brew of Strength in a typical list. I am doing wide for now, and since normal BC Druids are a staple with my Tribal Spears, we’ll see if the mounted version has any play with Lycans.
- Harpies. I need chaff! His lists both featured a trio of Harpy troops, but I can only run two troops myself. Hopefully these end up where they need to be.
- Beast of Nature. The Beasts were hammers in both versions of his lists, but I am only taking two of these myself, due to lack of models. With just CS2, they haven’t been as powerful as I would have liked previously, but I have often forgotten Vicious. We’ll try them out again here.
- Avatar of the Father. I still quite like my model, and still really want to try and find a place for him, even if that’s a niche use. Fliers tend to get better the more of them you take, as it’s harder and harder for the opponent to effectively zone them all out. It’s not the first time I’ve run him alongside the Beasts, but hopefully all the extra speed the Lycans’ bring plays well with him.
- Spirit Walker Horde with Brew of Haste. The Brew takes them up to Speed 7, and with a d3 Wild Charge, the Spirit Walkers have a crazy long charge, often able to multi-charge alongside Lycans or the flying Beasts. With Def3 though, even as a horde their existence is on a timer, so I will need to use these quickly and wisely.
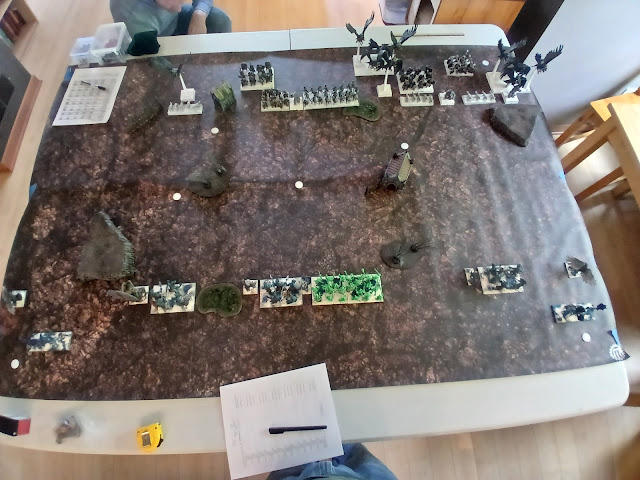 |
| Overview of the table. |
My opponent won the roll for sides, and was lazy, setting up where he was standing. I make light of lazy gamers in the blog, and am almost always one of them, but in truth, it's a credit to the map-makers that choice of sides does so rarely feels determinative in games.
 |
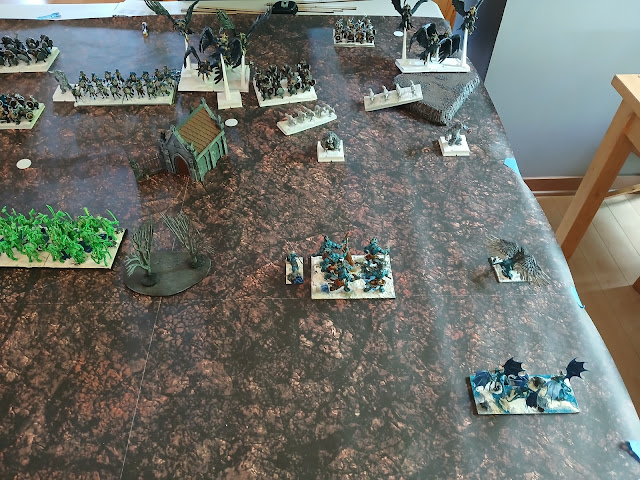
| View from the left. |
The Northern Alliance line was sparse out on the left, with just speedy Snow Foxes and a Frostclaw Champion ready to zip out and contest objectives. A building broke up the line. Hearthguard stalked in reserve off-center, with Dwarf Clansmen, a Snow Troll, and the Naiad horde all on the line.
 |
| View from the center. |
The right was stacked with a lot of speed. On the line were alternating Snow Foxes and Snow Troll Primes, back slightly was a Frostclaw Champion, more Hearthguard and a Frostclaw horde, and back further away as another horde of Frostclaws centrally, and more Dwarf Clansmen in the corner.
 |
| View from the right. Sorry again about the glare. |
The forest and hills were ahead of my line and I did not want to be blind and behind them, so the Herd spread out in a few groups, and mostly deployed on the line in order to leverage my generally higher speed. On the left we had a flying Beast and Harpies in reserve with a token, then the Avatar and Lycans, then Moonfang, more Lycans, Druid, and Spirit Walkers, and then the right had the Druid with the Staff, Lycans, the second Beast and more Harpies in reserve.
 |
| Overview again, with the tokens circled (in red). |
Deployment was a little rough, as all the Frostclaws were coming down as I was finishing up. I agonized whether to put the Avatar on the left or the right, and ended up on the left for Inspiring reasons, and because I was expecting the Frostclaws to split.
Top of Round 1: Herd
 |
| Movement on the left. |
The Harpies on the left hold, to burn the corner token. The Lycans out here zipped up a bit but not drastically. This let the Avatar of the Father pull in behind them with his two pivots. This is still about 10" forward then, so either unit should be able to reach the enemy lines next turn. The Lycans control a token, and will burn it at the end of my turn.
 |
| Slightly less aggressive moves in the center. |
Centrally, Moonfang ran up, but held back to use the woods as cover to prevent the Frostclaw Champion from seeing him. The Lycans pull in behind, about 6" up, and the Druid does the same behind them, hiding. The central line of the Northern Alliance is flanked by the Frostclaw Champs, so I am trying to be cautious, and these moves should basically either box them in or give me charges next turn.
The Spirit Walker horde moves up. I had deployed them slightly bad, with the obstacle in their immediate path. The Herd does care about obstacles, so we'll just be mindful of what we try to charge.
 |
| Cautious moves on the right. |
On the right, I am cautious. I was not expecting the stacked wing here, so I want to keep pace with my line to feint, and then reposition.
The Harpies back in the right hold this round, in order to control the token and then burn it. That means I've burnt 3 tokens at the end of the round. It's drastic, but with my speedy list, I don't really want to be babysitting anything, and don't feel like I have the time to be coy. My goal for the game is to burn whatever I can and try to fight for the center.
Bottom of Round 1: Northern Alliance
On the right, the Northern Alliance lines are a mess. The Dwarfs hang back to control the corner token, and do not burn it. The Frostclaw Horde gets a leader point on the hill to see... but it's Height 4 and can see over it anyways.
 |
| A coordinated advance from the right. |
The Frostclaw Champion and Horde near the center flap about, and with throw into the Spirit Walkers, along with the Champion out on the left, and 8 damage is done, though the horde doesn't seem to notice.
 |
| The Northern Alliance center pushes out as well. |
The Naiads move up, daring charges. They don't have the Phalanx upgrade this time, but Ensnare can still be tricky. The nearby Prime holds back, using other units to help protect him.
The Hearthguard here use the building to protect their flank in the coming turns, from stuff like my flying Beast. As-mentioned the Champion on the left hops up to shoot the Spirit Walkers.
 |
| The pesky Snow Foxes. |
We weren't using clocks, so my opponent spent a fair amount of time figuring out what to do with the Snow Foxes out here. The Champion was safe from the Beast, so they didn't need to block and die, but they couldn't really advance to evade (the Harpies on the left could chase them down), and if they tried to back up, the flying Beast could charge and be looking at rears. He had almost settled on sticking them by the fence, to force a hindered charge should something want to charge them, but eventually ran them up to screen, which was a great decision, but bad for me. The left Lycans can't see around the woods, but the central ones sure could, but now do not have the lane to reach.
Top of Round 2: HerdOn the left, the Harpies fly their 20 inches up and pivot to zone things out. The Lycans on the left do not have good charges this turn, so move up and pivot, hoping for flanks. Everything ran away, so the flying Beast on the left does the same, and the Herd units get out of arc of the Hearthguard, which is the scariest unit over here.

Moonfang could reach the Frostclaw Champion, but I didn't like his odds of surviving a charge from the Hearthguard... but he's Def5 while the Lycans are Def4, so maybe that would have been the better call, depending on the angles. Instead he does into the Snow Foxes, I only roll 5 attacks for him, and while 4 damage still lands, the Foxes hold firm.
 |
| The Dwarfs are quite sturdy, and this doesn't really feel like overkill. |
I considered throwing Moonfang, Lycans, and Spirit Walkers into the Naiads, but that seemed really risky, and I was worried about reforms. Additionally, the Spirit Walkers would be running right ahead, hindered and Ensnared. So, instead, while Moonfang tries to clear chaff, the Lycans and Walkers go cleanly into the Dwarfs, devastating and routing them, as is proper. It's close quarters and the reform options are still bad though. The Lycan's cannot sidestep since Moonfang is there, and cannot really overrun since the Foxes are around. Ultimately, they will back up 1", and the Spirit Walkers will overrun towards the Naiads, trying to get out of arc of the Frostclaws, and tie things up.
 |
| Bad options for reforms. |
I felt like I have a decent plan brewing until the Snow Foxes decided to come up and block. Then, I couldn't fully adjust my thinking, and then I have a bunch of cascading bad decisions and results. Some of this might be allayed with pre-measuring, but
 |
| A small retreat to draw the Northern Alliance in. |
On the right, the token that was here is no more, so my intent is to draw what I can in, and then use my speed to reposition. Everything backs up and gets out of charge range.
Bottom of Round 2: Northern Alliance
Like the Foxes last turn, the Champion on the left measures a lot of things and tries a number of moves, but can't quite get away from everything, so eventually just goes into the nearby Lycans. The Snow Troll Prime was able to nimble charge into them too, but two heroes in the front is not enough to budge them, and only 7 damage is done.
 |
| A mess of multi-charges. |
The Snow Foxes have a purpose, and claw two damage back onto Moonfang. With arcs being what they are, my expensive hero only have a charge into them next turn.
The situation for the Spirit Walkers goes from bad to worse. Their overrun bumps them up into the Naiads, but the Frostclaws could still catch a sliver of their flank, and can charge there. Worse still, is that the Naiads are a little offset, so the overrun puts their leader point into the flank too. The Hearthguard go in too, as they actually can't reach much else, and my opponent really wants to make sure he picks the fearless unit up.
 |
| Aftermath of Round 2. |
As should be expected, the Spirit Walkers are indeed devastated and then routed, as-is proper. Even had I lucked out or figured out some better positioning, the Spirit Walkers were very unlikely to survive the turn. They did manage to occupy a ton of units and points this round though, so hopefully that is enough for me to make something happen on my turn.
The Frostclaw Champion in the center shoots over the Naiads, and slips one point of damage onto the Druid, who is his only target. The Nerve Check is hot, and the Druid wavers.On the right, the Dwarfs continue to hold, securing the token in the corner. This is why my opponent brings these units!
 |
| A lucky waver for the Northern Alliance. |
The Hearthguard inch forward, and the Frostclaw horde gets close enough to shoot into the Lycan horde, as it has the lowest defense of anything that it can reach. Four damage lands, and my opponent gets a hot boxcars to waver. It is at this point that I realize that I didn't designate which horde had which item. Instead of rolling a bunch of dice, I decide to just go left-to-right. The left-most had the Ale, the middle had the Chalice and this one has the Staying Stone, which still results in their wavering, which seems fair.
The Snow Foxes and Snow Troll Primes inch up, just getting into charge range. On the far right, the Prime is hanging off the corner of the Frostclaws, preventing a cheeky charge, and the Snow Foxes block things up. The Frostclaws cannot be charged next turn, thanks to the blocking Northern Alliance units.
Top of Round 3: Herd
My plan was to start bailing on this flank this turn, so the waver here is really unfortunate. They actually have range into the central Frostclaws, but facings might be an issue. Regardless, they are wavering and cannot flee nor assist. To rub salt in their wounds, I roll up four 1's for their regeneration roll. They are not doing great.
 |
| Ouch. |
I can't safely bail on this flank, so decide to spend another turn trying to draw things out and into this corner with no tokens. Thinking that the Frostclaws were just barely in range to shoot, the Lycans back up q4 inches, and I am imprecise with the Druid, thinking she is safe. The Beast of Nature backs up and Nimble-pivots in the corner. The Harpies aren't going to be able to do much of anything, and I don't want them shot off, so they take the opportunity to flee.
 |
| Charges for the Herd. |
Swinging out to the far left, the Harpies flap in with a flank charge against the Snow Foxes. He doesn't have another charge to help with, so Moonfang counter-charges here too, hoping to pick up the Foxes this time, and thankfully, we will.
The Lycans who discover they had the Chalice regenerate down to 3 damage, and countercharge the Frostclaw Champion, to ground him. The Druid is wavering, so I cannot Bane Chant, but 7 damage slips in, and I am able to pick up the intrepid flying dwarf. Since the combat would have bumped the Snow Troll Prime out, we allow the Lycans a tiny pivot in victory.
 |
| A few reforms for the Herd. |
The Lycans with the Ale crash into the Hearthguard, joined by a flying Beast. I can't add Bane Chant here either, but a combined 11 damage lands, and we luck out with the Nerve checks and are able to pick this unit up too! The Lycans overrun for 1 inch, and the Beast pivots.
I considered sending the Avatar into the fight as well, but decided to chance things as leaving a horde of Frostclaws unbothered seemed bad. So the Avatar of the Father flies in, and smacks them for 5 damage, just to occupy them.
Bottom of Round 3: Northern Alliance
Combats continue to roil in the center. The Snow Troll Prime charges the Lycans with the Chalice, and brings them to 5 damage but cannot best them.
 |
| The Northern Alliance fight back after some significant losses. |
The Naiads and a Frostclaw Champion do into the Lycans with the Ale, land 10 damage, but the Herd horde prevails, and is unwavered, which is great news.
The horde fighting the Avatar of the Father rolls well, to land a troublesome 6 damage to the legendary flier.
The remaining Hearthguard peels off from the right, looking to support the center. The Avatar is taller than the Frostclaws, so this is actually quite dangerous.
 |
| A big loss for the Herd. |
On the right, my assumptions bite me. It looked like the the Frostclaws had just snuck into shooting range of 18", so I assumed my moving back would be out of charge range. The Beast is, but wavering Lycans are quite in, and my opponent will eagerly take this charge. The Lycans did not regenerate anything, and are Def4. They aren't devastated, but even Inspired they are easily picked up, and the Frostclaws pivot.
I don't remember the spacing details, and so don't know if I could have actually gotten to safety or not with the backing up, but this is still an error as I could have measured it and did not. This charge let the Hearthguard divert their attention towards the center, so is impactful elsewhere too.
The Snow Foxes and Primes still out here shift around, trying to layer up to contain my flying Beast.
Top of Round 4: Herd
Looking at the pictures, I might have been able to nimble the Beast on the right safely into the flank arc of the Frostclaws and threaten them. That did not occur to me at the time, so I don't know if it was indeed a possibility. Having first been delayed by the waver and now having lost the Lycans here totally, I am ready to cut my losses and run.
 |
| Harpies mostly about-face to deter the Frostclaws. |
The Harpies nimbly wheel around to try and zone out and scare away the Frostclaws, and the Beast flies the full 20 away after pivoting. I could have dallied and safely threatened a flank into the Hearthguard, but I did not envision a reason why the Hearthguard wouldn't be charging on their turn, so grabbing all the inches I could towards the fights seemed most prudent.
 |
| Charges from the Herd. |
Centrally, the Avatar fights the Frostclaws again with a counter-charge, and I send the Harpies from the left in as well, hoping another damage or two will push the odds into my favor. This proves to be wise, and I bring the horde to 12 damage, and will get the rout, and the Harpies will overrun to momentarily occupy the attention of the Hearthguard, and the Avatar will face towards them. The goal is to threaten the Hearthguard with the Avatar, but maybe hop them next turn to go fight the Dwarf Clansmen in the corner instead.
The Lycans nearest the center regenerate town to 2 damage. I can't spare a Bane Chant, but they roll a little hot to land 8 damage, and I will luck out and get the rout and victorious reform.
Moonfang has some options, and I decide that I don't want the Frostclaw Champion here free, so send the legendary Lycan in for the disorder, landing a measly 2 damage. He's grounded for now, but that's about it.
 |
| Reforms for the Herd. The Naiads live. |
The Lycans with the Ale go from 10 down to 7 with their regeneration, and counter-charge the Naiad horde. The Beast has a flank charge and takes it, bypassing Ensnare. Bane Chant is attempted for the Lycans, but fails. The Naiads take 14 damage, and ultimately, they check is low, and I do not even waver them.
Bottom of Round 4: Northern Alliance
The Naiads holding and not even wavering is a big boon to the Northern Alliance. They countercharge the Lycans, land a few damage, need 7's to rout, and get it twice to remove the unit.
The Hearthguard make a hindered flank-charge into the Beast, rolling well to land 18 damage to devastate and rout it, as is proper.
 |
| Moves from the Northern Alliance. |
The nimble Snow Foxes scamper back to camp one of the three tokens left, near the building. The Snow Trolls start making their way towards the center as well.
 |
| Important reforms from the Northern Alliance. |
Frustratingly, I positioned the Harpies poorly, and the Frostclaws are able to nimbly pivot around, and move 10 inches to get maybe a millimeter out of their arc, to come up behind the flying Beast. They fire into the Avatar of the Father, but mercifully, only 1 damage slips through.
Top of Round 5: Herd
I am reeling a bit, and need a big turn. Moonfang continues against the Frostclaw Champion, and I roll this combat first, looking to remove the only source of Inspiring around these parts. Moonfang lands 5, brining the Champ to 8, and I am able to pick the flier up with a pair of good checks.
 |
The Naiads had regenerated 3 damage, and are down to 11. Quarters are tight, but I need to hit them soon if I want a chance at routing them. The Lycans with the Chalice go in, but angles and spacing mean that Moonfang is blocking them and they cannot shuffle down, so it's all or nothing here as their flank will be exposed. Bane Chant lands, and while I only deal 7 damage (that's about as-expected; Ensnare is potent!), I am luckily able to still rout the horde and spin around to face new threats.
Harpies fly out to fight Snow Foxes, and I am able to claw down the unit too. In victory they will sidestep, just trying to protect my fliers fighting the Hearthguard.
 |
| The Herd frantically claws and flaps about the center of the board. |
The fleeing Beast joins the Avatar in a frontal charge against the Hearthguard, as I measure things out, and we determine that the looming Frostclaws actually cannot see this combat. The Druid with the Conjurer's Staff is finally able to cast Bane Chant to aid the Beast, and I roll great to land 11 damage. off the two frontal charges. The unit is uninspired, and so I need 6 just once, and roll up Insane Courage instead. At least the Frostclaws can't get rear charges next turn.
On the far right, the other Harpies have no charges, and fly around. If the Avatar and Beast prevailed, I was hoping to fly out and fight the Dwarfs. Now, I'll just need to threaten the token near the building.
I needed a big turn, and got some good results, but it wasn't decisive, and I am feeling the pressure.
Bottom of Round 5: Northern Alliance
The Dwarfs in the corner pivot to get Harpies into front arc. The remaining Snow Foxes charge the Harpies, and are joined by a Snow Troll Prime, and the flying beast ladies are thumped.
 |
| Movement for the Northern Alliance. |
The insane Hearthguard eagerly take their reprieve, and choose to fight the injured Avatar of the Father. They'll land 10 damage, and easily pick him up.
The Frostclaws are cautious enough to say more than 18 inches away from the Lycans, and shove the Snow Troll Prime forward as an offering instead. The Frostclaws then fire into the Beast, landing a strong 4 damage.
Top of Round 6: Herd
I am running out of units! The Frostclaws were careful to avoid the Lycan horde, but Moonfang is much closer, and in range. I use a Druid to block the obstacle, forcing the legendary lycan to zip out and then in for the disorder, landing 4 damage and grounding them. This should prevent them from reaching the center for the rest of the game.
 |
| Charges for the Herd. |
The Beast has no real choice but to go into the Hearthguard, and Bane Chant fails. The regiment is on 11 damage, and the Beast claws 3 more in to take them to 14 damage, but they survive. I am pretty positive I rolled a 3 here, which should have taken them off, so we might have donked up the Nerve math here, or the Beast really choked and only did 2 damage, or we donked up on the existing damage. Whatever the reason or error, the Hearthguard are still alive and kicking, and so still immensely dangerous.
The Harpies fly up to stalk the token near the building. With the Beast and the Harpies, I had hoped to fight for a second token in a potential Round 7, but that looks unlikely now.
Bottom of Round 6: Northern Alliance
The Hearthguard fight the Beast, land another (consistent) 10 damage, and rout the monster, and are now eagerly (and safely) eying the flank of my Lycans.
The remaining Snow Troll Prime and Snow Foxes arrange themselves to prevent good alignment for the Harpies.
 |
| Reforms for the Northern Alliance. |
The Frostclaws countercharge Moonfang, and land a whopping 6 damage. Both hordes have rolled hot while disordered! Still it's a tall order, and the legendary Lycan holds firm.
It's 2:1 in favor of the Northern Alliance, and we roll up a Round 7!
Top of Round 7: Herd
Each objective token is worth the same, but I get tunnel vision. Moonfang lands some damage into the Frostclaws again, but doesn't move them. That's ok, as they are still too far way to score the center.
 |
| Movement for the Herd. |
Bottom of Round 7: Northern Alliance
The doubly-, maybe triply-insane Hearthguard charge the Lycans, land a resounding 12 damage, but fail to rout them.
 |
| Final charge for the Hearthguard. |
I don't recall if the Hearthguard are close enough to contest the center token or not, but regardless, the Northern Alliance control the other two tokens, and just those are enough secure a strong win!
Game Conclusion
The Nerve checks may look to have been egregious and overly-determinative, but I had a lot of above-average results myself, so I don’t think this aspect was as “against me” as it may appear at first glance - it just looks silly all concentrated on the one lucky unit of Hearthguard. Dice happen. It was a great game and a neat match-up, and pretty close despite the final scoring.
So much speed is a lot of fun to mess around with, but is clearly still a double-edged sword for me still. I’m just not used to it all yet, but with only two games into this playstyle and me still not running the same list twice… that’s perfectly understandable. It will take some time to learn! I did not play a clean game this day, but think I played a good one, and things were certainly interesting!
Testing Conclusions
- Lycan Hordes. Three hordes felt better than two, though I need to keep items in mind. If I’m going wide, there might be an argument for the Helm of Confidence as the third item. It won’t mitigate wavering, but could give me a little more flexibility with deployment.
- Mounted Druids. The caster without the Staff missed a few BC casts, as should probably be expected. These did fine for now, and are a good default option for supporting the Lycans, but unlocks are very tight. We’ll experiment more in the future.
- Harpies. Overall I had the right idea with these, but some details escaped me, like the facing to cover my retreat. I’ve been working on some positional fine-tuning already, like keeping fliers dead-ahead early so you can fly and then use the pivot at the end to threaten instead of pivoting and then flying over, but there are a lot of little facing things I could be looking at. I’ll try to keep an eye out for those.
- Flying Beast. I was able to threaten a lot of things, slow down a lot of others, and still even got some flank charges in. Not a stellar performance, but used well enough. If I bust the remaining Hearthguard on the second attempt, I think they could have bullied their way to a Herd win, but it was not to be. Still a fun unit and probably a must for this style list.
- Avatar. Unfortunately no flank charges for them, and they needed to go interdict instead of go on the offense. And once again they happened to charge in and fight an insane unit. My poor Avatar! Not a fantastic showing, but a decent one, and being part of a speedy list seems like a good spot for him.
- Moonfang. Yeah, so, he’s strong! Regeneration on a 4+ is also great, and I can see why folks online really like him. The extra attack is nice, and probably worthwhile, given his good general stats. A nice pick and worth exploring more!
- Spirit Walker Horde. Their existence is fleeting, but I can see the potential. I like Fearless, and the item plus Wild Charge does give a bonkers charge range for an infantry unit. The next few Herd lists will continue to explore them, but I’m wondering if Centaurs or Spears could substitute or supplement here. Centaurs are a weird unit, but should hit slightly harder on the charge, do better in the grind, all while having a pretty comparable threat range right out of the box. If my trusty Spear hordes take the Brew of Haste we’re not as quick or killy, but a little sturdier and that might not be a big deal if the first turn (or two) are positional plays. I am growing to appreciate the Spirit Walkers, but have some other ideas kicking around.
- Throwback Lists. Alpha strike is definitely a challenging style to play. On the table I need to be swiftly routing multiple units a turn, and thus have some concerns with drops, total unit strength, and then off the table, I have concerns with list building generally, due to high unit costs, and figuring out unlocks generally, as the list wants a lot of toys. So, it’s a lot to juggle, but I am enjoying exploring the idea and trying to utilize all the speed. I’ve got a handful of other list ideas queued up already, and we’ll push those off on different players in the coming months, as opportunities arise.
The stars and schedules aligned, and it was great to fit this in, and finally take a turn hosting a throw-down. Thanks for the game and for making the trip over on a busy day!
No comments:
Post a Comment